Outlook, by default, stores emails, contacts, calendar, tasks, and other mailbox items in PST files when configured with the POP protocol. You may need to change PST file location in Windows 10 to free up valuable space from the primary partition drive (C Drive). But moving a PST file isn't as simple as cutting and pasting into a new folder.
If Outlook fails to locate the file afterward, your mailbox data becomes inaccessible. Hence, we will guide you to locate the PST file, move it to a preferred location, and reconnect it to Outlook correctly.
Why Do You Need to Move Outlook PST File to Another Location?
There can be several reasons that lead you to relocate PST files. Check out the below section to know them:
- Open archived or old PST files to view its contained data.
- Backup Outlook data to a secure location for protection.
- Need to access or store PST file data on another system.
- Resolve a missing PST path by finding the associated file location.
- Free up C: drive space by moving large PST files to another local drive.
What Is the Default PST File Location In Windows 10? - Get Detailed Steps to Find
The default location of PST files depends on the Outlook version you are currently using. Check out the sections below to find them:
For Outlook 2016/2013 version, the default location is the format:
C:\Users\<username>\Documents\Outlook Files\
Outlook 2010
C:\Users\<username>\Documents\Outlook Files\ (or My Documents\Outlook Files\)
Outlook 2007 and Older
C:\Users\<username>\AppData\Local\Microsoft\Outlook\
Steps to locate the PST file directly through Outlook if you cannot find it manually
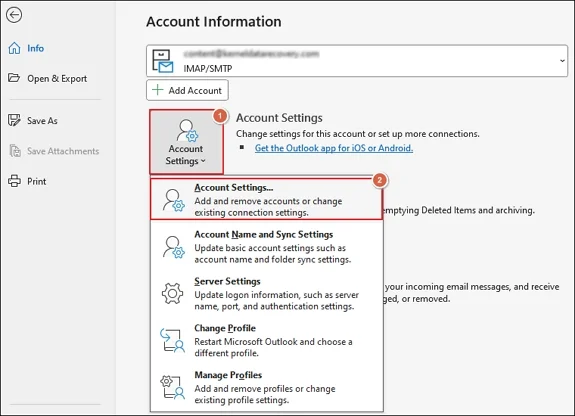
Launch Outlook and go to the File menu.
Expand Account Settings> Account Settings to proceed.
Navigate to Data Files tab and select the PST file. Then, proceed to Open File Location.
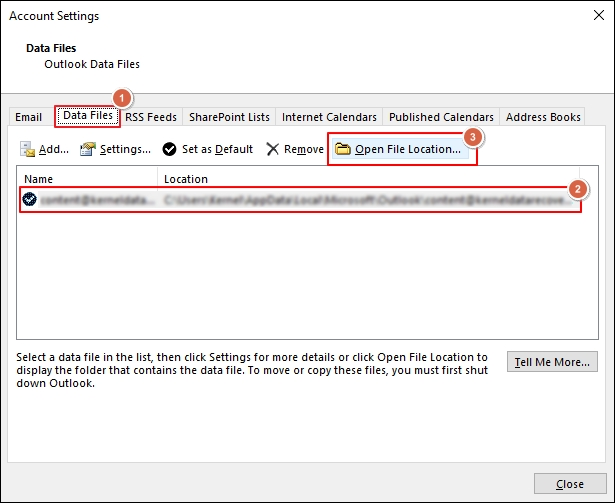
It will open the location where the PST file is saved on your system.
Close the Outlook application once you have noted the PST file location.
Top 4 Ways: How to Manage PST File Location In Windows 10?
You can change the default location of the PST file by using different solutions. Here are the most suitable methods for the same.
Method 1. Change PST File Location Using File-System Pointers
You can use the Symbolic Links and Junction Points to relocate PST files to different locations without interrupting Outlook functionality. Here's how:
A. Using Symbolic Links
Copy the PST file path address and close Outlook.
Save the PST file to the desired folder.
Run Command Prompt as an administrator and execute the command below.
mklink "C:\Original-Path" "D:\New-Path"
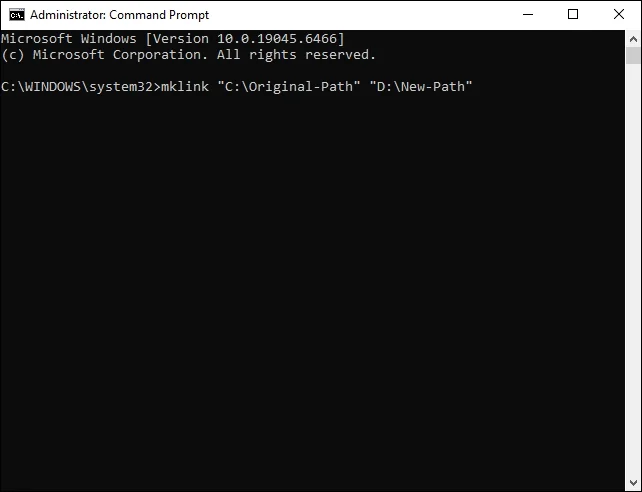
Once done, you will see a .symlink file in the default location.
Now, you can work on Outlook with the modified location of the PST file.
B. Using Junction Points
Close the Outlook application and check for background instances.
Navigate to the default PST file location.
Cut and paste the PST file to the desired location.
Remove the original empty folder or path.
Open Command Prompt as administrator and run the command below.
mklink "C:\Original-Path" "D:\New-Path"
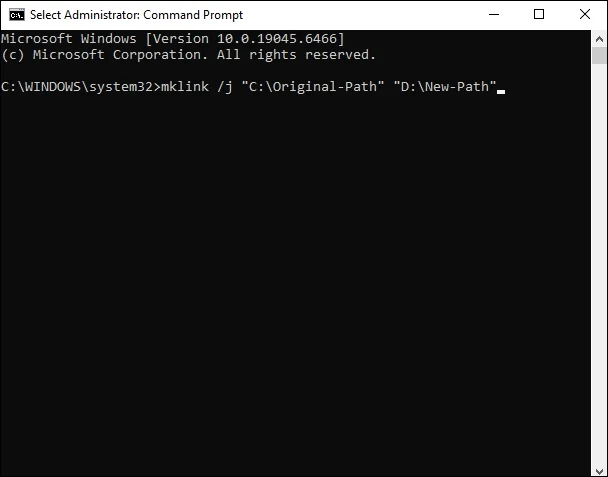
After completion, restart the Outlook application.
Method 2. Move Outlook PST File to Another Location
You also manage PST file locations by manually cutting and pasting them to another folder. Here's how to do the same:
Go to the PST file location and copy and cut the file.
Then, select the desired folders and paste it.
Access the Outlook application once complete.
Click OK on the displayed error and browse to the new folder where you saved the PST file.
Choose the PST file to Open and view all the contained data.
Then, expand Account Settings> Account Settings.
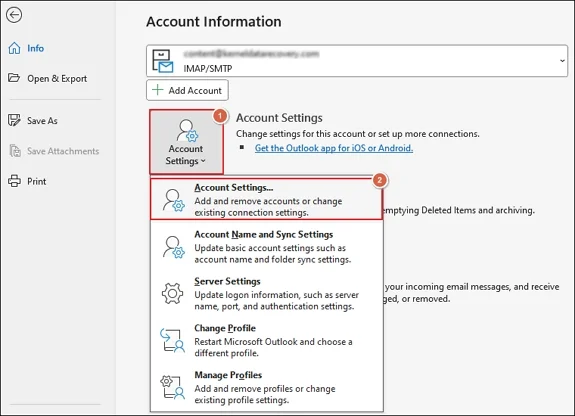
Navigate to the Email tab and select the associated email account of the PST file.
Tap on Change Folder and choose the Inbox to create New Folder.
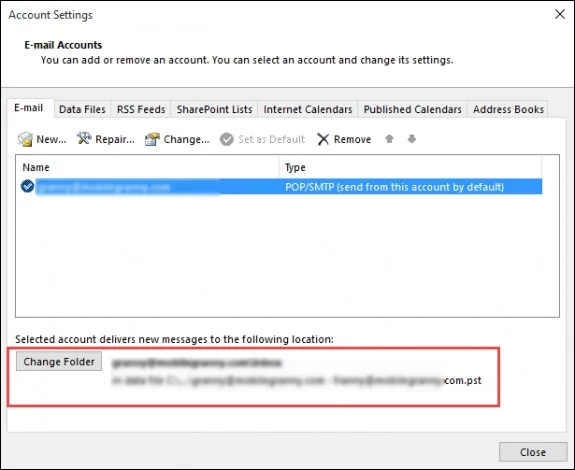
Name the folder and click OK to proceed.
Again, click Change Folder, select the Inbox folder, and click OK.
Finally, restart the Outlook application.
Method 3. Manage PST File Location With Control Panel
Follow the given steps to change PST file location in Windows 10 using the Control Panel.
Make sure that Outlook is closed properly.
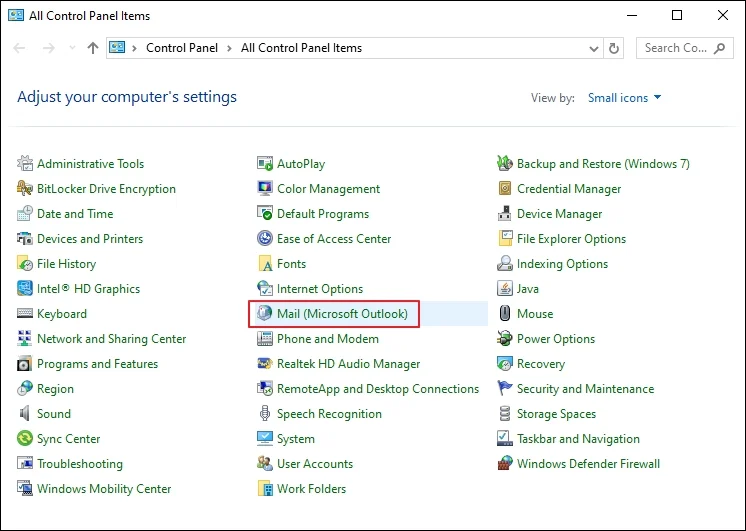
Access the Control Panel and go to Mail (Microsoft Outlook).
Click Show Profiles under the Mail Setup wizard.
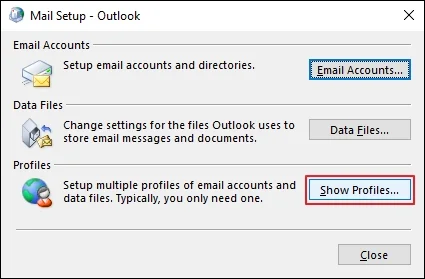
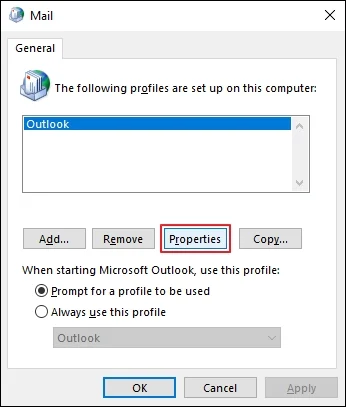
Navigate to Mail > General > Properties to proceed further.
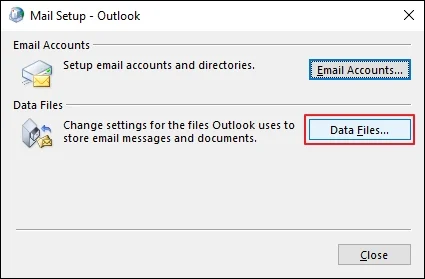
Tap on Data Files to change settings.
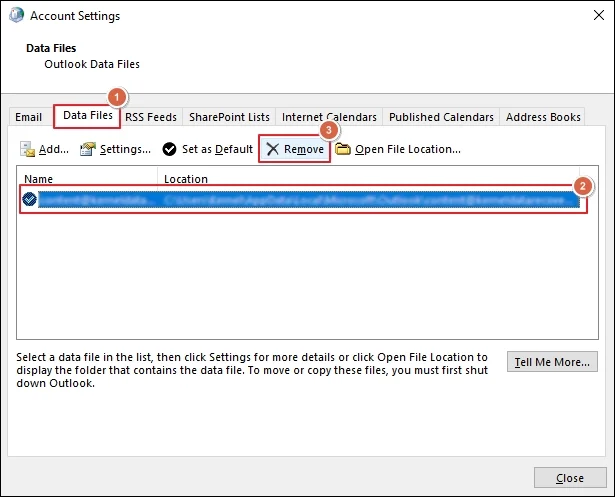
Then, select your email account and click Remove.
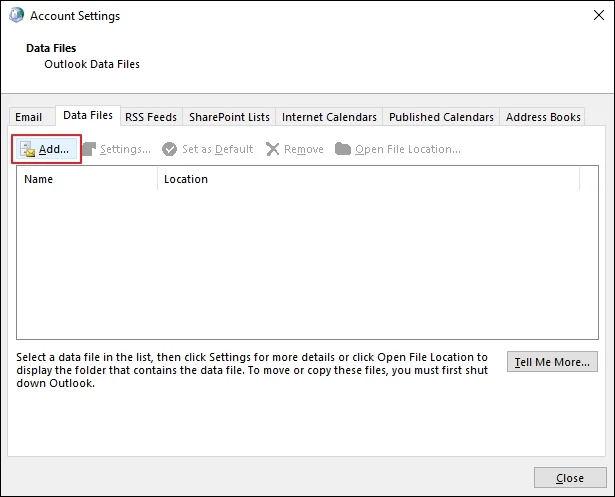
Change the PST file location to the desired one.
Browse to Add the new PST file location and click OK.
Once done, Set as default and restart Outlook.
Method 4. Use the Registry Editor to Modify PST File Location
For tech users, the Registry Editor is the most suitable option to manage PST file location in Windows 10. Here are the complete steps to do so:
Press the Windows+R key to open the Run box, and type regedit and then click OK.
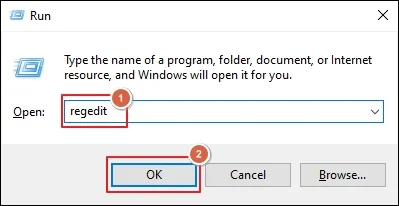
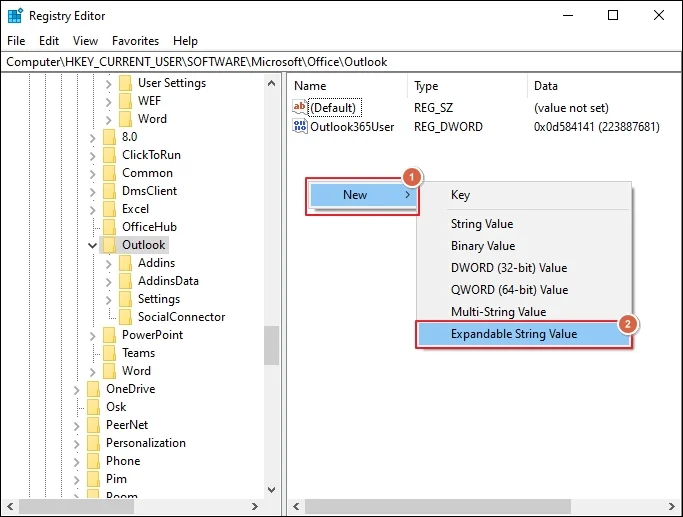
Once the Registry Editor is launched, use the left sidebar for navigation, which will depend on Outlook.
On the right side, right click on space New > Expandable String Value.
In the Edit String dialog box, select ForcePSTPath and then enter the new location of the PST file to make it the default. Then, click OK to proceed.
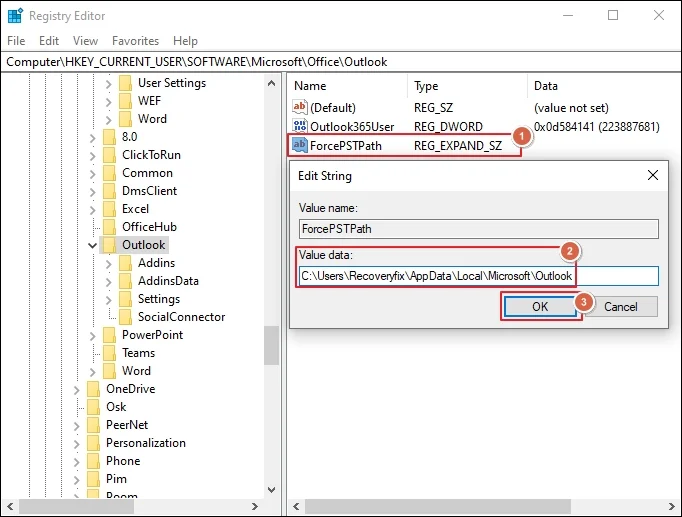
Close the Registry Editor after you have completed the above steps.
Troubleshoot Common Outlook PST File Location Issues [Know Quick Ways]
Sometimes relocating the PST file location can cause Outlook to lose its connection to the file and lead to different problems. Fix them now by using the instant solutions:
- Outlook Cannot Find the PST File
- Verify the PST file path.
- Check the file name properly.
- Reconnect the PST file to Outlook.
- Restore the original location temporarily and reconnect it.
- Outlook Cannot Open the PST File
- Verify that the PST file is not damaged or corrupted.
- Check that the PST file is not used by another application.
- Make sure the PST file is stored on an accessible local drive.
- Repair minor PST file errors with the Inbox Repair Tool (SCANPST.EXE).
- Moved PST File Is Not Showing In Outlook
- Add the PST file manually.
- Check the data files list.
- Verify the file extension.
- Outlook Still Uses the Old PST Location
- Check the configured path.
- Reconnect the moved PST file.
- Verify the default location settings.
- Restart Outlook after changing its configurations.
Ending Note: Get Easier Way to Manage PST Files
Here, we have discussed all the necessary information to manage PST file location in Windows 10. You can use it to find, move, and change the default location of Outlook PST files. However, if the PST file is severely damaged or corrupted, then you have to first fix it before changing the location.
For that, you can use our Recoveryfix Outlook PST Repair tool. The software repairs inaccessible or broken PST files to make them accessible again. Once restored, you can easily manage the PST file location based on your requirements.
FAQs
Q1- Is it possible to move a PST file without losing emails?
Ans: Yes, you can move the PST file to another drive without losing its contained data. Here's how:
- Close the Outlook application.
- Move the PST file to a different folder.
- Reconnect the moved file correctly afterwards.
Q2- Can I change the default location for new PST files?
Ans: Yes, you can change the default PST file location by using the file-system pointers, Control Panel, and Registry Editor methods.
Q3- How can I access the PST file to a different computer?
Ans: You can access the PST file data on another computer by using these steps:
- Copy the PST file to another system.
- Set up Outlook on that computer.
- Open the PST file from its location.
Q4- Can I store an Outlook PST on OneDrive?
Ans: Yes, you can store the Outlook PST file on OneDrive as a backup copy. But you also have to maintain an active PST file on a local drive for smooth synchronization and Outlook functionality.