
Is importing OST files to Office 365 possible? Yes, it is but it requires a two-phase process. You need to first export the OST data to PST via an Outlook profile and then import the PST with Network Upload or Drive Shipping. Moreover, you can also use a dedicated solution to migrate orphaned or disconnected OST files directly. The ideal method you choose is totally dependent on the condition of the OST file and Outlook profile. To help you out in the easiest way possible, follow our step-by-step guide and import OST files to Office 365 smoothly.
Why Do You Need to Import Outlook OST to Microsoft?
Below, we have mentioned the different situations to migrate OST files:
- Save and access local-only items in Office 365 mailboxes.
- Move mailbox data from Exchange Server to Microsoft 365.
- Access emails and other Outlook items from old backup files.
- Consolidate mailbox data to an existing Microsoft 365 mailbox.
- Extract available mailbox data from left OST files due to system failure.
Before You Import OST to Office 365: Know What to Prepare?
Here is the pre-import checklist that you first need to verify before moving forward. Note that, you may not need
- The original OST file.
- Sufficient Microsoft 365 mailbox storage.
- Required permissions for Office 365 mailboxes.
- Installed Outlook application & configured profile.
- CSV-mapped files with a Microsoft 365 destination mailbox.
Two Ways to Import OST Files to Office 365
After going through several hits and trials, we have come up with alternative ways to import Outlook OST files to Microsoft 365. Check them out to find out the most suitable method based on your situation.
Way 1. Export OST Files Data & Import to Office 365
Office 365 exclusively supports PST files for import purposes. Hence, to access the content of your OST files in Office 365, you need to export them as PST files from the Outlook application. Here are the detailed steps to do so.
Section 1. Export OST Files Into Outlook PST Format Using Outlook Application
Launch Outlook application, go to File tab> Open & Export> Import/Export option.
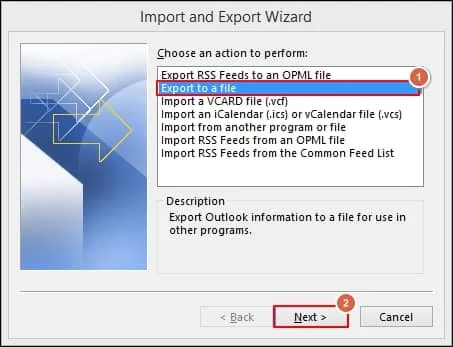
Click on Export to a file option and click Next.
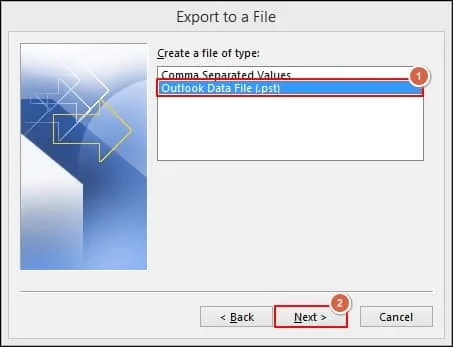
Choose Outlook Data File (.pst) and tap on Next option.
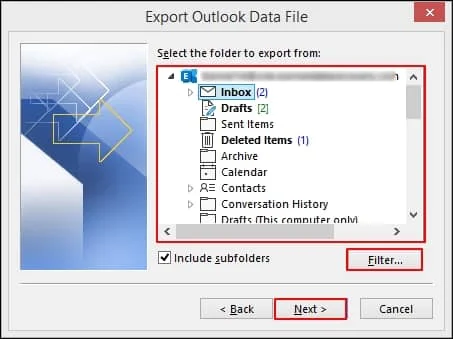
Select the Outlook folder you wish to export and proceed to Next.
Browse to choose the saving location, select suitable Options, and click Finish.
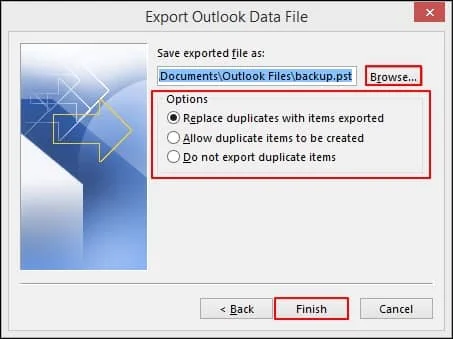
You have successfully exported Outlook data files into PST format.
Section 2. Import PST files (Exported OST Mailboxes) to Office 365
Once you have the PST files, execute the following steps to import them to Office 365. For this, the Microsoft import service offers two ways that are, as follows:
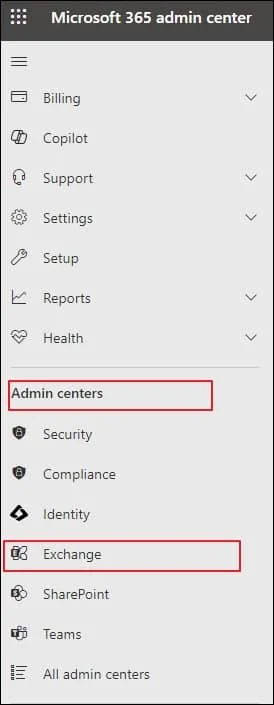
A. Network UploadGo to Microsoft 365 admin Center > Exchange > Admin centers.
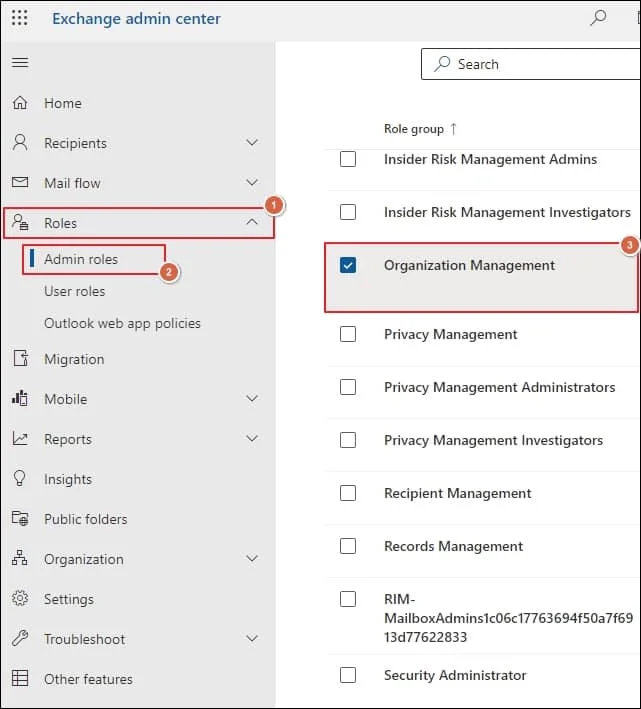
Expand Roles, then select Admin roles and click Organization Management & other required permissions to proceed.
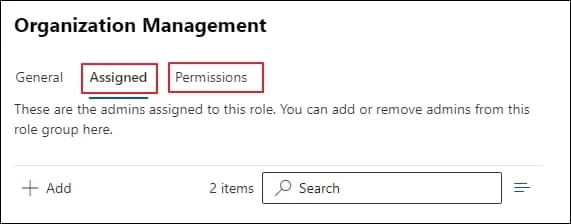
Go to the Assigned tab to check the assigned admins' roles and grant them permissions by accessing the Permissions tab.
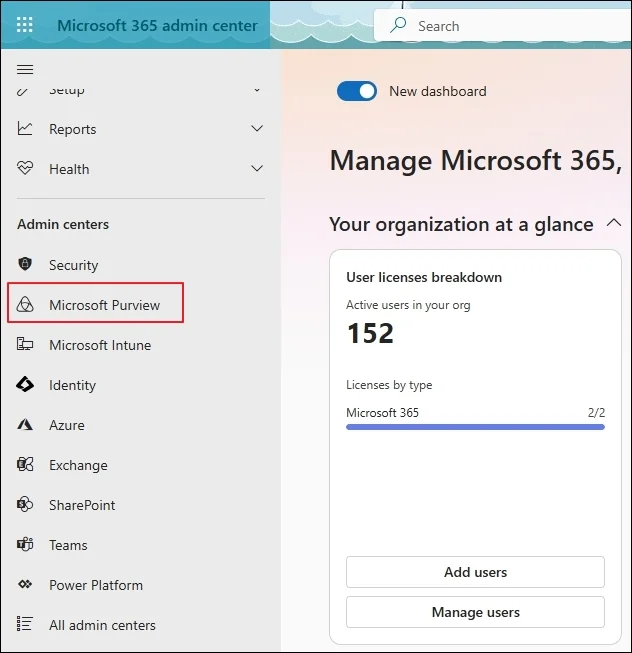
Once permissions are assigned, go to Microsoft Purview under Admin centers.
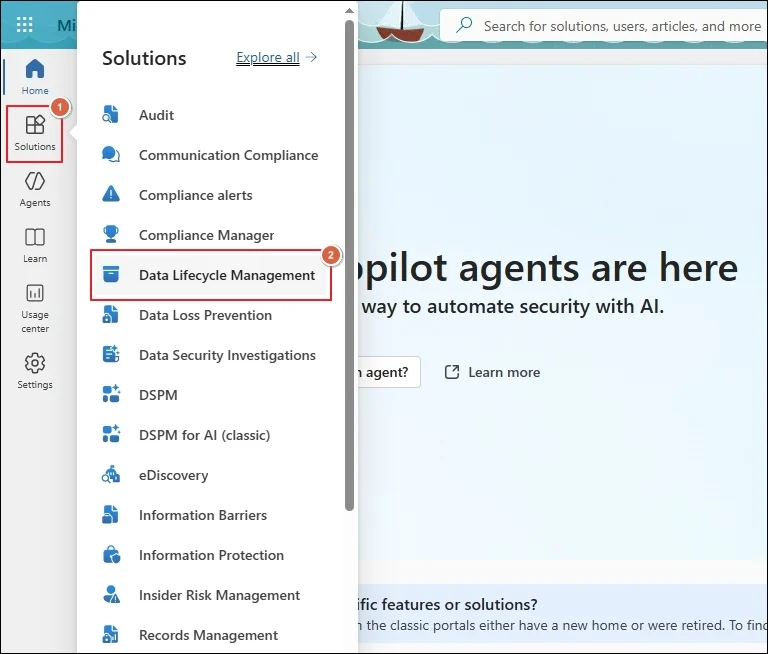
Hover over Solutions and begin with the Data Lifecycle Management.
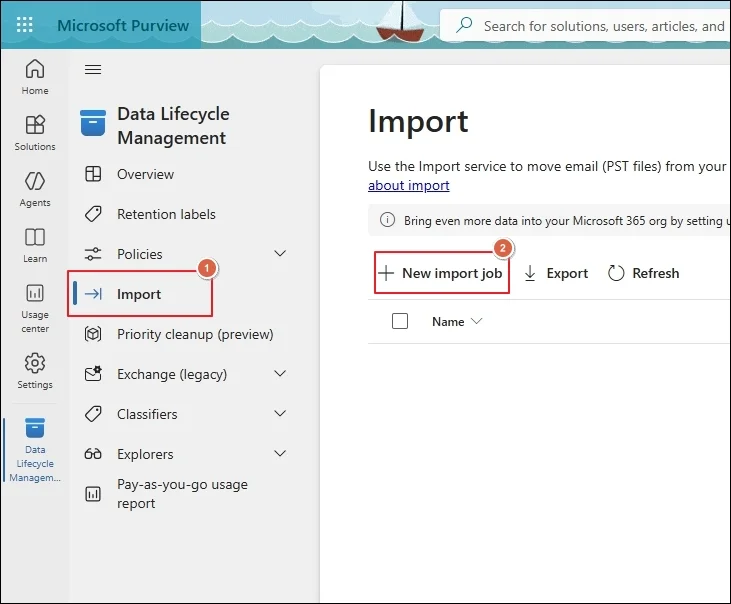
Click on Import to create a New import job.
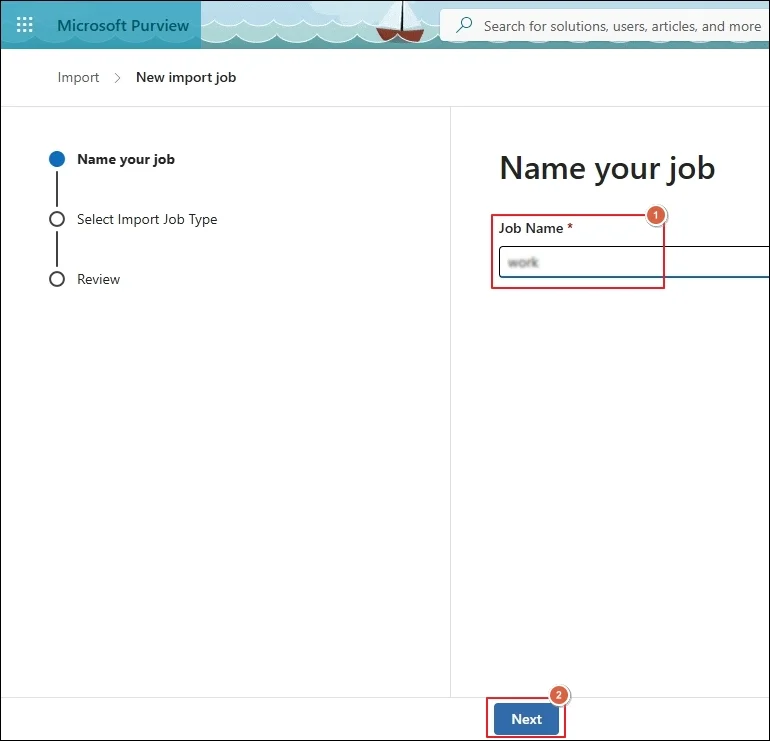
Name your job and click Next.
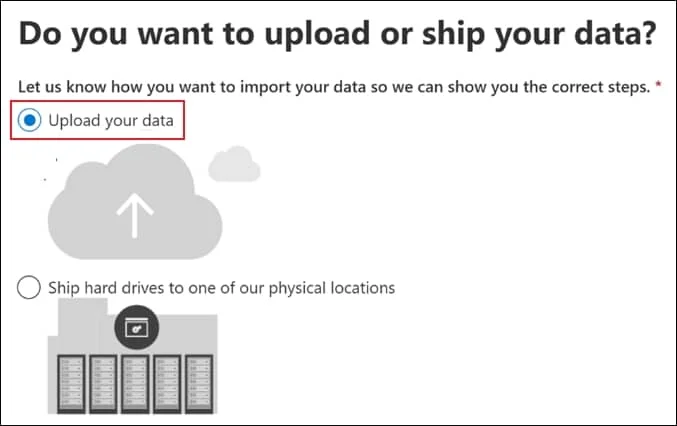
Select Upload your data and tap Next.
Under the Import data window, perform the following two things:
- Click on Show network upload SAS URL option to view it, and then save it to a safe location
- Then, tap on Download Azure AzCopy to download it to your local system.
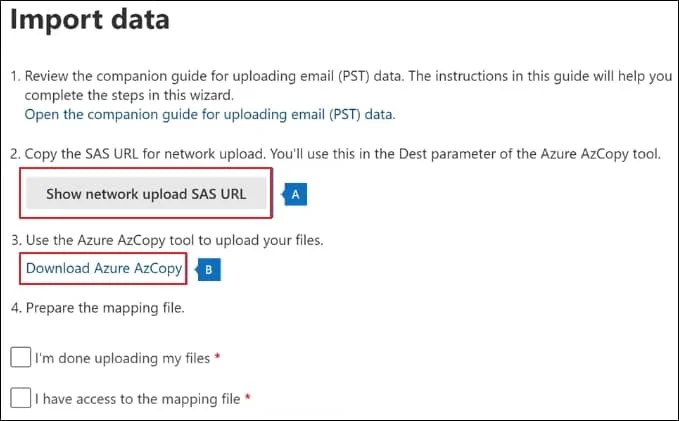
Open Command Prompt, then access the location where azcopy.exe was downloaded. Run the given command to upload the PST files to Office 365.
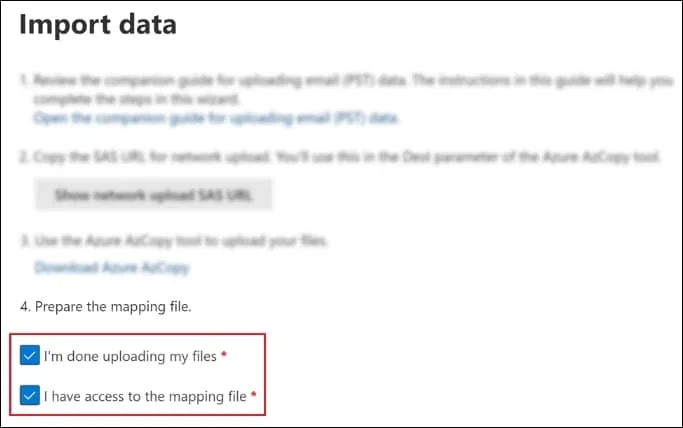
You need to create a PST import mapping file in CSV format to specify which users' mailboxes will be imported.
Check both options and then click Next.
- I'm done uploading my files.
- I have access to the mapping file.
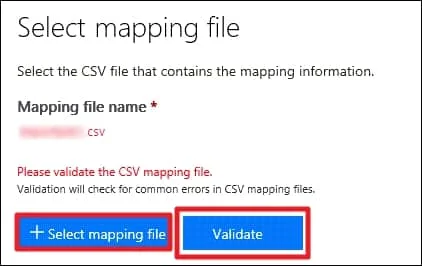
Select mapping files name to choose the recently created CSV file. Then, click on Validate to check for any errors.
Read the terms and conditions documents and tap on the checkbox once the CSV files are validated.
Tap on the Save option to submit the import job. Once the job is successfully created, Close it.
Refresh to update the status information. When the analysis is completed, the data is ready to be imported, and the status changes to Analysis completed.
Go to the Import section, select the created import jobs, and proceed to the Import to Microsoft 365 option.
Filter your data window will appear, which allows you to sort your data for a selective import process.
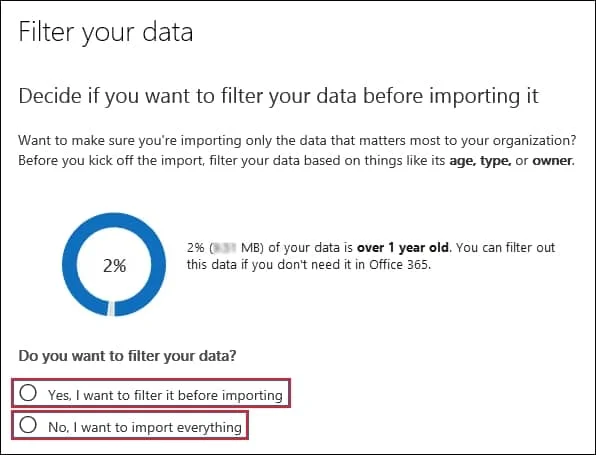
Click on the Import data option to start the import job process. This will complete the import process of your Outlook data files to Office 365.
B. Drive Shipping MethodDrive Shipping is another import service offered by Microsoft 365 to import Outlook data files. You can use this method when you have data on a large scale for a one-time import.
Network Upload Vs Drive Shipping: Key Differences & LimitationsBoth Microsoft Purview import methods come with their own restrictions. So, use the comparison below to see the differences and choose the right one.
|
Limitation |
Network Upload |
Drive Shipping |
| Cost | Free | Paid |
| Supported Licenses | All commercial licensing agreements. | Enterprise Agreement (EA) only — not available via MPSA. |
| Max Data Volume | Unlimited (network-dependent). | 10 TB per drive & max 10 drives per job. |
| Upload or Process Time | Several hours per TB. | 7–10 business days after Microsoft receives the drive. |
| Available Regions | US, Canada, Brazil, UK, France, Germany, Switzerland, Norway, Europe, India, East Asia, SE Asia, Japan, South Korea, Australia, UAE, Israel, Mexico, Taiwan, New Zealand | Same list except Germany and Switzerland. |
| Suitable For | Ongoing imports or smaller migrations. | Large, one-time data migrations. |
| PST File Size | 20 GB per file. | 20 GB per file. |
| Message/Item Size | 150 MB (larger items skipped). | 150 MB (larger items skipped). |
| Nested Folders | Under 300 levels. | Under 300 levels. |
| Public Folder | Not supported. | Not supported. |
| Archive Mailbox | 100 GB per import job. | 100 GB per import job. |
| Required Permissions | Mailbox Import Export + Mail Recipients roles, or Global Admin. | Mailbox Import Export + Mail Recipients roles, or Global Admin. |
| Import Speed | Estimated 24 GB/day per mailbox. | Estimated 24 GB/day per mailbox. |
| Retention Period | Mailbox auto-placed on indefinite hold. | Mailbox auto-placed on indefinite hold. |
Way 2. Import Outlook OST to Microsoft 365 Directly
The above method helps you import OST to Office 365 only when you have an active profile and it is configured in Outlook. But the method fails when you want to import orphaned, disconnected, isolated, detached, stranded, abandoned, unassociated, or unlinked OST files.
For this, you can use the Recoveryfix Import PST to Office 365 tool to import OST or PST files to Office 365 mailboxes directly. Here are the steps to do the same:
Access the software and click on Add.
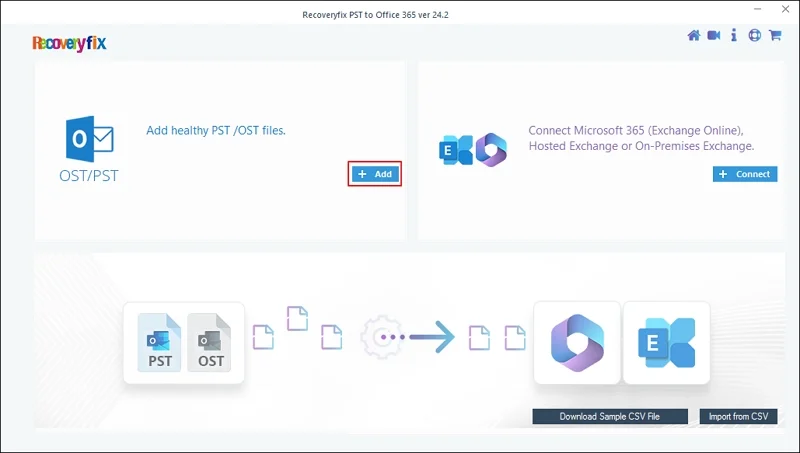
Browse to the saved location of the OST file and click Open.
Connect to your Microsoft 365 account once you have added the files.
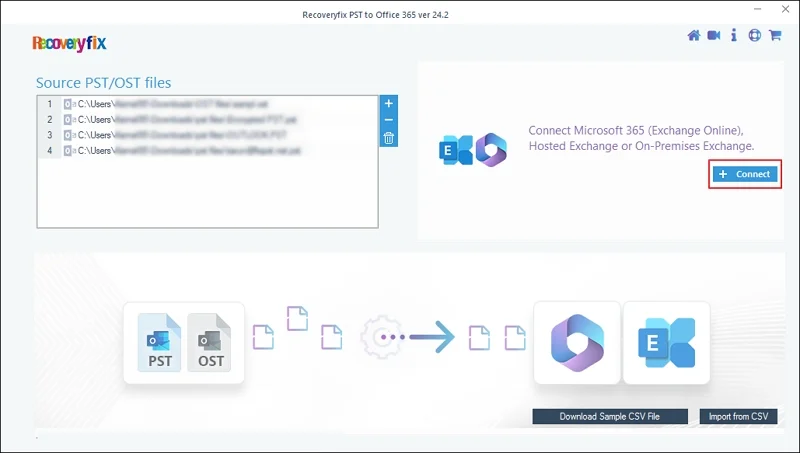
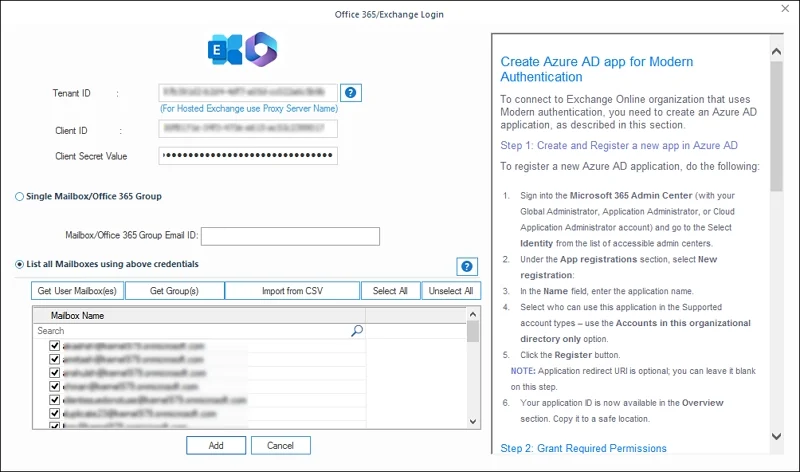
Enter your account details & list user mailboxes. Then, click Add.
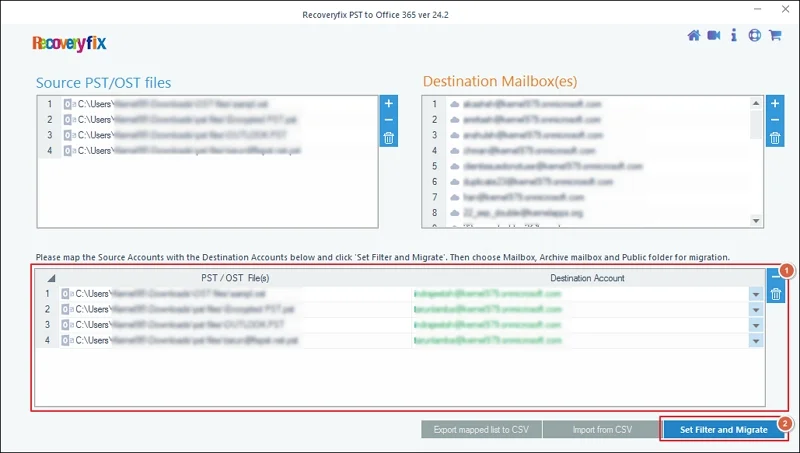
Map the source data files to destination mailboxes and proceed to Set Filter and Migrate.
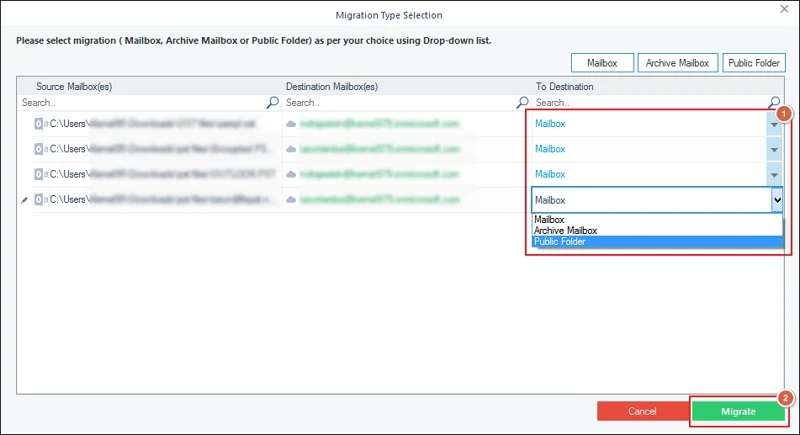
Select the mailbox type to migrate between Mailbox, Archive Mailbox, and Public Folder. Then, click on Migrate.
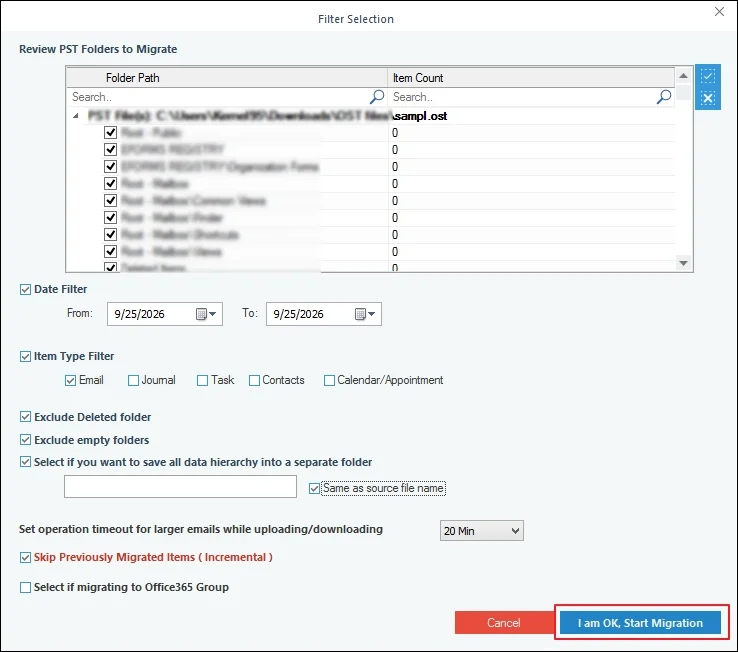
Apply the required filters and proceed to I am OK, Start Migration.
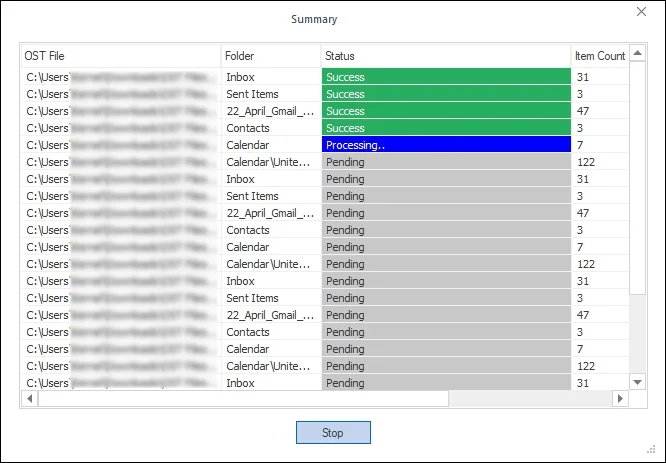
It will start importing your OST files to Office 365.
Let’s Recap
The blog has provided a detailed guide on how to import OST to Office 365 using different approaches. You can use the native approach to access the content of your OST files only when they are connected and configured with an Outlook profile.
But they become completely ineffective in the case of orphaned OST files. Therefore, using the recommended approach is the best way to import OST files. The software helps you directly import Outlook OST to Microsoft 365 without any limitations.
FAQs About Importing OST to Office 365
Q1- Can I directly import OST files to Office 365?
Ans: No, you cannot import OST files directly into Microsoft 365 using the Microsoft Purview portal or manual Outlook options.
Q2- Why can't I directly import OST to Office 365?
Ans: You cannot import Outlook OST files directly into Microsoft 365 because they are designed as local cache replicas that are tied to a specific Outlook profile and mail server.
Q3- Is it possible to import multiple OST files using the native import service?
Ans: Yes, you can use the native import service to upload multiple OST files to Office 365 mailboxes. It also allows you to add CSV files to map files to the destination mailboxes.
Q4- What are the common problems I can face during OST to Microsoft 365 import?
Ans: You may face the following issues when importing OST files manually:
- OST to PST export fails.
- Imported emails are missing.
- PST mapping file validation fails.
- Outlook cannot open the OST file.
- Duplicate emails appear after import.
- Microsoft 365 doesn't accept the PST file.
Q5- Is it necessary to export OST files into PST format before importing them to Microsoft 365?
Ans: Yes, exporting OST files into PST format is necessary before importing them to Office 365 mailboxes. For this, you must have an active profile in the Outlook application.
Q6- Can I import orphaned OST files to Microsoft 365?
Ans: Yes, you can import orphaned OST files directly to Office 365 by using automated solutions like Recoveryfix.
Q7- Does the native import service of Microsoft 365 allow me to import OST file data to existing mailboxes?
Ans: Yes, you can import the OST file data to existing Microsoft 365 mailboxes with the native import service. Just upload the mapped CSV file with sources and destinations.
Q8- Can I import contacts and calendars from an OST file?
Ans: Yes, you can use both Microsoft Purview and dedicated solutions to import emails, attachments, contacts, calendars, journal, notes, appointments, and other mailbox items from OST files.