Recover and restore a mailbox from Exchange Server 2010!

Updated On - April 30, 2025
For smooth and effortless recovery and restoration of the mailbox from Exchange Server 2010, you can use Recoveryfix for Exchange Server tool.

Exchange Server’s various security features empower businesses to communicate safely. However, due to some technical glitches, there are situations in which users can face several issues and errors. Here we have listed some frequent errors that users usually come through while working with the Exchange:
- Exchange Server is in the inconsistent stage
- Exchange Server is unavailable
- Mail flow related issues in Exchange Server
- Exchange database (EDB) file corruption
- Create a recovery database for Exchange Server 2010.
- Restore the database from Windows Server Backup.
- Bring the database to a clean shutdown state using ESEUTIL.
- Recover the mailbox from the recovery database.
- To create the recovery database, start the Exchange Management Shell, and use the New-MailboxDatabase command.
- Step 1. Launch Windows Server Backup, go to Actions and click Recovery option.
- Step 2. Select the location of the backup and click Next option.
- Step 3. Select the date/time of the backup and click Next.
- Step 4. Choose the option ‘Applications’ to restore the Exchange Server 2010 mailbox and click Next.
- Step 5. Select Exchange as the application to recover and click Next.
- Step 6. Choose the option ‘Recover to another location’ and browse a location to save the recovered mailbox items. Then click Next.
- Step 7. At the Confirmation page, review your selection and finally, click Recover button.
- Step 8. After successful completion of recovery, click Close button to cancel the Windows Server Backup wizard. You can go and check the newly created recovered folder at the location which you had selected earlier.
- First, check the state of the database.
eseutil /mh ‘C:\test\Exchange\NDRWEB\RecoveryNDR.edb’
- Here, you check the state, if it shows ‘Dirty Shutdown,’ then you need to restore it. Read more about: How to fix Exchange Database Dirty Shutdown Error
eseutil /r NDRWEB /i /d ‘D:\test\recovery\RecoveryNDR.edb’
- After restoring the database, you can mount the database back and recover the mailbox from the database.
Mount-Database RecoveryNDR
- After mounting the database, its time to recover the mailbox.
Run the command to get the mailbox in the database.Get-MailboxStatistics -Database RecoveryNDR
- Use the following command to restore the mailbox, including its folders and sub-folders.
Restore-Mailbox -Identity “Peter” -RecoveryDatabase RecoveryNDR -RecoveryMailbox “Peter” -TargetFolder Restore
- At last, you can see the deleted mailbox in the database once again.
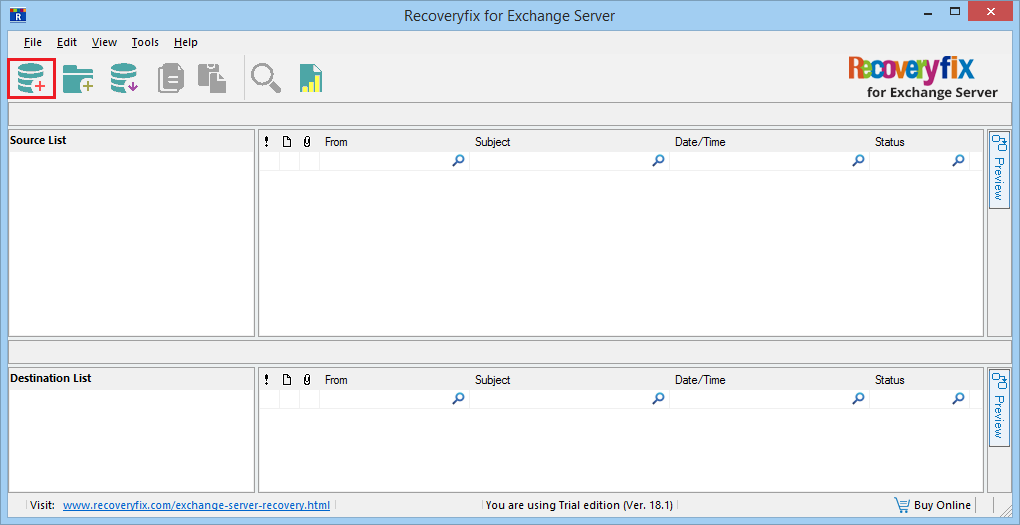
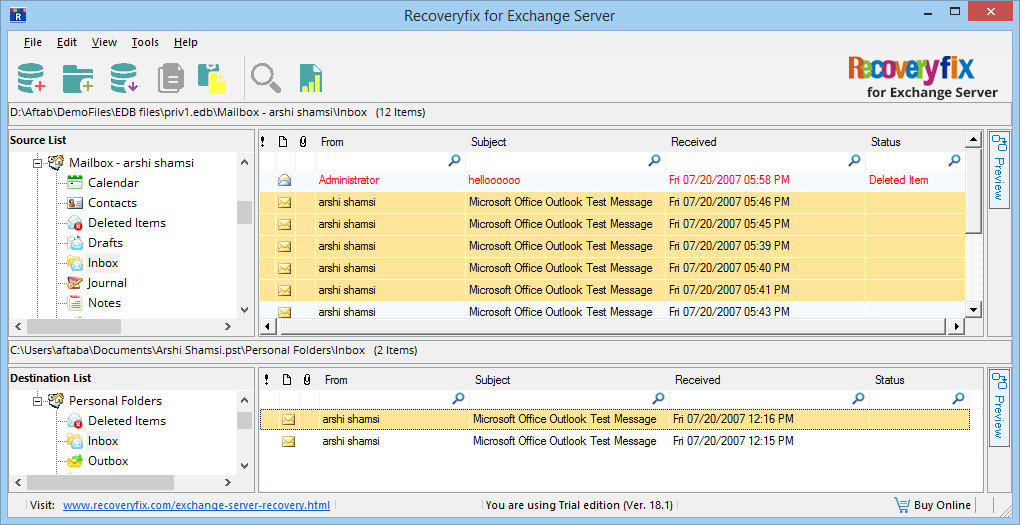
- Step 1. Install the software and complete the installation process on the local system. Run it & click on the Add Source icon.
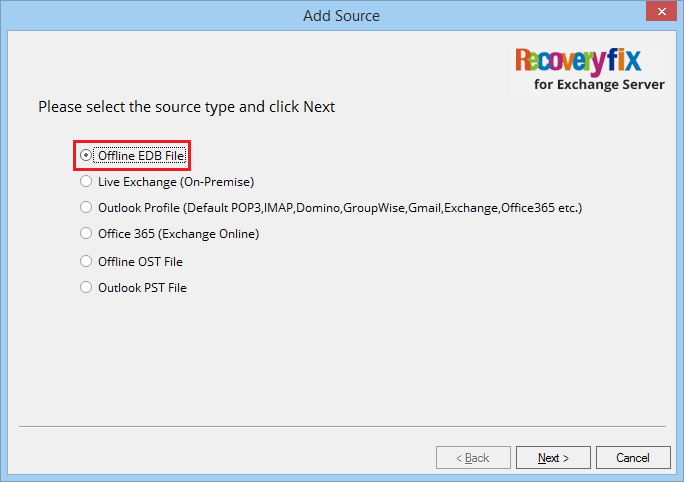
- Step 2. Select the option ‘Offline EDB file’ in the next section. Click the Next option.
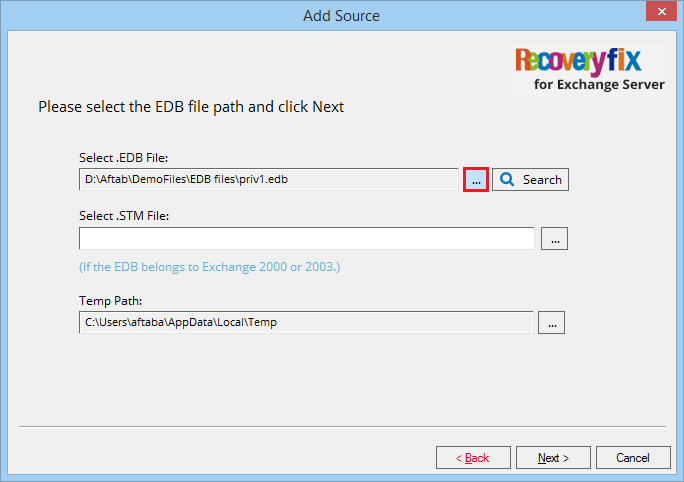
- Step 3. Browse the EDB file from its saving folder, or you can also search it from a drive or folder.
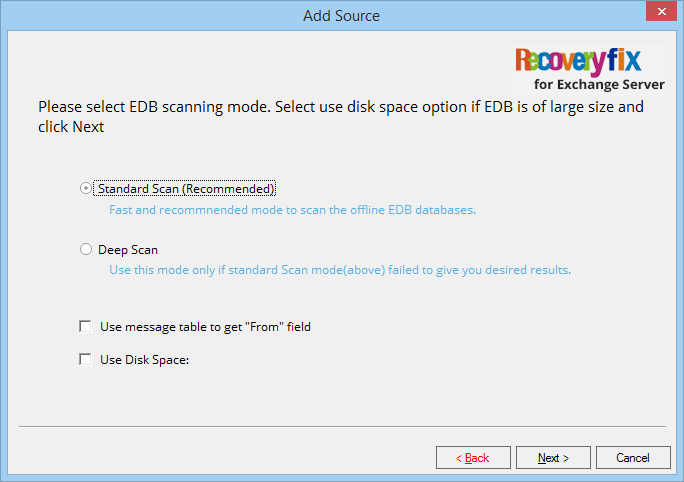
- Step 4. There are two scan modes which you can choose for the EDB file – Standard Scan and Deep Scan. Choose any one and click Next.
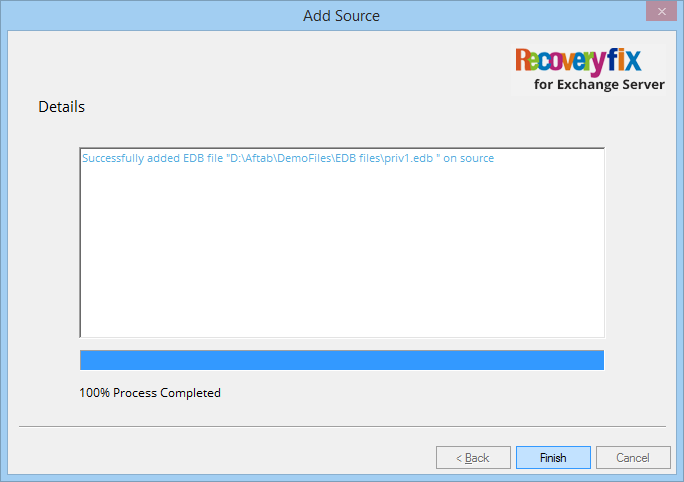
- Step 5. The tool scans the file and recovers the inaccessible and deleted data. Tap on the Finish option.
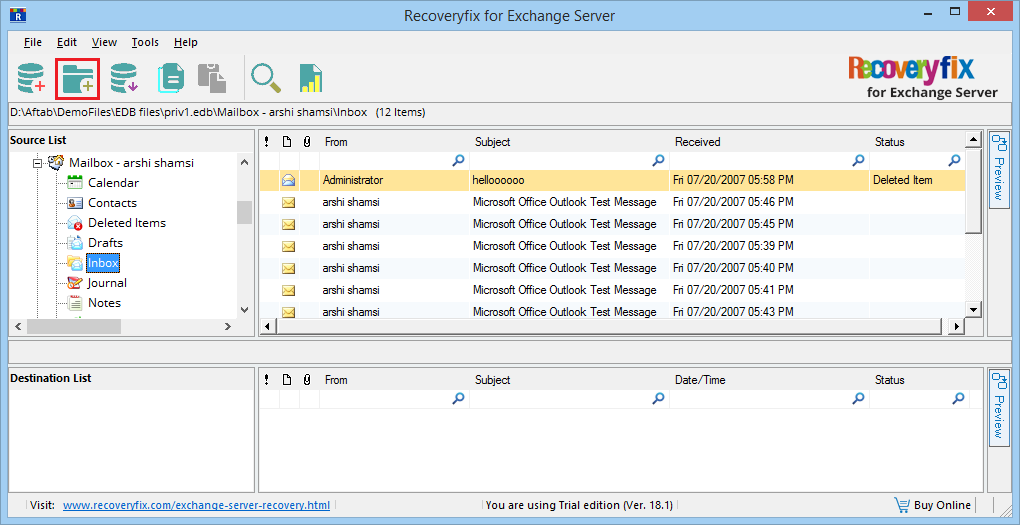
- Step 6. Go to the Source List, where the recovered data is present. You can check any folder and get the preview of its data. Then click on Add destination icon.
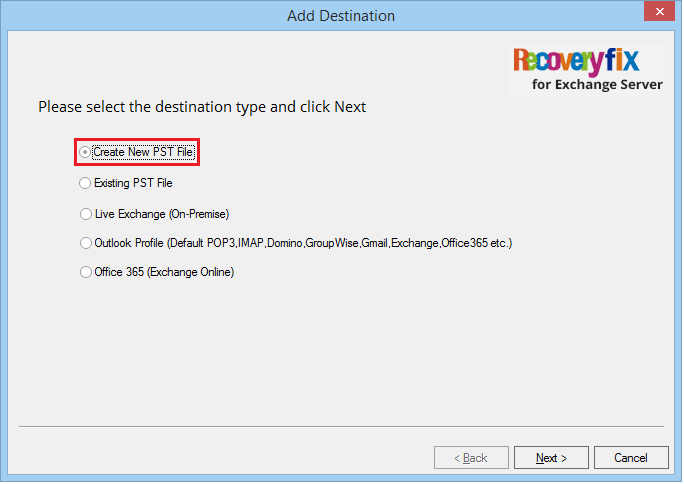
- Step 7. Select ‘Create New PST file’ & click on the Next option.
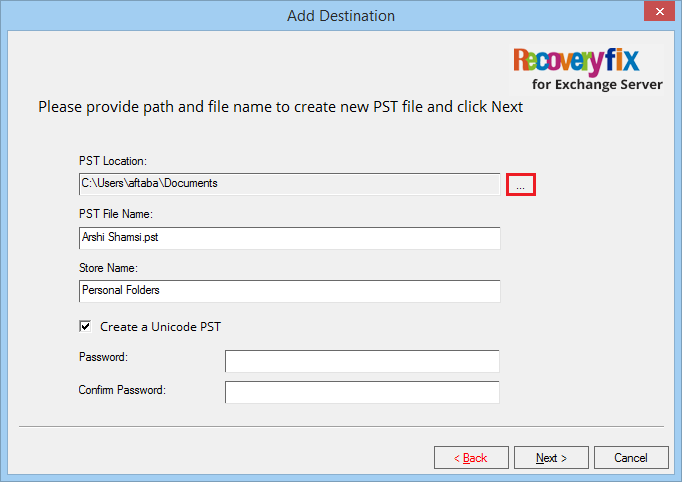
- Step 8. Provide a saving location and name to the PST file. You can also choose the password-protected PST file. Then click on the Next option.
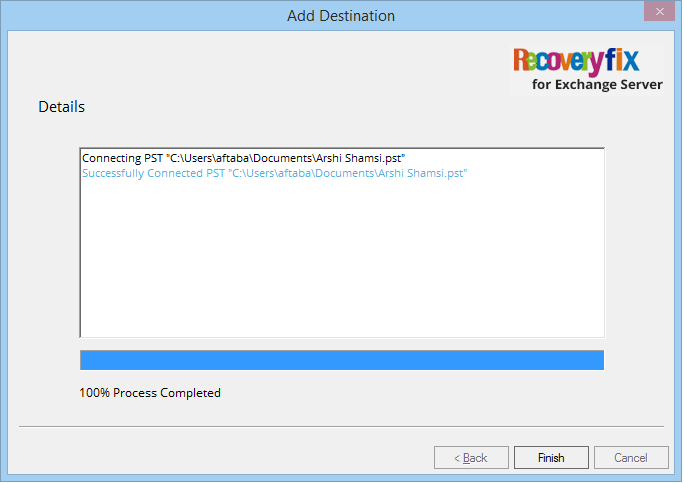
- Step 9. The tool adds the PST file as the destination. Click Finish.
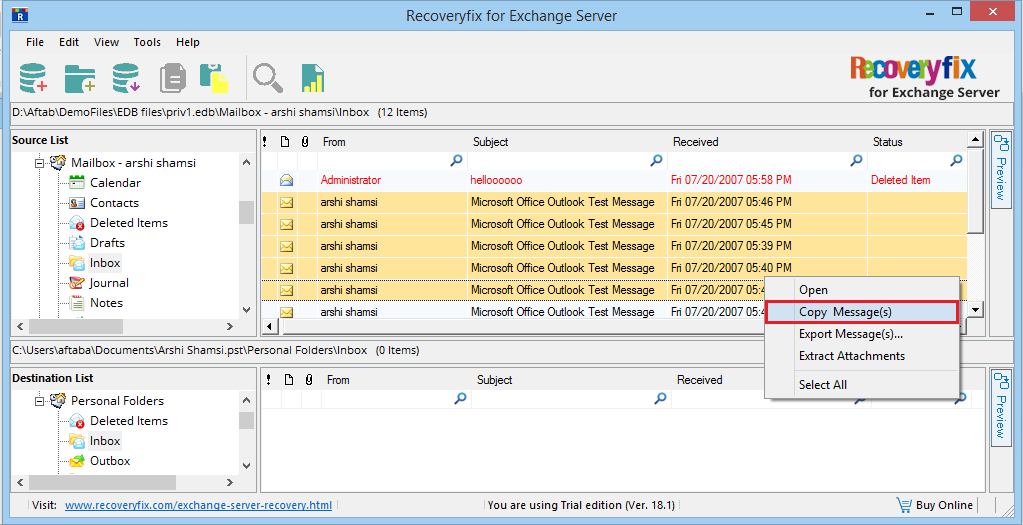
- Step 10. Select the messages, right-click on them & hit on the Copy Message(s) option.
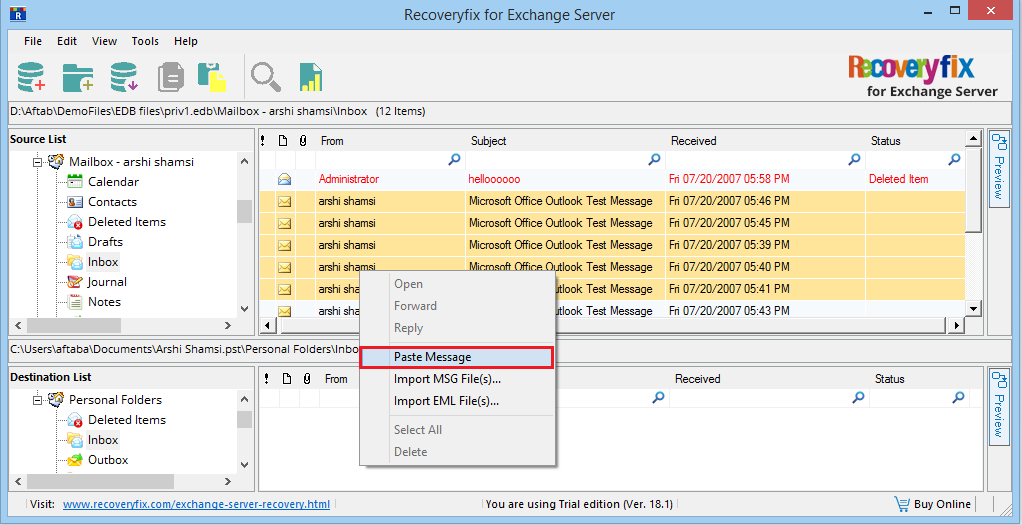
- Step 11. Now, go to the destination pane, right-click on it, & select the ‘Paste Message’ option.
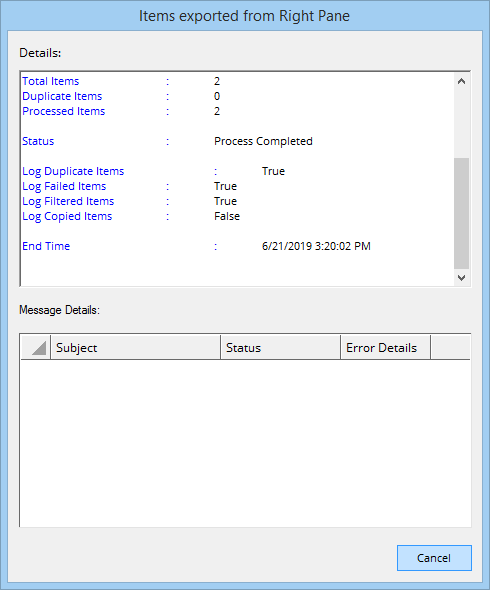
- Step 12. After migrating the data, the tool will show a report depicting the status of each message.
- Step 13. This way, your data will be moved to the destination PST file.
When you update the Exchange Server and do not delete the files of the previous versions entirely, then chances of facing such error increases. Since older files have an active connection, they are stopping the new Exchange Server from working.
This error occurs when Outlook fails to connect with Exchange Server. There can be several reasons behind the error like a corrupt PST file, a corrupt Exchange database, an improper configuration, bad Internet connection, etc. In case of a corrupt PST file, you can go for the Scan PST tool; and for a corrupt Exchange Database, use the ESEUTIL tool.
Mail flow related issues stop the Exchange account from receiving and sending emails. Generally, it occurs due to corruption in Exchange database files or incorrect DNS configuration. You can run several troubleshooting methods to overcome the problem.
Exchange database file is the core of all Exchange operations. It consists of mailboxes of multiple users and their entire data. All the communication stores or retrieves the data from the EDB file, and corruption in it will bring much bad news to you. So, we need to rectify the corruption using either the ESEUTIL or ISINTEG tools that mainly works on Exchange commands.
How to deal with data loss situations in Exchange 2010?
Whenever there is a data loss situation, the Exchange administrator has to resolve it as soon as possible and let the user access their mailbox smoothly. For Exchange Server 2010, users can use the Windows Server Backup tool for recovery. Due to this, files will come back to the exact place where they were saved.
The recovery procedure includes several stages which the administrator should follow-
Note:Ensure that you have all the required permissions to perform these actions.
1. Create a recovery database for Exchange Server 2010
New-MailboxDatabase -Recovery -Name RecoveryNDR -Server NDRWEB -EdbFilePath C:\test\RecoveryNDR.edb -LogFilePath C:\test\logs
2. Use Windows Server Backup to restore the database
Using the Windows Server Backup, you can restore the backup of the database at a safe location.
3. Bring the database to clean shutdown state
When you restore the database from the backup, then it remains in the Dirty Shutdown state. You need to change the status to a clean shutdown state by using the ESEUTIL tool.
4. Recover database mailbox items from the recovery database
How can we recover Exchange 2010 Mailboxes without a Recovery Database?
The manual method which we mentioned above is quite long, and you need to follow several steps to recover the mailbox data. Moreover, it requires a backup file, and need to create a Recovery Database. In case you have no backup, then the above method might not be helpful to you.
In these scenarios, using the advanced option can be the best option to avoid all the uncertainties. Recoveryfix for Exchange Server Recovery is considered one of this category’s safest data recovery software. It requires only the EDB file for recovery and can even retrieve deleted items without a recovery database. Following is the whole procedure to understand its feature’s credibility:
Conclusion
Recoveryfix for Exchange Server removes all the complications related to Exchange Server 2010 mailbox recovery and presents you a smooth, optimal, and secure method for the recovery. The deleted items are also recovered and presented in colour red for easy identification.
The deleted items are also recovered and presented in red for easy identification.For hands-on experience, you can utilize its free trial version.