How to create PST from Exchange Server?

Updated On - September 12, 2024
Moreover, you can consider the Recoveryfix for Exchange Server advanced software for getting quick & precise results.
Since PST files are well known for their diversity & easy shareability, saving the data in PST files can be the user’s preference over any format. So, our guide will focus on acquiring the necessary knowledge for a seamless process. It includes basic reasons, things to know, & best possible method.
Before exporting, you must install Microsoft Outlook on the computer connected to the Exchange server. Let’s start the discussion with the reasons behind executing the process.
Export PST from the Exchange Server: Why?
Exporting data from Exchange to PST is crucial for various reasons, and there are multiple reasons for it, such as:
- For legal discovery or compliance purposes.
- To keep a backup of Exchange mailboxes.
- To protect critical emails, messages, attachments.
- PST also allows users to manage their mailbox sizes by archiving them.
- Easy migration & portability of the PST file prevails over other file formats.
Another important reason behind exporting Exchange mailboxes to PST is migrating Exchange data to Office 365 with the help of MS Outlook.
Consideration before the process: Important Ones!
Here are some basic prerequisites that users need to follow to avoid any ambiguity in the process. Let’s explore them one by one.
- You need to provide the Mailbox Import Export role to a group and make the account a member of this group
- You will have to export mailboxes to PST on a UNC network share that is accessible to the Exchange
- You will have to create mailbox export requests in the Exchange Admin Center or Exchange Management Shell
These are a few points that you should keep in mind before exporting Exchange mailboxes to PST.
Best method to export Exchange Mailboxes to PST
Now, we are going to discuss how you can export Exchange mailboxes to PST file format with Exchange Admin Centre (EAC) or Exchange Management Shell(EMS). Follow them carefully.
Solution 1. Use Exchange Admin Center utility
To create an export mailbox request with the Exchange Admin Center, follow the below steps:
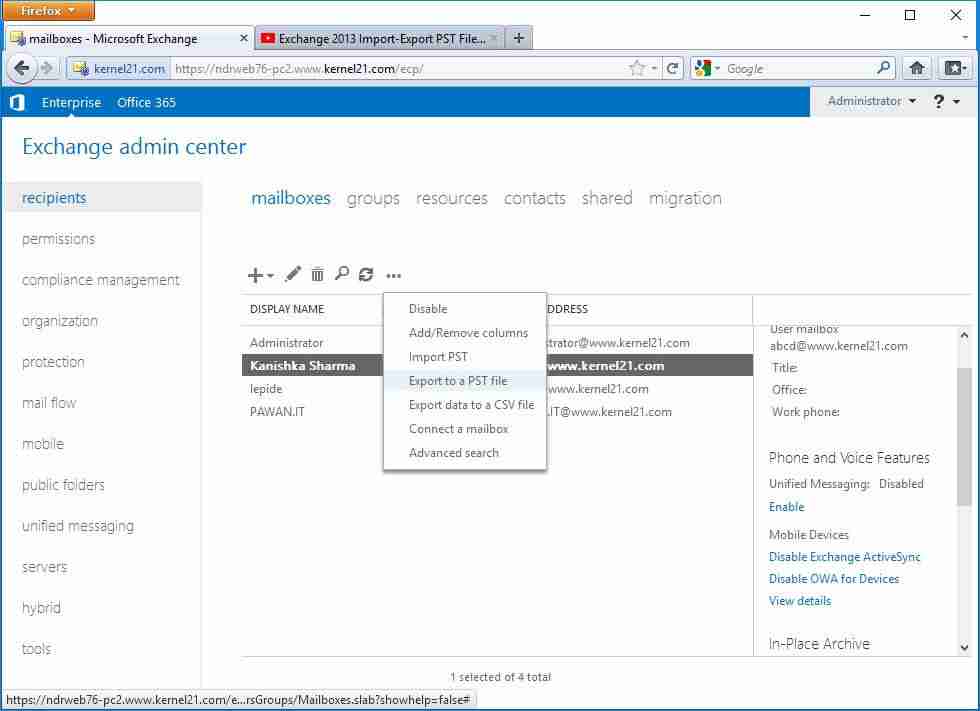
- Open EAC and go to Recipients > Mailboxes, click More Options, and then select Export to a PST file.
- It will open a new wizard on the screen, select the source mailbox from the first page, and then make your selection from options below.
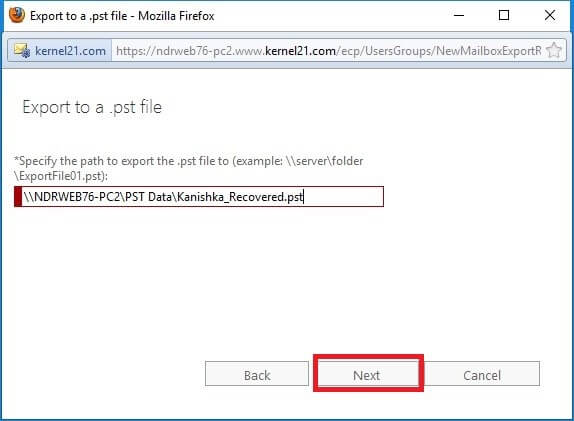
- In the next step, enter the UNC path and filename of the target.pst file, and then click Next.
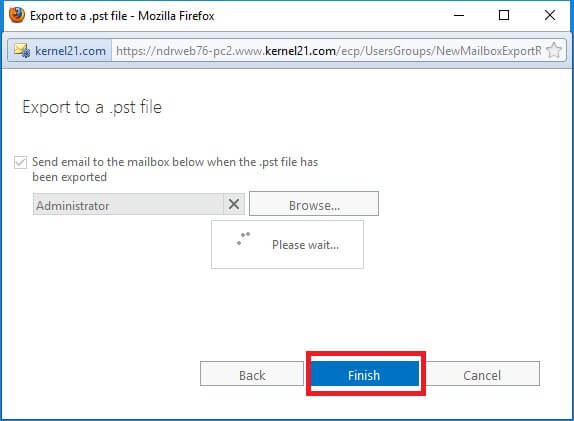
- In the final step, check the checkbox Send email to the mailbox when the PST file is exported. Click Browse to add notification recipients. click Finish.
After making your selection, click next.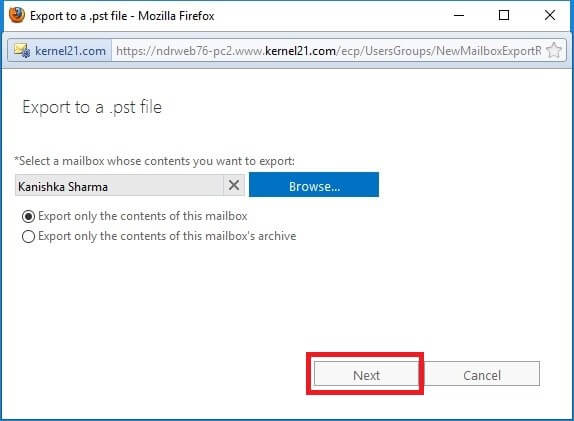
It will start exporting Exchange data to PST automatically. Once it is complete, a notification message will be sent to your mailbox.
Solution 2. Use Exchange Management Shell
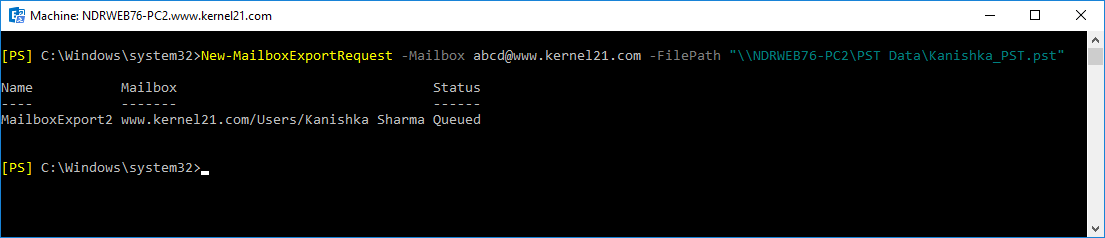
To export Exchange mailboxes to PST with Exchange Management Shell, you will have to use NewMailboxExportRequest. Below we have given the basic syntax of EMS cmdlets for exporting Exchange mailboxes to PST.
New-MailboxExportRequest -Mailbox < TargetMailboxIdentity > -FilePath < UNCPathToPST >
For example,
New-MailboxExportRequest-Mailbox abcd@www.kernel21.com -FilePath \\NDRWEB76-PC2\PST Data\Kanishka_PST.pst
The complete cmdlets for exporting the mailbox is:
New-MailboxExportRequest [-Name
Executing this command will create a new mailbox export request. It includes the following settings:
- Mailbox export request name – The MailboxExport syntax defines the default value, which could be between 0 to 9
- Source mailbox – Name of the user mailbox
- Target .pst File – \server01\PSTfiles\UserName
- Content and folders – All the data in the folder paths in source mailbox will appear in the target .pst file
- Priority – You can set the Priority as per your requirements
What can be the alternate option to create the PST one?
The manual process of exporting exchange data to PST is a little complicated. You can use a third-party software program such as Recoveryfix for Exchange Server Recover for an easy and speedy export. Users can export one or more mailboxes at a time.Some other useful features like Exchange Mailbox migration, Office 365 migration and public folder migration are also available in this tool.

The working of the software is straightforward; let’s have a look at it:
- Download and configure the software on your system.
- On launching the tool, a pop-up window will appear on the screen. Select the Live Exchange option and click Next.
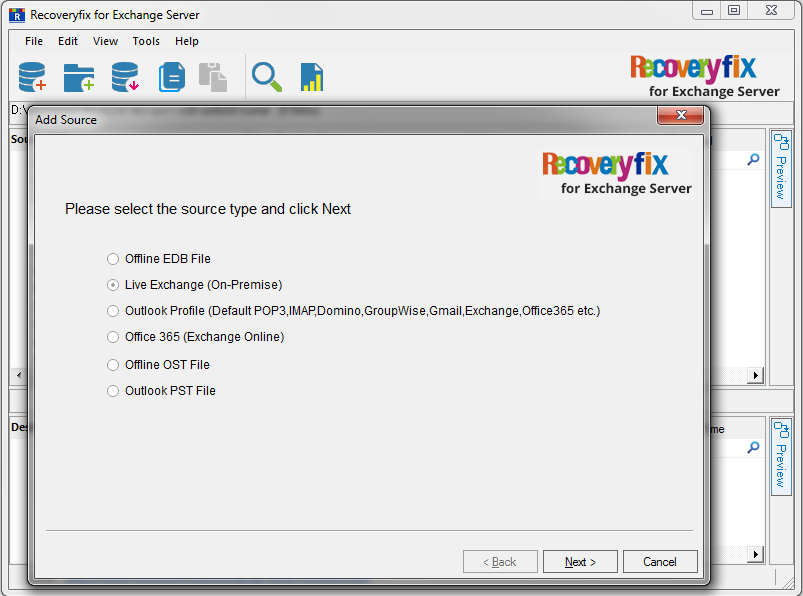
- Click on Add Source and select the source type and then click Next.
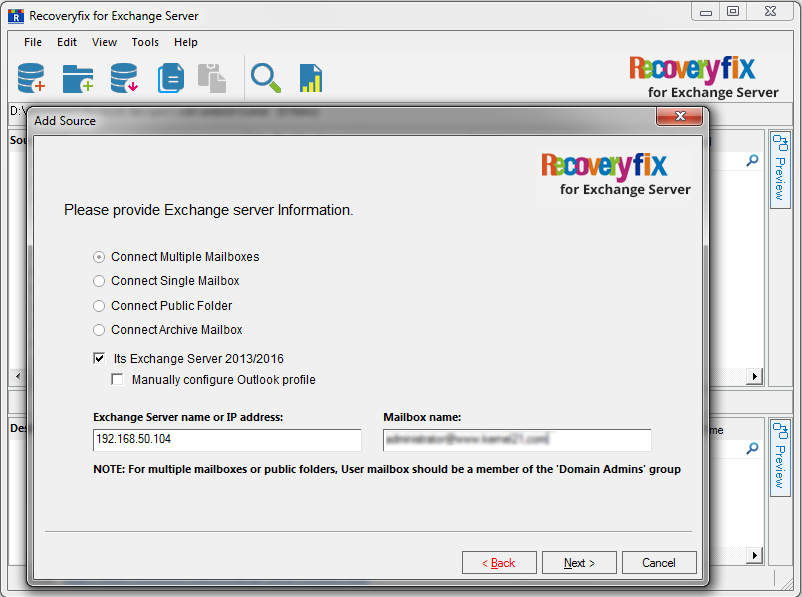
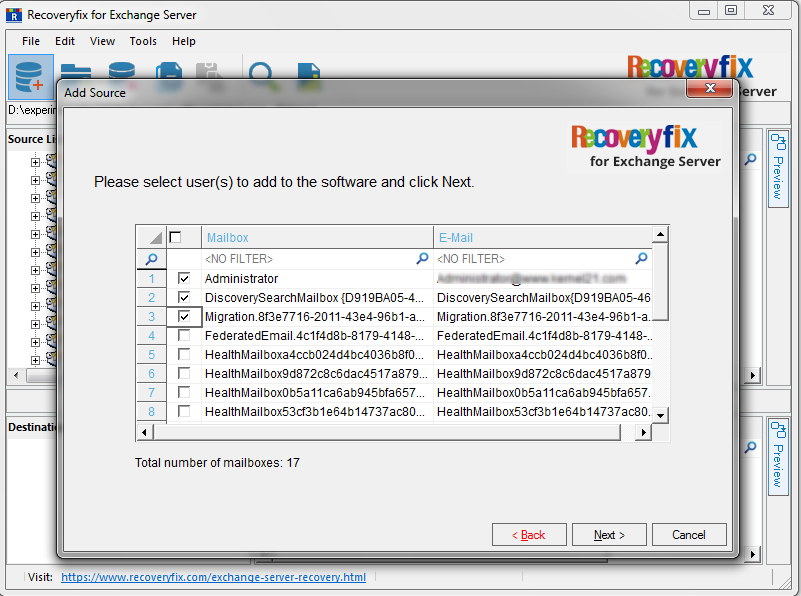
- The mailboxes will appear on the screen; select the mailboxes that you want to export to PST and click Next.
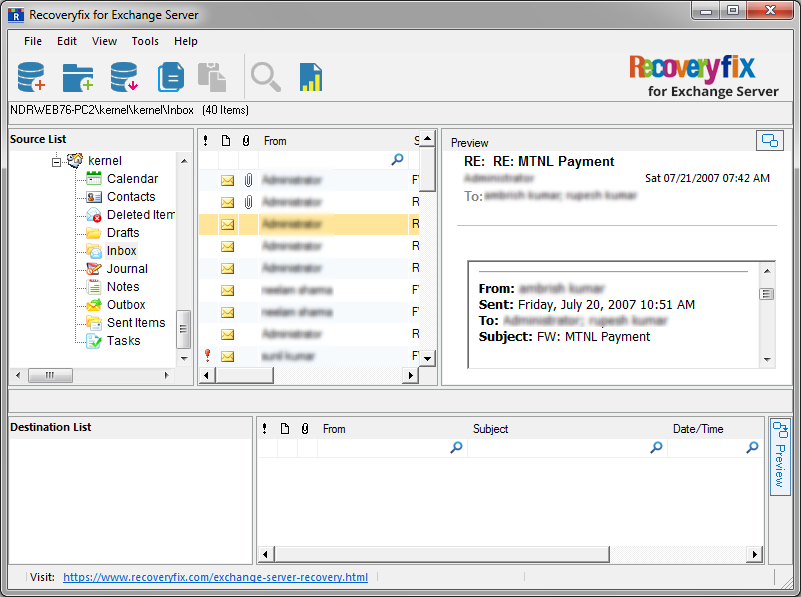
- The live Exchange mailboxes will be added to the tool, and you can preview the content by selecting any folder or item.
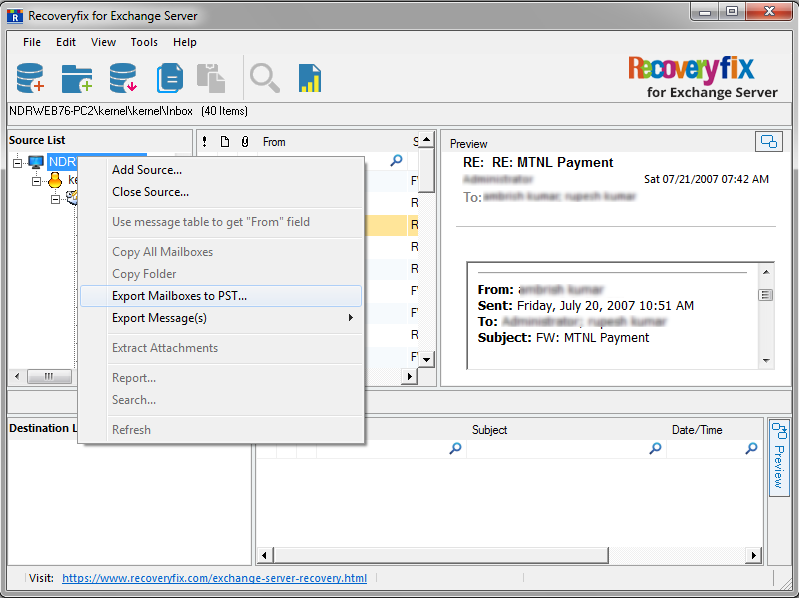
- Now, to export all mailboxes to PST, right-click on the source root directory and click Export Mailboxes to PST.
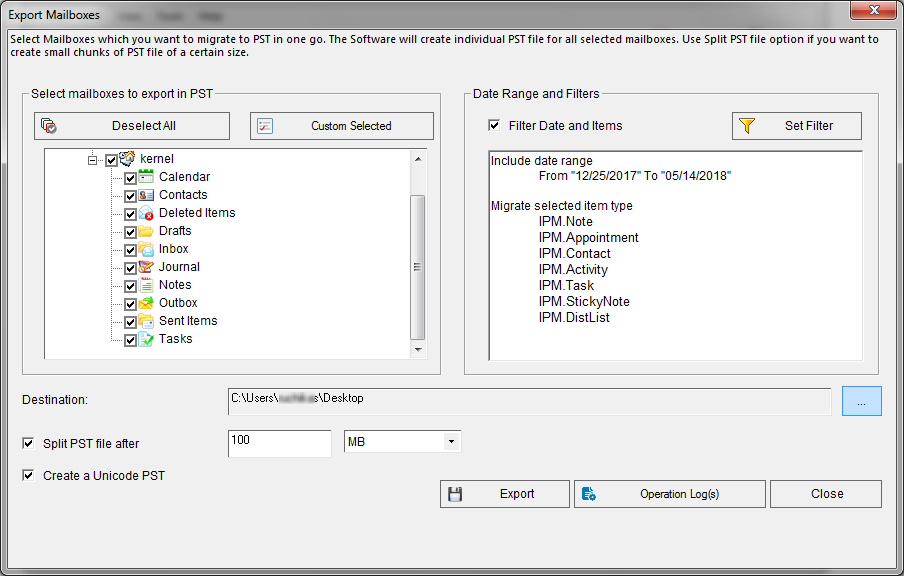
- The filter section window will appear in the next step; apply filters as per your requirements and click Export.
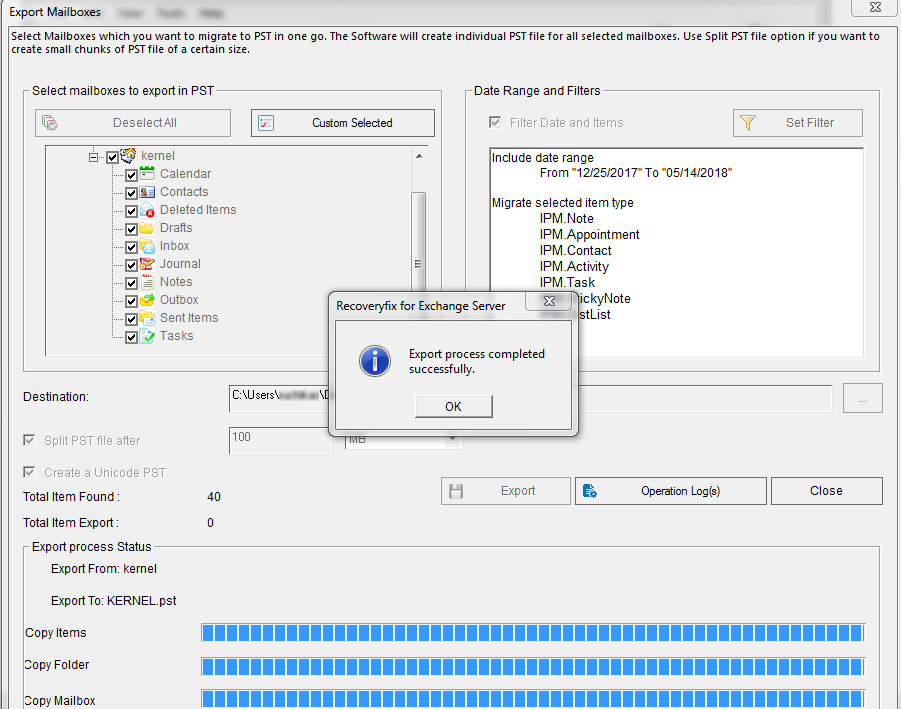
- The software will start exporting Exchange mailboxes to PST. Once the mailbox export process is complete, a notification will appear on your screen, click OK to finish the process.
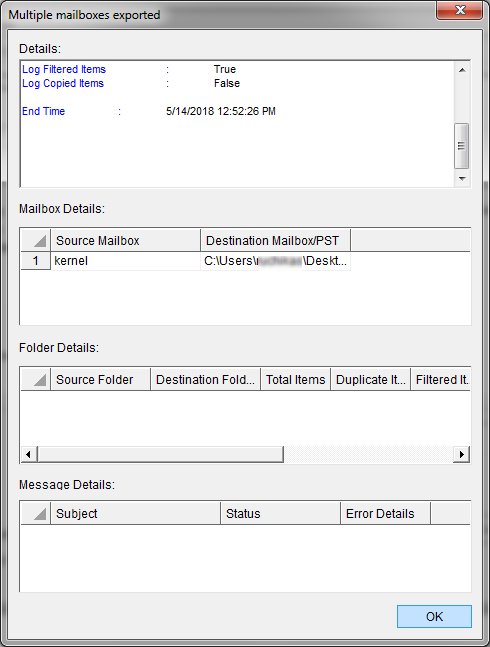
- In the end, a summary of the export process will appear on the screen, click OK to end the process.
That’s how you can easily export Exchange mailboxes to PST file format, and then access it via Outlook.
Conclusion
Users often need to export their Exchange mailboxes to PST to create a backup for the Exchange data or access the Exchange data via MS Outlook. Our blog has focused on each aspect of the concern that might help you gain more information.
Try the discussed manual or advanced methods to execute the process. For a hands-on experience, you can explore the tool’s free trial version.