Businesses are significantly dependent on email communication to communicate with their clients, partners, or shareholders. Therefore, it is necessary to manage inboxes regularly to keep them organized for better efficiency and productivity. But, when it comes to implementing this, users often encounter different challenges, including filtering important emails for future reference and deleting unnecessary ones. Hence, to save your mailboxes from an unmanageable mess, we have come up with different solutions. Explore them thoroughly to automate the Office 365 mailbox cleanup process for removing old emails after a specific time period.
Why cleaning up Office 365 mailbox is essential?
Keeping emails in the mailbox for future purposes makes it cluttered and hinders its smooth workflow. Cleaning it up has several benefits, which are as follows:
- Searching for a specific email is a quicker process in a well-maintained mailbox.
- Increase user performance by organizing emails in the mailbox systematically.
- Declutter your mailbox from unwanted emails and secure them from unauthorized actions.
- Help to free up storage space and increases the efficiency of users.
- Provide better collaboration between colleagues within the organization.
How to clean up Office 365 mailbox?
After a deep analysis, we have identified several Office 365 mailbox cleanup solutions. Check them out and find the most suitable one for yourself.
For Outlook 365
We are going to describe two solutions for cleaning up your mailboxes in Office 365. Here are the detailed steps to reach your desired outcome.
Method 1. Deleting older emails from a single folder
Deleting a single folder in Outlook 365 is a simple process. Here’s how you can do it.
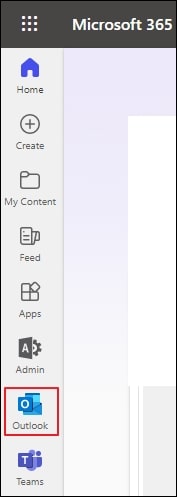
- Go to office.com, then access Outlook 365 from the left pane.
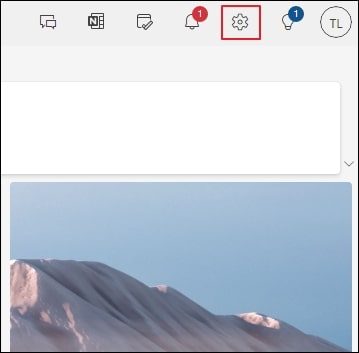
- Click on Settings icon in the top right corner when it is opened.
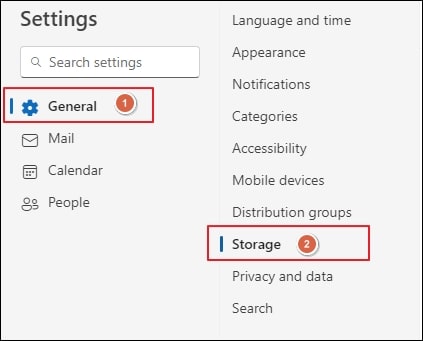
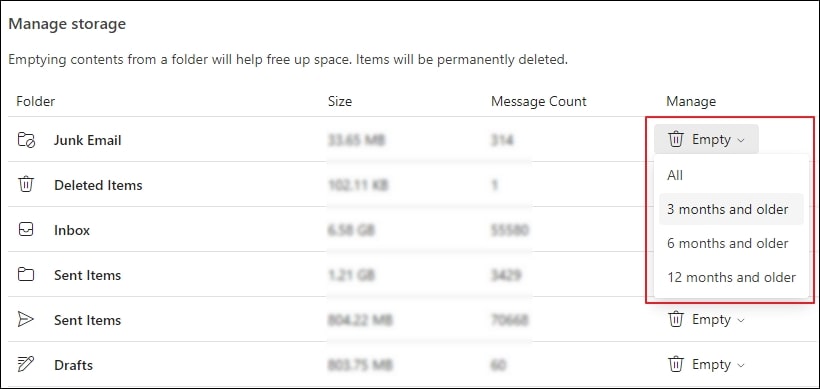
- Tap on Storage option under General tab.
- Go to the folder that you want to delete, open Empty dropdown to choose a period, and proceed to OK.
Note: If you have multiple folders to delete, repeat the previous steps for each folder individually.
Method 2. Automatically delete emails by setting up mailbox Rules
Cleaning up a single mailbox at a time can be a tedious and time-consuming process. Therefore, setting up Rules for auto deletion of mailbox emails will be more convenient. Here is the process of doing so:
- Go to Settings, then click on Rules option under Mail tab.
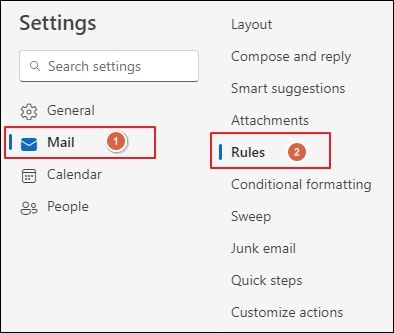
- Click on Add new rule option to create one.

- Enter name of the rule, then Add a condition as needed, select Delete as an action, and click Save.
Note: You can Add an exception to exclude the important emails.
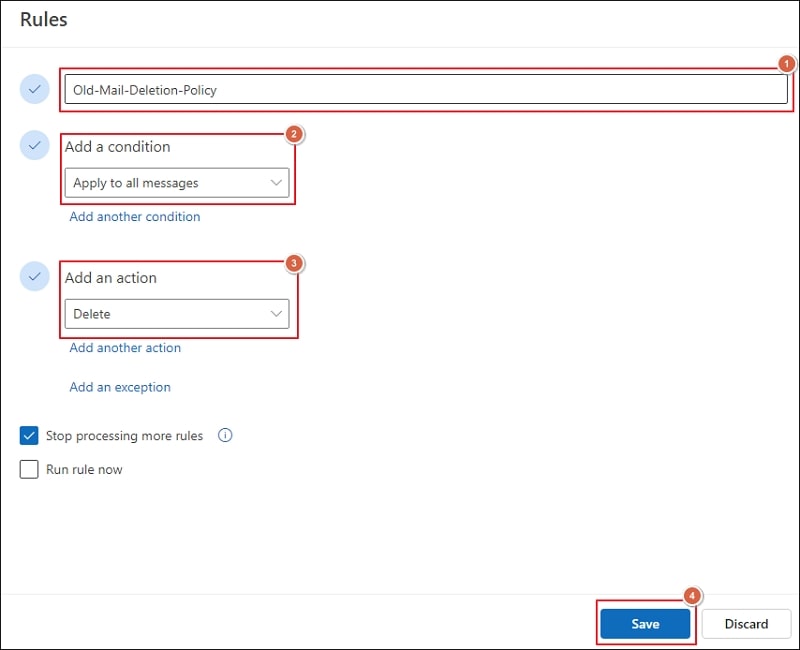
- You have successfully set up a rule for auto-deletion of your mailboxes.
For Exchange Online
We have simplified the process of deleting old emails in Exchange Online by dividing it into two parts. Go through each section carefully to set up an auto-deletion policy in Exchange Online to get the desired results.
Part 1. Create new Retention tag and policy
In Exchange Online, you need to create a new retention policy and then apply that retention policy to the mailboxes that you wish to clean up automatically after a certain period. Here are the steps to perform this operation smoothly.
Creating Retention tag
- Go to Microsoft 365 admin center by clicking on Admin option from the left pane.
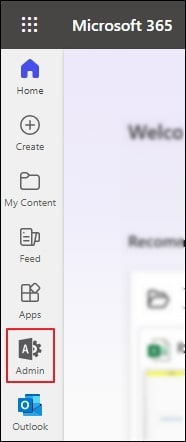
- Navigate and click on Compliance option under the Admin centers.

- Expand Data lifecycle management section, then select Exchange (legacy).
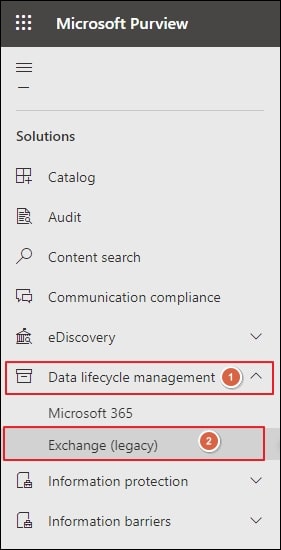
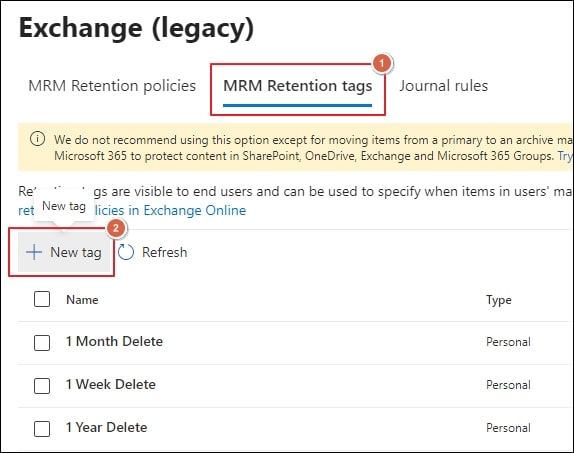
- Access MRM Retention tags under the Exchange (legacy) and click on New tag.
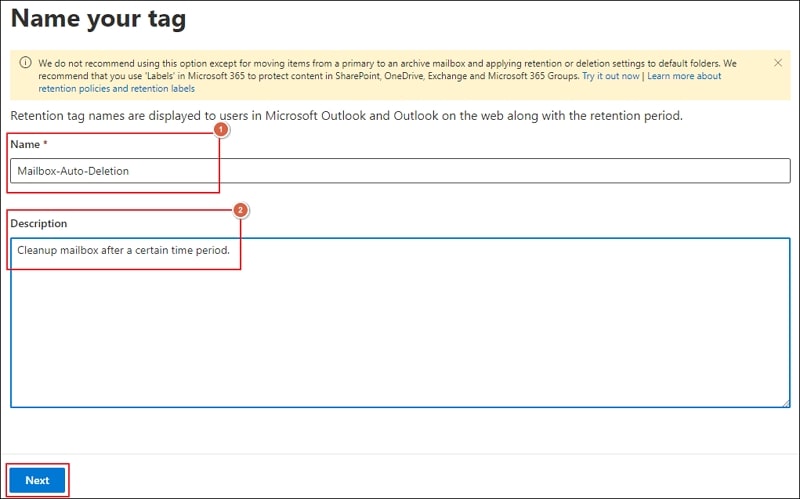
- Type name and description for new tag and proceed to Next.
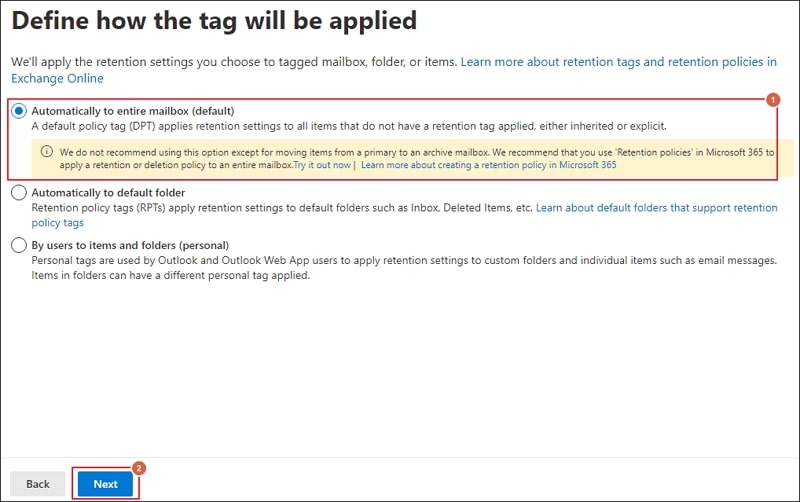
- Select Automatically to the entire mailbox under Define how the tag will be applied, then tap Next.
- Specify Retention Period in days, then select Delete and allow recovery option as Retention action and click Next.
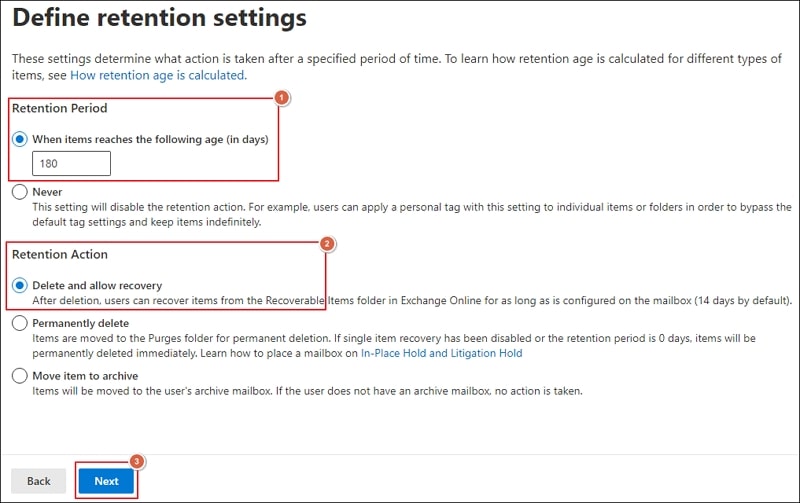
- Review and verify tag details, then click on Submit option.

- Click on Done option when it is created.
Creating Retention policy
- Go to MRM Retention policies tab, then click New policy to create one.
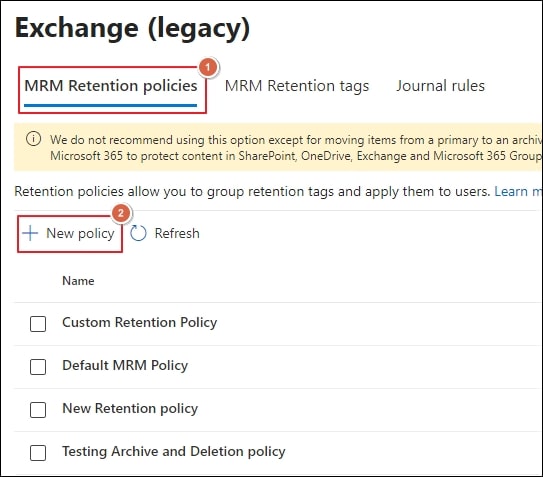
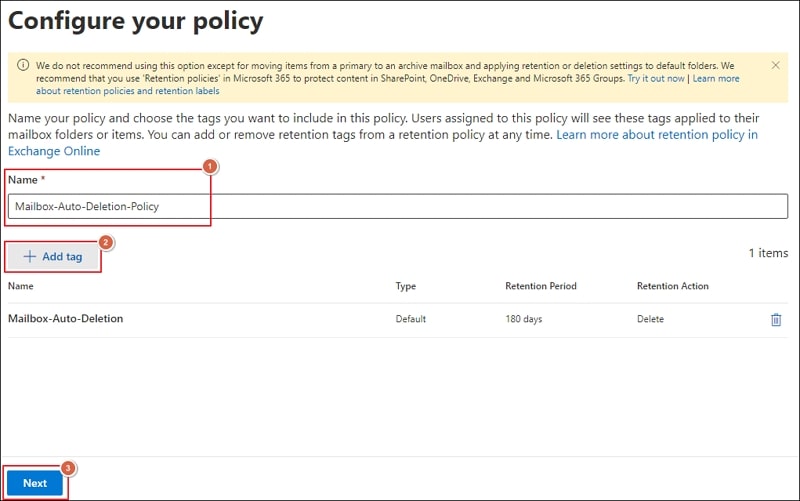
- Designate a Name to the Retention policy, then click on Add tag to select the created one and proceed to Next option.
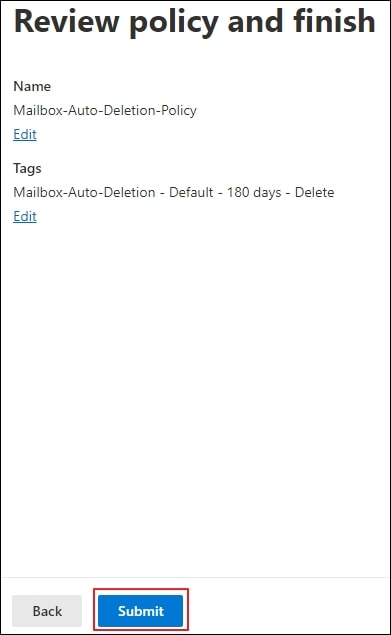
- Verify policy details, including Name & Tags, then click Submit.
- Once it is created successfully, tap on Done option.
Part 2. Implement the newly created Retention policy to the desired mailboxes
Once the Retention policy is successfully created, apply it to the desired mailboxes to automate the process of deleting old emails from user mailboxes on Exchange Online.
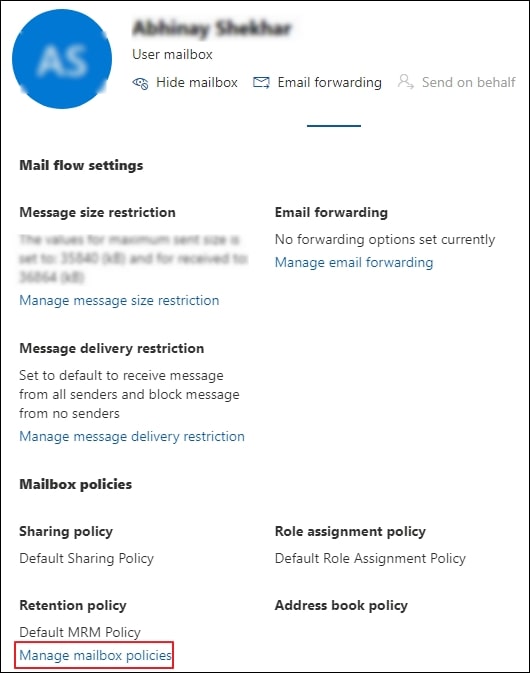
- Click on user mailbox, access the Mailbox tab, and proceed to Manage mailbox policies option.
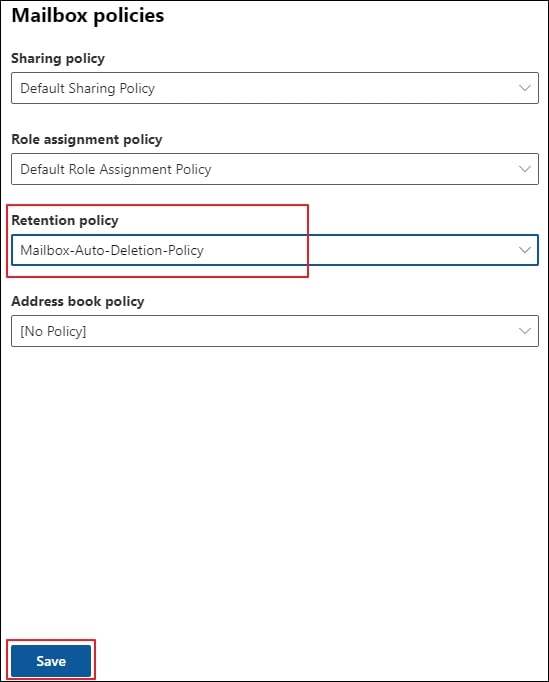
- Select the newly created policy using the drop-down list under the Retention policy box, then click Save.
Note: Repeat the above process for each user mailboxes for auto deletion of old emails for mailboxes.
- You have successfully set up a Retention policy to automatically delete your old emails from user mailboxes on Exchange Online.
Alternative to clean up my mailbox emails without losing them?
Deleting emails from your Office 365 mailbox will help you to make it clutter-free and more organized for enhanced performance. Sometimes, Office 365 mailbox cleanup process costs users their important emails alongside unwanted ones, which might be required in the future. Hence, taking a backup of Office 365 mailboxes will be more beneficial for users in this scenario. For this purpose, you can either opt for a manual solution or an automated solution to carry out the backup process.
Manual solutions may be cost-effective, but they often require significant technical expertise to perform the backup operation smoothly. On the other side, relying on an automated solution simplifies the process and offers precise control over the backup operation.
Recoveryfix Backup for Microsoft 365 is one such solution that can handle the job without having any difficulties. This versatile software is capable of backing up your Office 365 data within just a few clicks. On top of that, Microsoft 365 Backup Software provides advanced filtering options to carry out the backup operation with precision.
Conclusion
The blog has discussed detailed processes for Office 365 mailbox cleanup. By going through the above-mentioned approach, you can easily clean up your old emails from the Office 365 mailbox with ease. However, it is essential to backup your Office 365 mailboxes to avoid the situation of losing important emails along with unwanted ones. For this purpose, we have put forward a recommended solution that can help backup or export Office 365 mailbox to PST and provide complete control over it.


