How to fix “PST file doesn’t show Sub-folders under Inbox”

Updated On - June 26, 2024
Microsoft Outlook is considerably the most popular email client in today’s time. It has seen an exponential increase in its user base owing to its innovative features and easy-to-use user interface. Although, like other applications, Outlook also encounters several errors. One such error is when your ‘PST file does not show Sub-folders under Inbox.’
Missing subfolders error happens when a PST file gets corrupted. Corruption in PST files give rise to various issues like accidental deletion of subfolders, inaccessible Outlook profile, etc. Read ahead to get an in-depth knowledge about missing subfolders under inbox issue and its solutions.
Why are your subfolders missing in Outlook?
There could be several factors why your PST file does not show Sub-folders under Inbox. We’ve listed some of the potential reasons below:
- Outlook can’t connect to the server.
- Accidental deletions of subfolders in Outlook.
- Making changes in the View Settings of Outlook can give rise to various types of errors.
- Some folders/subfolders can disappear from your mailbox due to corruption in PST files.
Methods to fix missing PST file’s subfolders under inbox issue
There are various methods to fix the ‘PST file does not show Sub-folders under Inbox’ issue. Follow them with proper step-by-step instructions to get accurate results.
Method 1: Reset View Settings in Outlook
Making changes in the View Settings may lead to inaccessibility of PST file’s subfolders. Resetting them again might solve this issue. To reset the View Settings, follow the steps below:
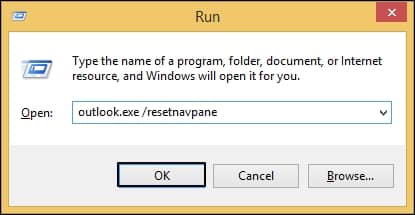
- Close all the windows of Outlook running on your system.
- Press Win + R and type outlook.exe /resetvpane in the command box. Click OK.
Method 2: Reset the Folder View settings
Resetting folder view settings may also help you to achieve the desired result. You can easily change the folder view settings with the following steps: Launch Microsoft Outlook in your system and navigate to Inbox folder.
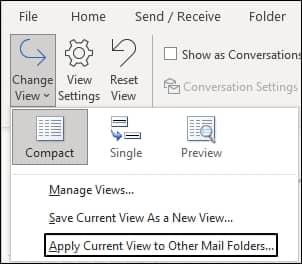
- Click on the View tab and click on Change View.
- Choose the needed View mode from the drop-down list.
- Click on Reset View in the View tab and check Yes in the dialogue box.
- Now, click on Change View in the View tab and choose Apply Current View to Other Mail Folders from the list.
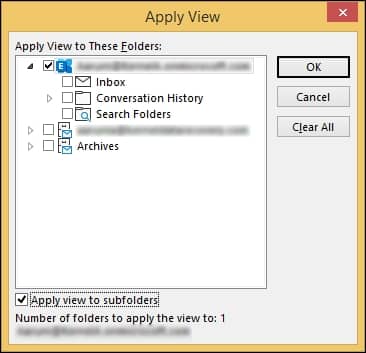
- In the Apply View dialogue box, check the box for Mailboxes and their subfolders.
- Check the box for Apply View to subfolders and click OK.
Method 3: Run Scanpst.exe
Microsoft offers a valuable free utility that can repair your Outlook data files so that you can use them again. Scanpst.exe, also known as the Inbox Repair Tool, is an inbuilt utility designed specially to fix and repair corrupt or damaged PST files. This tool by Microsoft is an excellent choice to repair minor corruption from your PST files. This tool can also help you recover your lost or corrupted data easily. Although, it can’t repair severely corrupted PST files that may cause problems for users, such as data loss.
Method 4: Try another Outlook version
This method can be helpful if your PST files aren’t compatible with your current Outlook version. So, to fix this issue, first, create a backup of the corrupted PST file. Then in another version of Outlook, create a new PST file and transfer all the data from the old PST file to the new one. Try opening the new file and see if this resolves your issue.
Method 5: Use an automated PST repair tool
If these manual methods didn’t help much in resolving your issue with the missing PST file’s subfolders in Outlook, consider using a professional third-party tool like Recoveryfix for Outlook PST Repair. This revolutionary tool allows you to repair severe corruption in your PST files efficiently while keeping the data hierarchy intact. This tool can also recover accidentally deleted mailbox data such as emails, calendars, tasks, contacts, etc. save them in multiple file formats.
Conclusion
This blog discusses the reasons behind the missing folder issue in Outlook and offers several ways to recover your subfolders. Although if you can’t access your subfolders due to corruption in PST file, we suggest you take the help of a professional tool like Recoveryfix for Outlook PST Repair. This tool easily repairs severely corrupted files while maintaining the hierarchy of your folders. This tool is also capable of recovering accidentally deleted items.