Microsoft Inbox Repair Tool – Get Complete Information

Updated On - May 12, 2026
- How to find SCANPST.EXE.
- Limitations of the SCANPST tool.
- How to use the Inbox Repair tool.
- How the Inbox Repair tool works.
- Fix SCANPST not working issues.
- SCANPST.EXE location in different Outlook versions.
Outlook issues can appear unexpectedly, and inaccessible PST files are one of the most frustrating situations. It disrupts your workflow, and all the important emails, contacts, and business data seem out of reach. Most users think that their data is permanently lost, but it is recoverable using the built-in Microsoft Outlook Inbox Repair Tool. Here, we will explore all the necessary information to recover data from damaged or corrupted PST files using the same utility.
What does the Inbox Repair tool do?
Scanpst.exe, commonly known as Inbox Repair tool, is a first-aid tool to diagnose and repair errors related to Outlook Data files.
- It analyses directory structure of Personal Folders (PST) file and item headers to recover PST folders and items.
- It validates and corrects errors in the internal data structure of the PST file.
- It creates a backup copy of the PST before attempting to repair it.
- It recovers PST files after repairing them to the possible extent.
- It tries to change any .pst file (even renamed files) to a mountable PST file.
Detailed Steps to Repair PST Files With SCANPST.EXE Utility
This section covers the detailed steps to fix PST file corruption issues. Follow each part carefully to get the desired results.
Part 1- Find the Location of PST Files
You can find PST file location easily using Outlook. Follow the steps below to find it:
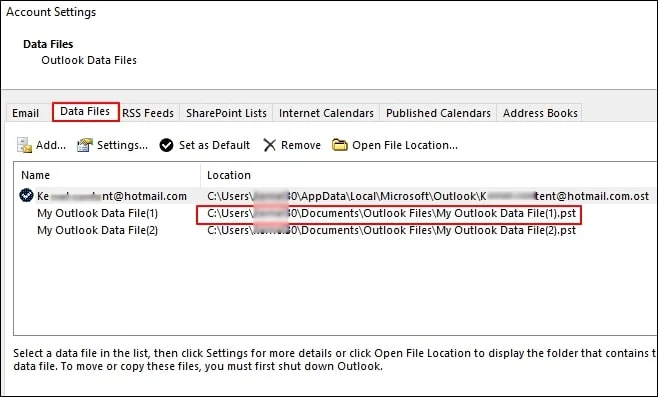
- Open Outlook 2010/2013 and click the File tab on the ribbon; click the Info tab on the menu.
- Click the Account Settings tab.
- Again click Account Settings.
- Click the Data Files tab and note the path of the PST file.
Part 2- Locate the Inbox Repair Tool
After figuring out where your PST file is now, look for the tool we need. Here are the default SCANPST.EXE file locations for different Outlook versions.
Outlook 2016 and later versions
\Program Files\Microsoft Office\root\office16 \Program Files(x86)\Microsoft Office\root\office16
Outlook 2013
\Program Files\Microsoft Office 15\root\office15 \Program Files(x86)\Microsoft Office 15\root\office15
Outlook 2010
\Program Files\Microsoft Office\Office14 - disk drive>\Program Files\Microsoft Office(x86)\Office14
Outlook 2007
\Program Files\Microsoft Office\Office12 \Program Files\Microsoft Office(x86)\Office12
Note: If you can’t find the location of SCANPST.EXE, then it may be hidden. To unhide it, enable Show hidden files and folders settings on your computer before searching for it (steps are given below).
- Go to Start and type Folder Options / Control Folders; click OK.
- Click the View tab
- Select Show hidden files and folders under Hidden files and folders, and click OK.
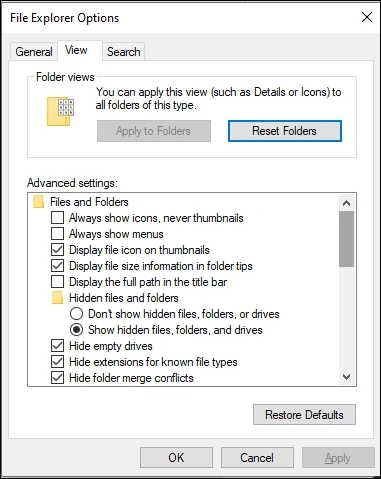
(For Vista, right click on Control Folders and click Run as administrator, double-click Folder Options)
For windows 10/11:
- Navigate to the folder where tool is present.
- Click the View tab from the menu ribbon.
- Check the Hidden items option and refresh the folder.
Part 3- Starting the File Repair Process
Before running the Inbox Repair tool, please exit Microsoft Outlook.
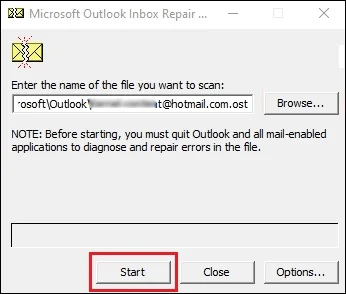
- Locate Scanpst.exe (Inbox Repair tool) and double-click it.
- Select the PST file using the Browse button (or you can enter the PST file name in Enter the name of the file you want to scan).
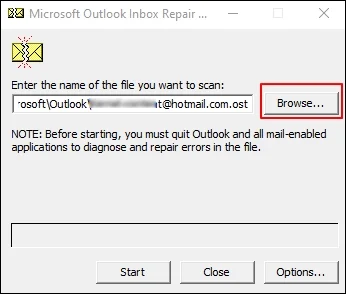
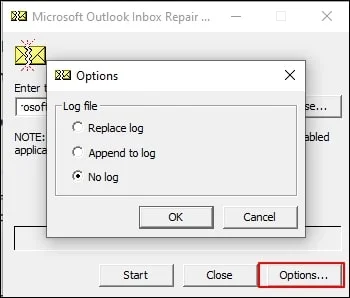
- Click Options and select specify the scan log option.
- Click Start.
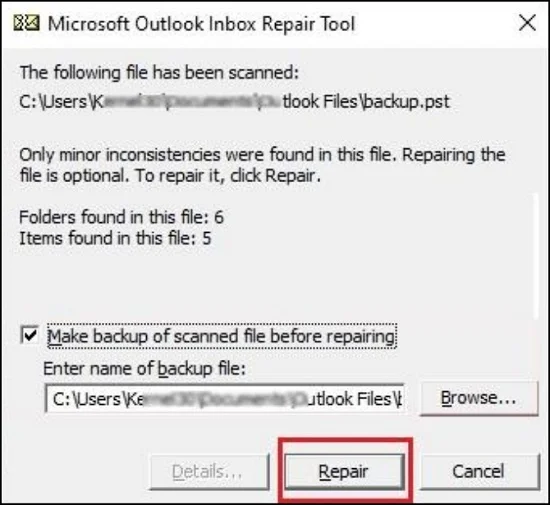
- Let the processing complete.

- If errors are found, click Repair.
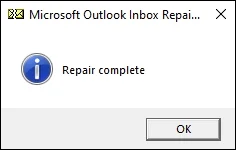
- Click OK to finish.
Note: You can change the name or location of the backup file created by the Inbox Repair tool (Use the Browse button to select the file or enter a new name in Enter the name of backup file box).
What To Do If Some Mailbox Folders Are Empty?
Sometimes the repaired PST file contains empty folders with no data. It mostly happens when the Inbox Repair tool, after repairing, cannot decide where to put some files. These files can be recovered from the ‘Lost & Found’ folder. The user can select and drag the files required.
How to Recover the Files from Lost & Found
To do so, the user must create a new Outlook profile and move the data from the repaired PST file to the new one. Follow the steps below:
- Create new Outlook profile
- For Outlook 2003 or 2007, PST file can be created using following steps:
- Open Outlook and click File.
- Select Data File management tab to open Account Settings, select Data Files, click Add.
- Specify name and location of the file. Click OK.
- To create new PST file in Outlook 2010 or later:
- Open Outlook and click the File tab on the ribbon; click the Info tab on the menu.
- Click the Account Settings tab. Again, click Account Settings.
- Click Data Files tab. Click Add
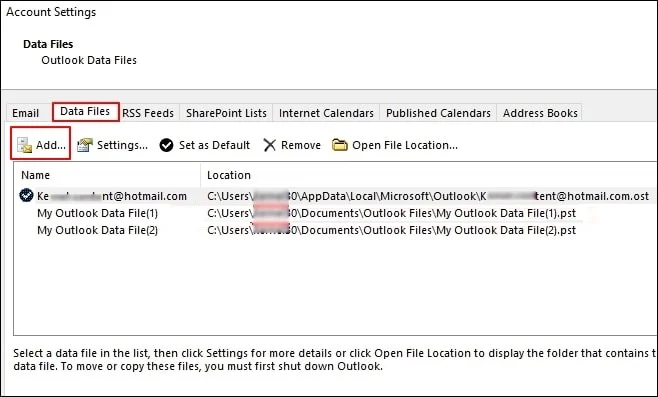
- Enter a file name when the Create or Open Outlook Data File dialogue box appears; click OK.
- Move the data
- Open the Outlook profile with repaired PST and the new Outlook profile simultaneously.
- Select the missing files from the Lost & Found folder. Folder would be available on the left pane, or you could press Ctrl + 6 to access it.
- Drag those files to the new Outlook profile.
- Users may delete the content of Lost & Folder post moving.
Limitations of Microsoft Outlook Inbox Repair Tool
The SCANPST.EXE tool is designed to fix minor file corruption, but it also comes with certain limitations. Here they are:
- Not able to repair severe PST file corruption.
- Limited capabilities to recover deleted emails.
- Requires multiple attempts to fix the file completely.
- Experiences performance issues with large PST files.
- Cannot recover the heavily damaged mailbox structure.
What to Do If Scanpst.exe Cannot Fix the Data Files?
If such a situation is met, then most probably your PST file is severely corrupted. Optimal solution for this will be using a professional recovery software Recoveryfix for Outlook PST Repair.
Advantages of Recoveryfix tool
- Uses advanced algorithms for data restoration.
- Deliver results with 100% data integrity.
- Require minimal technical expertise.
- Provides quick delivery of result
- User-friendly interface for less confusion.
- Can extract email from password-protected, compressed and encrypted PST files.
Ending Notes
Scanpst.exe is quite convenient when it comes to solving minor issues related to PST files. But the inbuilt tool has its limitations. If your PST file is severely corrupted, Inbox Repair tool will not be able to repair, and it will lead to data loss. For repairing files with severe corruption, you must use Recoveryfix for Outlook PST Repair. It ensures full data retention and offers user friendly interface for less confusion. It is optimized for handling recover data from a large corrupted PST file.
FAQs: Quick Answer Section
Q. How to Find SCANPST.EXE on Windows?
A. Here are the manual ways to locate the tool.
- Use the Windows Search functionality.
- Search the tool using Command Prompt.
- Access the Office installation directory in File Explorer.
Q. Why does SCANPST.EXE keep opening repeatedly?
A. It happens due to the following reasons:
- Faulty Outlook add-ins.
- Damaged Outlook profile.
- Incomplete repair process.
- Unresolved mailbox corruption.
Q. How can I fix the Inbox Repair Tool not working issues?
A. You can fix the SCANPST.EXE bot working issues with the following methods:
- Compact the size of PST files.
- Run SCANPST.EXE as Administrator.
- Repair the installed Microsoft Office program.
Q. The Inbox Repair Tool is not recognizing the file. Why is it happening?
A. The SCANPST.EXE tool fails to recognize the file due to:
- Outlook data file corruption.
- Incorrect file type or formatting.
- Exceeds the predetermined size limit.
- Using the older version of SCANPST.EXE.
- Special characters or a long name in the file path.