How to reduce Microsoft Exchange Server EDB file size

Published On - February 16, 2024
Microsoft Exchange Server is a service by Microsoft for managing email communications for large enterprises. It’s a high availability (HA) tool. It can easily handle the collaboration of various Microsoft apps like Calendar and Contact. An Exchange Server has one or more databases containing different user mailboxes. This database is known as EDB. With time, the exchange EDB file size may gradually increase, which may lead to degraded performance and a higher chance of data loss.
Why large EDB file size is not recommended?
- Reduce Server Performance: Server would take longer to load large EDB files, which will lead to slow access to emails and calendars.
- High Possibility of Data Loss: Larger EDB files are generally more prone to data corruption. Recovering emails from corrupted databases is very costly.
- Makes Backup & Recovery Difficult: It’s more accessible to backup files of smaller size. Thus, grown database files prove to be a challenge for Backup and recovery.
- Lessen Database Dismount Issues: Sometimes, a server may fail to allocate enough memory to mount the database if its size increases above a threshold limit. The Microsoft Exchange Server Standard Edition 2019, 2016 Standard Edition, and 2013 Standard Edition have a default database size limit of 1,024 gigabytes. However, there is no such limit for the Enterprise Edition.
How to Reduce the EDB file size?
- Delete unwanted data
- Offline Defragmentation
- Backup user data and delete mailbox.
Delete Unwanted Data
Search for any unwanted data items and delete them to decrease the file size. Over time, items like obsolete emails, duplicate files, and attachments that are no longer needed may have grown drastically. Removing them is the simplest way to shrink exchange data. It’s a good practice to make it a ritual to check the exchange data and clean it routinely. This would help in maintaining the database performance at its peak. To delete the data, users may use the Exchange Admin Center or Exchange Management Shell. Also, companies’ data cleaning policies must be followed to remove data safely.
Offline Defragmentation
Users can use the exchange eseutil tool to defragment the database and reduce the EDB file size.
Steps to use Eseutil
Run the exchange management shell. Then, do the following:
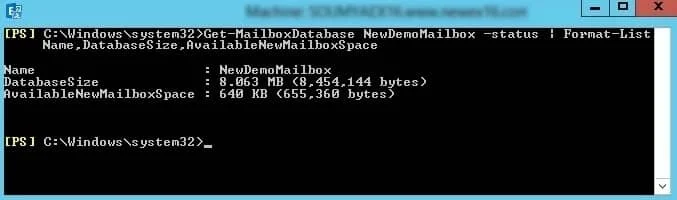
- First, Check available white space with the command.
- Then, use the following command to dismount the Exchange Server database
Dismount-Database DatabaseName.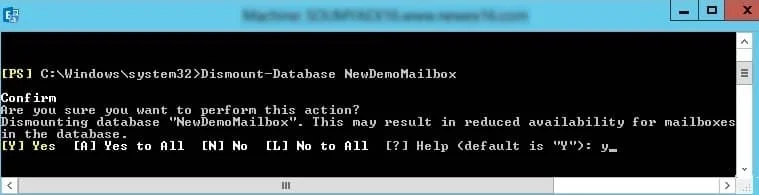
- Use the Eseutil command and Defragment the database. To run this command, you may have to navigate to the directory where you have installed the Exchange Server binaries or where the EDB file is.
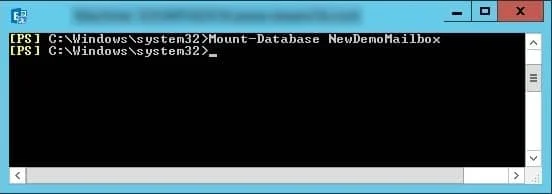
- ReMount the database
- You may rerun the white space command and check the success of the defragmentation
Get-MailboxDatabase DatabaseName -Status | Format-List Name,
DatabaseSize, AvailableNewMailboxSpace
Eseutil /d DatabaseName

Mount-Database DatabaseName
Backup user data and delete the mailbox
If neither of the solutions works for you, then you can back up the user’s mailboxes and delete the database. And then recover the mail data in the new database.
Methods to Backup Mailbox data
Using Windows Server Backup (WSB)
- Open Windows Server Backup.
- Select Local Backup.
- In the Actions pane, click Backup Once… to start the Backup Once Wizard.
- On the Backup Options page, select Different options, and then click Next.
- On the Select Backup Configuration page, select Custom, and then click Next.
- On the Select Items for Backup page, click Add Items, then select the volume(s) you want to back up, and then click OK.
- To exclude any files or file types from Backup, click Advanced Settings, then on the Exclusions tab, click Add Exclusion to add such files.
- Select “VSS full Backup” on the VSS Settings tab. Then, click OK and then Next.
- On the Specify Destination Type page, specify the location to store the Backup, and then click Next.
- Choosing Local drives will display Select Backup Destination page. To proceed, choose an option from the Backup destination dropdown and then click Next.
- Choosing Remote shared folder will display Specify remote folder page. Specify a Universal Naming Convention (UNC) path for the backup files and configure access control settings. To restrict access of Backup to a specific account choose Do not inherit. Provide the credentials of an account that has the necessary write permissions on the computer hosting the remote folder, and then click OK. Alternatively, you may choose Inherit for a Backup accessible by everyone having access to the remote folder. Click Next.
- On the Confirmation page, review the backup settings, and then click Backup.
- You can view the status and progress of the backup operation on the Backup Progress page.
- Leave the Backup Progress page by clicking Close. Backup will continue in the background.
Note: Choose volumes and not individual folders. Must select an entire volume to have an application-level backup or restore.
Using Exchange Admin Center (EAC)
- Log in to your Microsoft Exchange account, go to the Exchange Admin Center, and select Recipients, then, under it, click Mailboxes.
- Select the mailbox you want to extract with right-click.
- You will find an Export to PST wizard here. Select the mailbox to export by clicking the browse button and click Next.
- Choose a path to save the file, then click Next.
- Include other necessary features and make sure the option for managing mailbox emails is checked.
- Finally, click Finish.
Note: The user must have the Mailbox Import/Export permission assigned under the Organization Management to export data to PST.
Limitations of WSB and EAC
- WSB can only take full backups at the volume level, which means you must back up the entire volume containing the Exchange database and logs, not just the individual folders or files.
- Does not support the Exchange recovery database (RDB).
- No option to restore a single database or a single mailbox.
- Administrative permissions are required to export.
- The offline destination path must also have the necessary permissions.
- Sometimes, the export request may take hours or days.
Conclusion
Using the above-mentioned procedures will help in reducing EDB file size and restore server performance. However, these operations are complex, and skipping any step or getting anything wrong may lead to permanent data loss.
To avoid any such scenario, users can use our award-winning tool, Recoveryfix for Exchange Server Recovery. It’s user-friendly and can handle all the complicated tasks easily. It has no such limitations as the manual methods.