How to Migrate SiteGround Email to Exchange Online?

Published On - May 22, 2026
SiteGround is good for basic email communication, but it lacks advanced features that an organization needs. Migration sounds simple until you actually start doing it.
But, missing emails, authentication failures, folder mismatches, or mailbox sync issues stop users from migrating data. The hesitation increases when years of important client conversations are involved.
Therefore, the blog covers different methods to migrate SiteGround email to Exchange Online without facing major disruptions. Read now to understand, compare migrations, and avoid the most common migration mistakes.
Why Transfer SiteGround Email to Microsoft 365? – Know the Benefits
Here is the list of advantages that come with an Exchange Online account that drives SiteGround users to migrate their data.
- Larger mailbox storage.
- Better Outlook integration.
- Microsoft Teams compatibility.
- Shared calendars and contacts.
- Centralized dashboards for admins.
- Advanced email security and spam filtering.
- Access from any device with cloud accessibility.
Prerequisites: Know Before You Migrate SiteGround Email to Exchange Online
Keep the following ready for a smooth SiteGround to Office 365 migration.
|
SiteGround Requirements
|
|
Microsoft 365 Requirements
|
|
Recommended Preparation
|
Manual Methods to Migrate SiteGround Email to Exchange Online [2 Best Ways]
This section highlights the most appropriate solutions to move SiteGround accounts to Microsoft 365. Try them now and find the most suitable one.
Method 1. Use Exchange Admin Center (EAC) to Migrate Emails
Microsoft 365 supports the migration of emails from different IMAP services through the EAC portal. Here’s how to do the same:
Note: Remember, the method only migrates your emails from the SiteGround email.
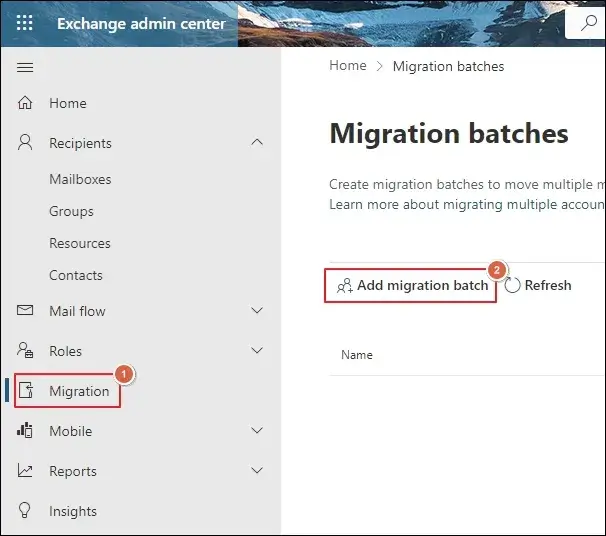
Step 1. Access the Exchange Admin Center > Migration > Add migration batch.
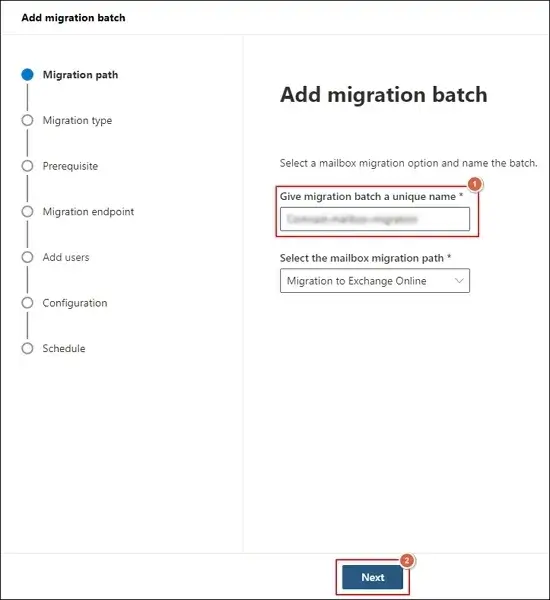
Step 2. Provide the migration batch name and hit Next.
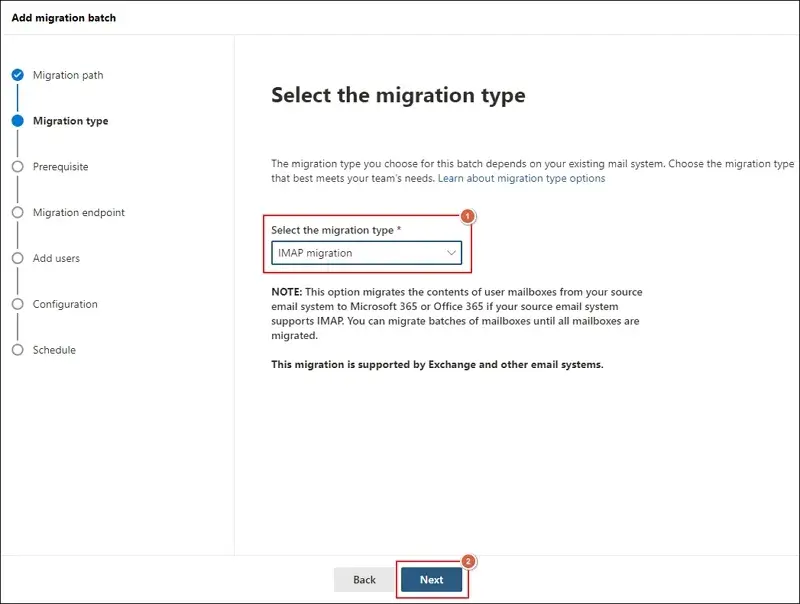
Step 3. Choose IMAP as the migration type and proceed to Next.
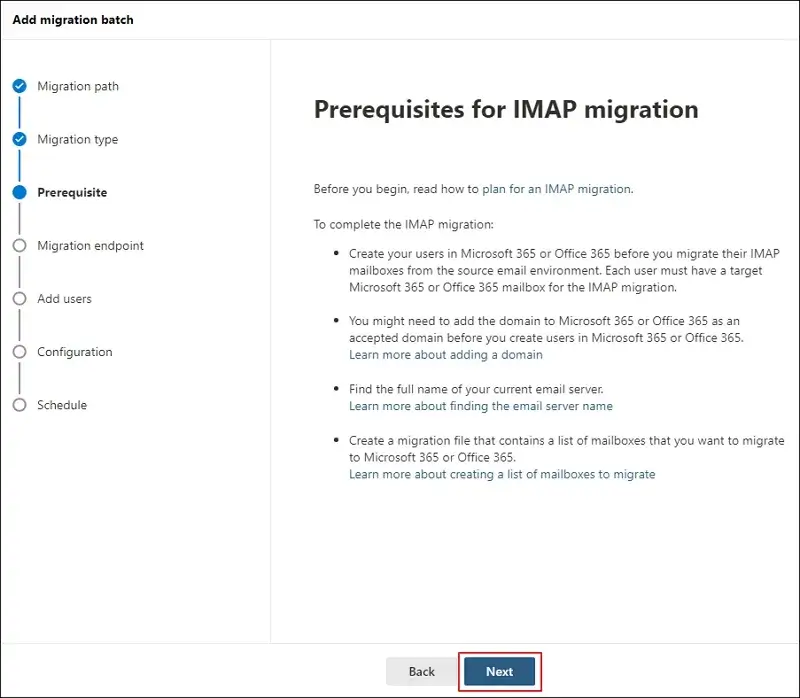
Step 4. Complete all the shown prerequisites before you click Next.
Step 5. Select a migration endpoint or create a new one to continue Next.

Step 6. Download a sample CSV file to map user mailboxes.
Step 7. Later, Import CSV file and hit Next.
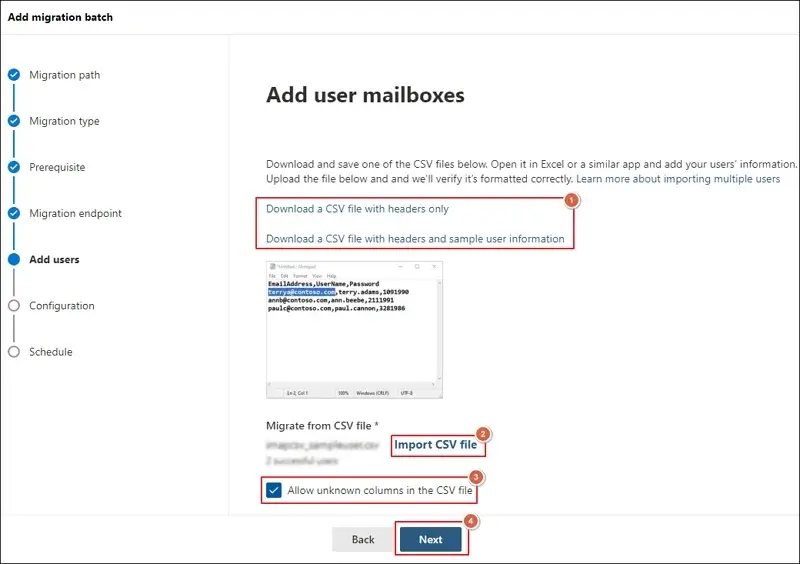
Step 8. Choose the necessary migration filtering options and proceed to Next. 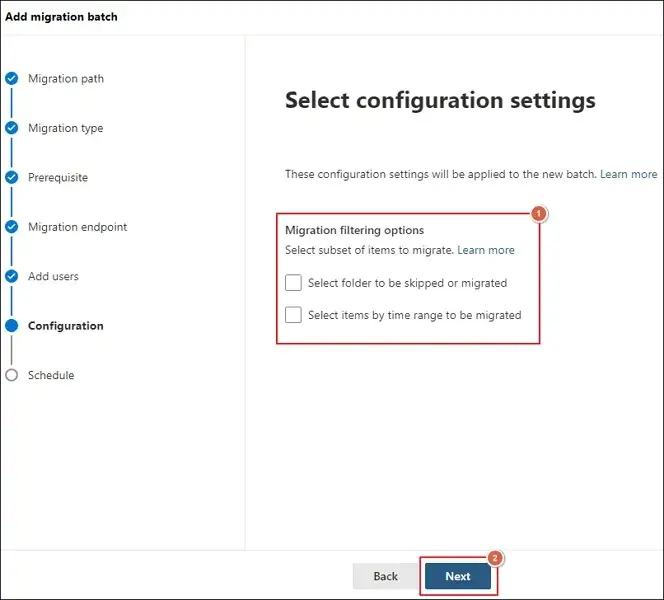
Step 9. Schedule batch migration and click Next.
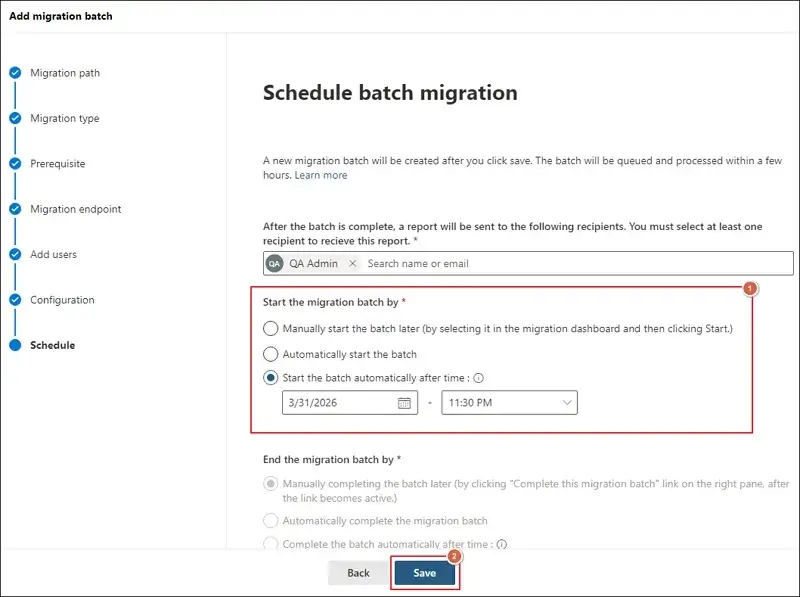
Step 10. Track status from the dashboard and Verify all emails after the completion of the migration process.
Method 2. Transfer SiteGround Email to Microsoft 365 Using Outlook
This method helps you to move complete mailbox data, along with contacts and calendars. Here are the detailed steps:
Section 1. Configure SiteGround Email In Outlook & Export Mailbox Data
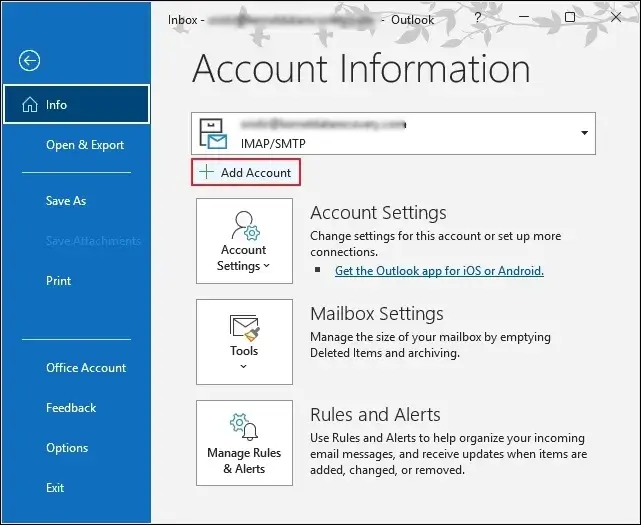
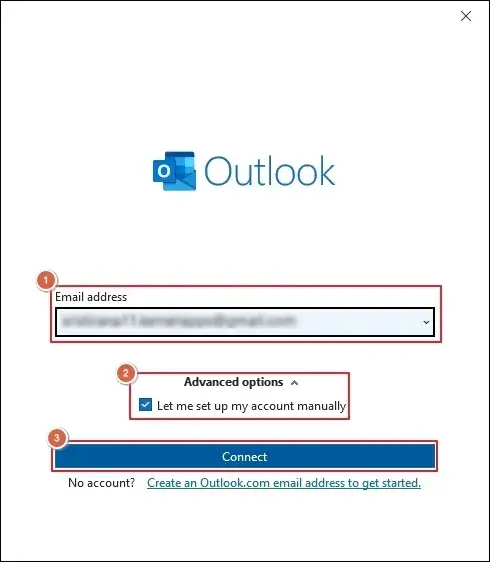
Step 1. Launch Outlook and tap on File > Add Account.
Step 2. Type your Email address and expand Advanced options.
Step 3. Tick the Let me set up my account manually option and proceed to Connect.
Step 4. Choose the IMAP account under Advanced setup. 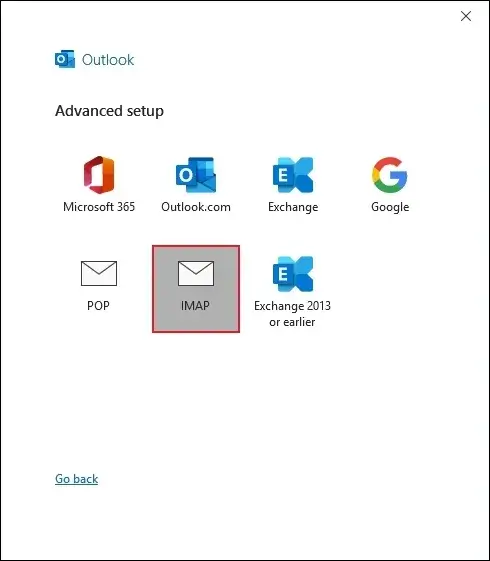
Step 5. Then, follow the on-screen instructions to complete the account addition process.
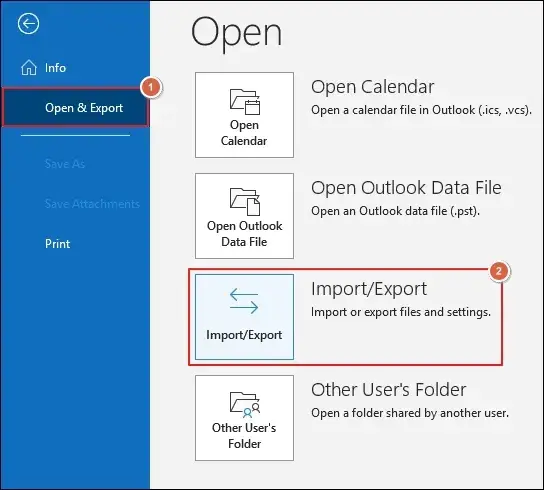
Step 6. Go to the Import/Export option to proceed.
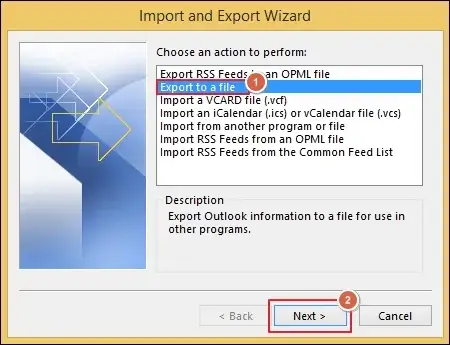
Step 7. Select Export to a file and tap Next.
Step 8. Choose Outlook Data File (.pst) and click Next.

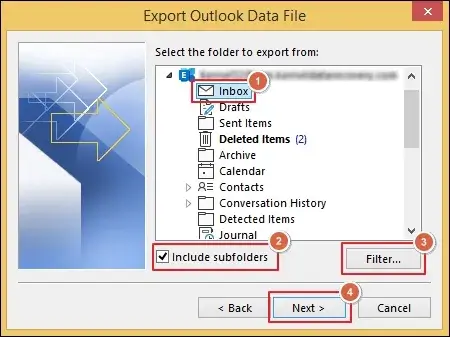
Step 9. Select the mailbox folder and check Include subfolders.
Step 10. Then, Apply filters and proceed to Next.
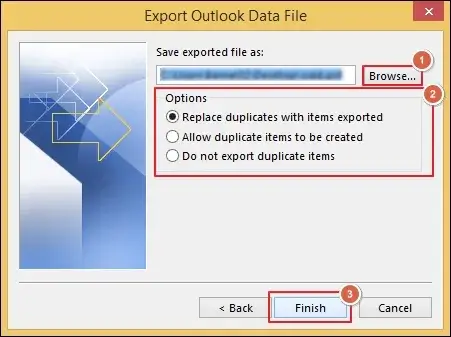
Step 11. Browse to choose the folder and select the appropriate Options.
Step 12. Then, click on Finish to proceed.
Section 2. Transfer SiteGround Email to Microsoft 365
Step 1. Use the SAS URL to download the AzCopy tool.
Step 2. Later, Upload PST files to Office 365 using the AzCopy tool.
Step 3. Once the completion is done, Check the uploaded PST files.
Step 4. Define the user mailboxes by creating the PST Import mapping file.
Step 5. Go to Microsoft 365 Import service and Start a new PST Import job.
Step 6. Check and filter out data from PST files to begin the PST Import job.
Step 7. This will upload all the PST files to the Exchange Online account.
Common SiteGround to Office 365 Migration Challenges
You may encounter several issues while migrating SiteGround emails.
- Email sync failures may skip mailbox content.
- Mailbox folder structure or hierarchy may change.
- Large datasets transfer slowly and take extra time.
- CSV mistakes or mapping errors can interrupt migration.
- Involvement of multiple steps makes the process difficult.
Need to Migrate Data Instantly? – Try the Automated Solution Now
Manual methods work in basic environments to migrate SiteGround to an Office 365 account. But the process becomes more complicated when you need to transfer multiple mailboxes. Therefore, relying on advanced solutions by Recoveryfix can be your best bet.
The IMAP to Office 365 software avoids all the constraints of native solutions and simplifies the entire process. It helps you migrate emails to Office 365 accounts without risking your precious data.
Final Thoughts
Here, we have covered all the necessary information to migrate SiteGround Email to Exchange Online. You can explore both manual and automated solutions to execute the complete process with step-by-step illustrations.
As per our analysis, you can use native solutions to transfer limited emails and opt for the automated tool for bulk migration. The software also helps you migrate data from Google Workspace to Microsoft 365 in a few clicks.
FAQs: Quick Answer Section
Q- Can I directly transfer SiteGround Email to Exchange Online?
A- Yes, Exchange Online supports IMAP migration for external mail platforms like SiteGround.
Q- Does IMAP migration help me to move contacts and calendars also?
A- No, IMAP transfers only emails from the source. You require separate migration methods (Networks upload or automated solution) to transfer contacts and calendars.
Q- Can I migrate multiple SiteGround accounts at the same time?
A- Yes, you can migrate up to 20 mailboxes simultaneously using the IMAP migration.
Q- Is it necessary to change the MX records after the migration process?
A- Yes, you need to update MX records to receive new emails in your Exchange Online account.
Q- Can I continue working on my emails during the migration?
A- Yes, but you need to keep the old email environment active until the migration is completed.
