Migrate Gmail to Office 365: Best Guide of 2026

Updated On - April 10, 2026
Email platforms transition seems simple until you begin the process. I experienced this firsthand while helping a team move their communication system from Gmail to Office 365. It revealed several challenges, like a large mailbox took longer to transfer, folder structures need careful handling & no information should be missed or lost.
So, how I managed the process smoothly, the following article will completely illustrate it. Besides, you will get some additional info like reasons, prerequisites, challenges, and best practices to make you more familiar with the migration.
Reasons to migrate Gmail to Office 365: Clarity is Important
Here are some common reasons behind the Gmail to Office 365 migration:
- Integrated productivity tools: Get seamless integration with Teams, SharePoint, OneDrive, & Outlook that boost overall productivity.
- Advanced Security features: Offers threat protection, encryption, & data loss prevention to secure organizational email data.
- Better Microsoft ecosystem integration: Works smoothly with Windows, Active Directory, & other Microsoft business applications.
- Centralized administration: Admins can easily manage users, permissions, & policies from a single management console.
- Enhanced collaboration: Tools like Microsoft Teams improve communication, meetings, & file sharing across teams.
- Scalable for business growth: Organizations can quickly add users, storage, & services according to the increased needs.
Pre-requisites to migrate from Gmail to Office 365 successfully
Follow the provided guidelines to increase the migration success rate:
- Create user mailboxes in Office 365.
- Verify the domain in Microsoft 365.
- Enable IMAP access in Gmail settings.
- Ensure proper admin permissions for migration.
- Prepare a CSV file for mapping source & destination mailboxes.
- Generate an app password if two-factor authentication is enabled.
A Manual Way to Migrate Gmail to Office 365
The Gmail to Office 365 transfer process is crucial for any organization or individual; performing the process with utmost care becomes important for the user. So, follow the given steps very carefully to avoid any uncertainty in the result:
Step 1. Domain verification
It is necessary to verify to Microsoft 365 that you own the domain you used for your G Suite accounts. Without verifying the domain, migrating Gmail to Office 365 may be delayed.
Note: Using your companyname.onmicrosoft.com domain that is included with the Office 365 plan is considered the alternate option instead of your custom domain.
Step 2. Add users to Office 365
Office 365 provides you with a feature to add users, either one or several users at a time. While adding the users, you also need to assign the corresponding license to them.
Step 3. Create a list of Gmail mailboxes for migration
To execute the task, you need to create a migration file that contains Gmail mailbox lists for migration along with the corresponding app password of each email. A migration file can also be created through Excel. Let’s delve into the steps to accomplish the task:
- Login to the Google Workspace admin console with your administrator username & password and go to the Users option.
- Copy the user’s email address.
- Now, launch the Office 365 admin center & select Users > Active Users.
- Further, open the Excel application to fill in the entries as shown:
- Then, save the file in CSV format & close the Excel application.
Step 4. Establish a connection between Office 365 & Gmail
For successful migration, Office 365 needs to be connected with Gmail. So, for this concern, Office 365 uses a migration endpoint that establishes the connection between them for the migration. Follow the steps below to create a migration endpoint:
- Go to Migration in the Exchange admin center.
- Click on the Endpoints & go to the Add+ option to create a new migration endpoint.
- On the Add Endpoint page, choose IMAP as the migration type & fill in the appropriate information in the following fields, like Migration endpoint name, IMAP Server & leave the remaining information as the default settings. Finally, click on the Create option.
Step 5. Create a migration batch & initiate Gmail to Office 365 migration
The Migration batch contains the migration file that we have discussed in the previous steps. So, for creating the migration batch, follow the given steps carefully:
- Go to the Exchange admin center, tap on Migration, followed by the Add migration batch option.
- In the Add migration batch, give a unique name to the batch & select Migrate to Exchange Online as a migration path. Then, click on the Next option.
- Choose the IMAP migration as the migration type & click on the Next option on the Migration type page.
- In the next steps, click on the Next option after ensuring that you have completed all the prerequisites.
- Now, select a migration endpoint from the dropdown list in the Set a migration endpoint page & then click on the Next option.
- Now, in the Add user mailboxes page, upload the user information by clicking on the Import CSV file option, followed by the Next option.
- After selecting the suitable options, tap on the Next option in the Select configuration settings page.
- By selecting the appropriate options for efficiently managing the migration in the Schedule batch migration page, click on Save > Done options.
Note: You can check whether the migration worked or not by going to the Migration option in the Exchange admin center. If the status is Completed, then migrated successfully; otherwise, recheck the associated mailbox status for specific errors.
Step 6. Update your DNS records to route Gmail directly to Office 365
For delivering email, email systems use a DNS record called an MX record to figure out the location. While in the migration process, usually, your MX record was pointing to your Gmail system. But to complete the migration process, it is needed to point your MX record to Office 365.
Follow the given steps to update the DNS record:
- Login to Office 365 with your work or school account.
- Tap on the Setup followed by the Domains option.
- Choose your domain & then select Fix issues.
- Choose What do I fix? for each DNS record type & follow the corresponding instructions to add the records.
- You will see a message that your domain is set up correctly (No action is required) once you add all the records.
Note: Wait for around 72 hours since your partner or customers take this much time to recognize the changed MX record.
This way, you can execute the Gmail to Microsoft 365 migration process completely.
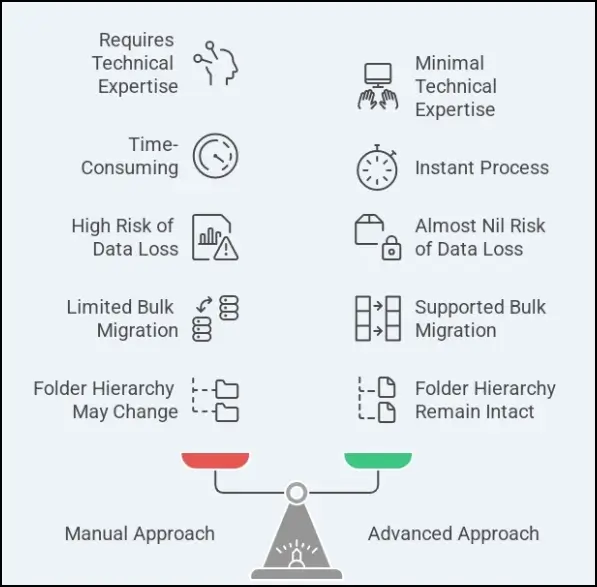
Common Challenges to Migrate Gmail to Office 365 Manually
Check out the challenges that come with the manual approach:
- Synchronization errors due to incorrect IMAP settings.
- It will allow migration of emails only, not contacts, calendars, & rules.
- Large or batch Gmail migrations can face frequent delays or interruptions.
- Manual transfer can change the folder hierarchy or structure if not performed correctly.
Easiest way to transfer Gmail to Office 365 [Smart One]
After performing the manual method, you can access your migrated data in the Exchange component of the Office 365 platform. But due to its inherent limitations, it can be frustrating or challenging for crucial data. Also, doing IMAP migration manually doesn’t support the complete migration of its components, like calendars or contacts.
Hence, to avoid these limitations, it is always recommended to prefer an advanced solution. Recoveryfix is one name that always addresses users’ concerns with its innovative software, like IMAP to Office 365. Its intelligent algorithms & advanced features allow users to migrate complete Office 365 components easily with no data loss.
Top features of the IMAP to Office 365 Migration tool
- Easily transfer IMAP emails to Office 365, Hosted, or On-Premises Exchange Server.
- Supports different IMAP accounts for migration, like Yahoo, G Suite, AOL, Zoho, Amazon Workmail, Zimbra Mail, etc.
- Offers an incremental migration feature for updated data at the destination.
- Generates a final report of migration in CSV format to get the detailed analysis of the migration process.
- Apply innovative filters to get the desired data at the destination without data loss.
Best Practices to migrate from Gmail to Office 365 smoothly
The section will help you with the best practices that can reduce the chances of error or data loss during the migration:
- Perform a small migration before full deployment.
- Backup Gmail data before initiating the migration process.
- Informs the needed personnel or users of migration timelines.
- Schedule migration during non-working hours for constant verification.
- Verify migration data once you complete the Gmail to Office 365 migration.
Final words on Gmail to Office 365 Migration
Migrate Gmail to Office 365 by using the Microsoft-built-in approach. Implement the steps as provided in the write-up. Try to adapt the provided guidelines to reduce the chances of the error. Moreover, if you just need one way to make the whole migration instant, error-free, and simple, consider the suggested automated solution.
FAQs
Q. Can I continue using Gmail during the migration process?
A. Yes. Users can continue accessing Gmail during the migration. But final synchronization may be required after completion.
Q. What is the Gmail account type [either POP3 or IMAP]?
A. Gmail smoothly works with both account types. But by default, it works as IMAP for modern use.
