How to fix your Outlook PST file issues?

Updated On - May 8, 2024
The Personal Storage Table (PST) files are used for storing copies of messages, events, calendars, tasks, journals, and notes within MS Outlook as backup. But often, they suffer from corruption due to a variety of reasons like the failure of storage device, faulty network device, power failure, attack of malicious virus or other software, abnormal Outlook handling, exceeding the size of PST file, etc. Such adverse conditions result in loss of your important PST file data or inaccessibility of the same.
To fix such corruption issues in your PST an immediate solution is required. Abnormal PST files will disrupt the communication process of an organization. Such disruption can lead to financial as well as reputational loss.
Methods to fix PST file issues
In this section, we will understand two ways of recovering corrupt PST file. We will be using the Microsoft Inbox Repair tool and a professional 3rd party tool. MS tool is a bit complex and will require some technical expertise. The other method is straight forward and accessible.
Method 1. Using Inbox Repair tool (Scanpst.exe)
Microsoft offers a free inbuilt utility known as the Inbox Repair tool, which comes with the source files of Outlook when you install the application. The Inbox Repair tool scans the corrupt PST file for any possible errors and resolves it by resetting the data file structure and rebuilding the headers of Outlook items.
Note: Make sure you exit the Outlook before using Inbox Repair Tool.
Before using the Inbox Repair tool, you must locate the executable file of the tool (Scanpst.exe) in your C: drive. Typically, the file resides in the following locations in your C: drive.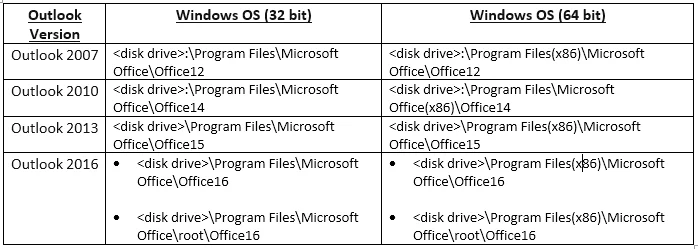
Note: For later Outlook versions like 2019 and Office 365, the tool’s location is same as Outlook 2016.
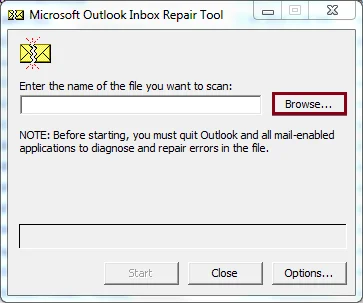
Once located, double-click the Scanpst.exe file to launch the Inbox Repair Tool.
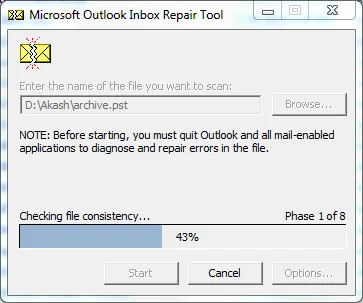
- Browse to navigate to the folder containing the corrupt or damaged PST file. Select the file and click Open.
- Click on the Start button to scan the file for all possible errors and corruption issues.
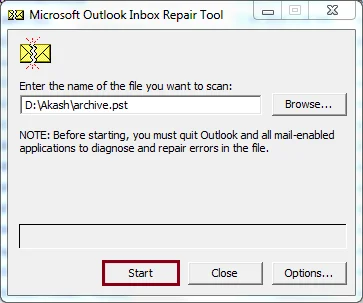
- Wait until the scan process is completed.
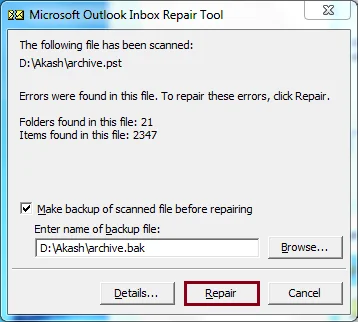
- Once the scan process gets completed, click on the Repair button.
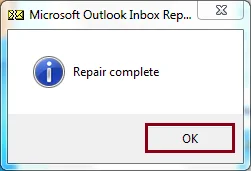
- Click OK to finish the process.
- Restart Outlook and try to access the profile that contains the .pst file that you tried to repair.
Functions of Inbox Repair tool (scanpst.exe):
- The scanpst.exe tool analyzes the Personal Folders (.pst) file directory structure and item headers for recovering all folders and items.
- The Scanpst.exe tool tries to turn any file into a Personal Folders (.pst) file. For example, if you rename an executable file to “Something.pst”, it will become a mountable .pst file.
- The Inbox Repair tool (scanpst.exe) makes a backup copy of any Personal Folders (.pst) file before you try to repair the file.
- Scanpst.exe utility typically validates and corrects errors in the internal data structures of a .pst file.
- If Scanpst.exe determines that a specific block of the structure or table is unreadable or corrupted, Scanpst.exe removes it.
Note: Sometimes, due to an unforeseen event, the Inbox Repair tool may not be able to perform or might become inoperable while scanning a PST file. In such a scenario, user can try certain troubleshoot methods mentioned below.
- Run the scanpst.exe file as administrator.
- Restart your PC and try again.
- Make sure you do not use the scanpst.exe file downloaded from external sources.
- Try repairing Outlook and try again. To do so, open Control Panel > Program and Features. Look for Microsoft Office. Double-click and perform repair.
Method 2. Using Recoveryfix for Outlook PST Repair
For an oversized or severely corrupted PST file, the optimal solution will be a professional tool Recoveryfix for Outlook PST Repair. It easily overcomes all the limitations of Inbox Repair tool.
To repair the PST file issue, please follow the step-by-step process:
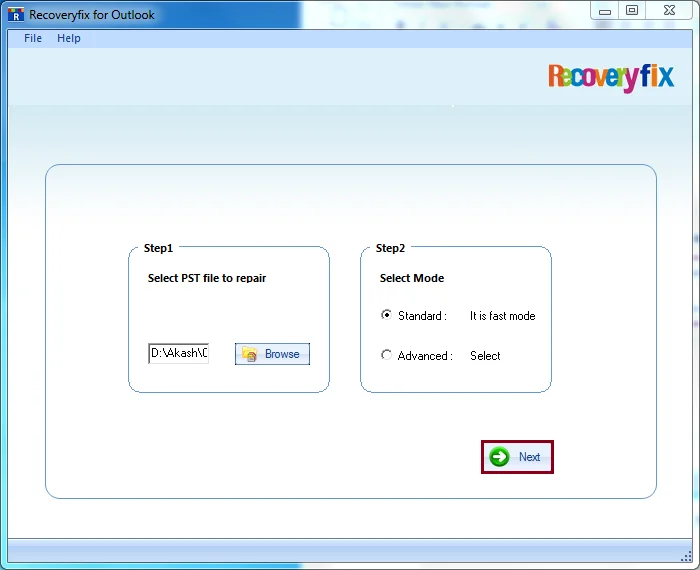
- Launch Recoveryfix for Outlook PST Repair on your PC.
- Specify the mode to scan and repair your file. Browse to locate the directory containing the corrupt PST file. Select the file and click Open. Then, click Next.
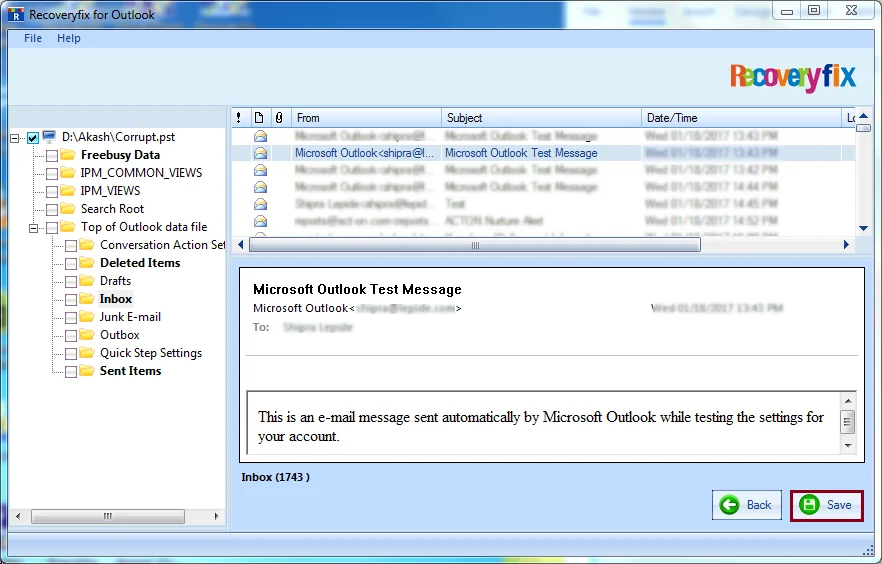
- The tool will process the file for all possible errors and corruption issues. The recovered items are displayed on the left-hand side pane. Select the required item and click on the Save button.
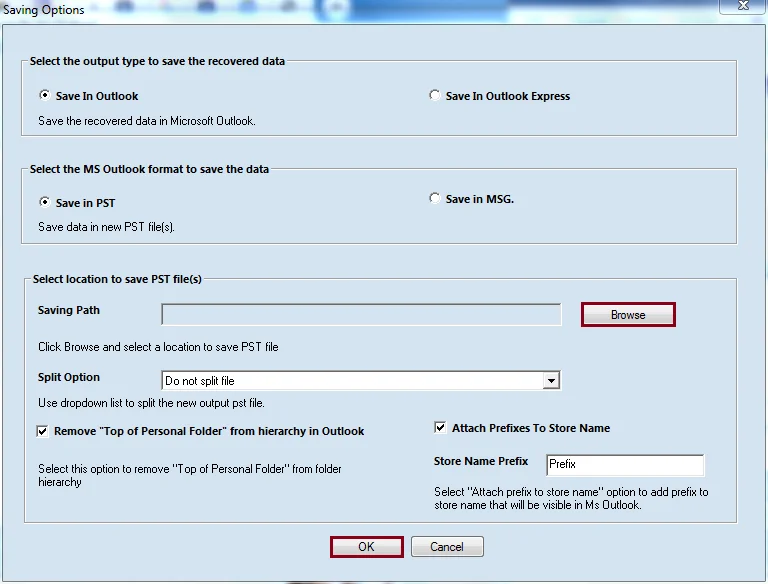
- In the Saving Options window, select the appropriate options to save your file. Once you have selected all the options, browse to provide a destination path to save the file and click OK.
- Wait until the tool processes the corrupt PST to fix the corruption issues.

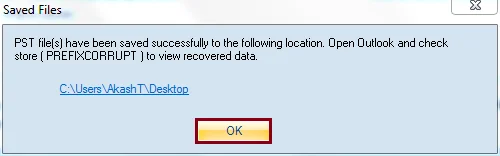
- The repaired PST gets saved to the specified location. Click OK to finish the repair process.
Advantages of Recoveryfix tool
- Uses advanced algorithms for data restoration.
- Deliver results with 100% data integrity.
- Require minimal technical expertise.
- Provides quick delivery of result.
- User-friendly interface for less confusion.
- Can extract email from password-protected, compressed and encrypted PST files.
Conclusion
You can choose any methods depending upon the degree of corruption. For minor issues, the Inbox Repair tool will be sufficient. But it provides temporary solutions that are not meant for severe corruption issues. In fact, you may have to perform several iterations of the recovery process to fix a single file. Also, Scanpst.exe deletes the corrupted data which will result in data loss. Therefore, for complete data restoration using a reliable tool like Recoveryfix for Outlook PST Repair is the best alternative.