Imagine you are working on important emails, but your Outlook crashes, and you can’t access them now. Frustrating, right? OST files are associated with Outlook and become useless if the account is deleted or corrupted.
But the good news is that you can convert OST to EML and regain access to your emails again. Here, we will explore why you need to perform the conversion and walk you through the best methods to convert emails safely.
What are the possible reasons to convert OST To EML?
Here are the possible reasons why users might need to perform OST to EML conversion.
- Convert OST files to EML format and access emails without the Outlook application.
- Recover important emails from orphaned OST files by converting them into EML format.
- Migrate emails to a different email client using the broad support of EML files.
- Backup emails for future use with EML files to store individual emails with attachments.
- Extract specific emails from Outlook instead of restoring an entire OST file using the EML file.
- Prevent OST file corruption originating from abrupt system shutdowns, crashes, or synchronization issues by keeping data in EML files.
- Share data through emails, cloud storage, or external drives in a universally accepted format.
- Legal & compliance requirements may drive users to convert emails into EML format for legal investigations, audits, or other purposes.
Best method to convert OST to EML: Step-by-step guide
Manually converting OST to EML can be time-consuming, complex, and risky, especially when the OST file is corrupted or orphaned. Therefore, advanced tools like Recoveryfix OST to PST Converter are needed to perform the conversion smoothly.
OST to PST Converter restores highly corrupted OST files while maintaining the email integrity and metadata intact throughout the process. The software quickly resolves OST file synchronization issues and other OST file-related errors.
Step-by-step process to convert OST to EML files with an advanced software
Go through the following steps to execute OST to EML conversion without any errors.
Step 1. Launch the software and Browse to select OST file. Then, choose Standard option as a Select Mode and click Next.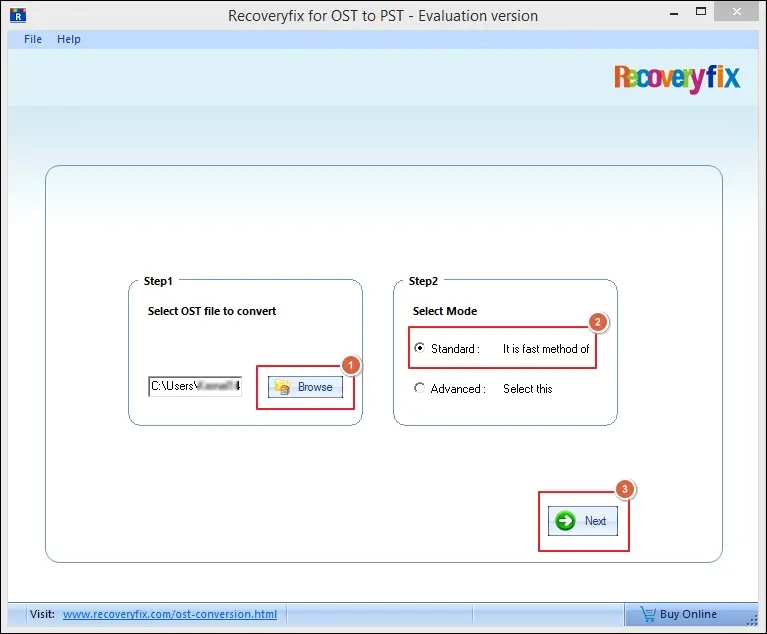
Note: Select the Advanced option if you have corrupted OST files.
Step 2. It will load the contents of OST file. Select the required folders and proceed to Save option.
Step 3. Choose Save in Outlook Express as an Output type. Then, tap on Save in EML, Browse to choose the saving path, and click OK.
Note: Uncheck the Remove IPM_SUBTREE from hierarchy in Outlook Express option if not needed.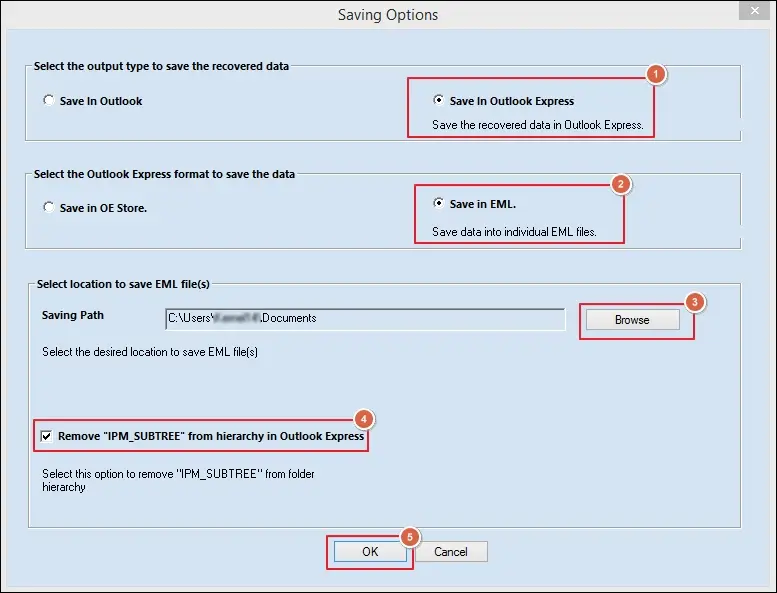
Step 4. It will begin saving your files in EML format.
Step 5. Once done, a pop-up message will appear on the screen along with the saving location. Click OK to end the process.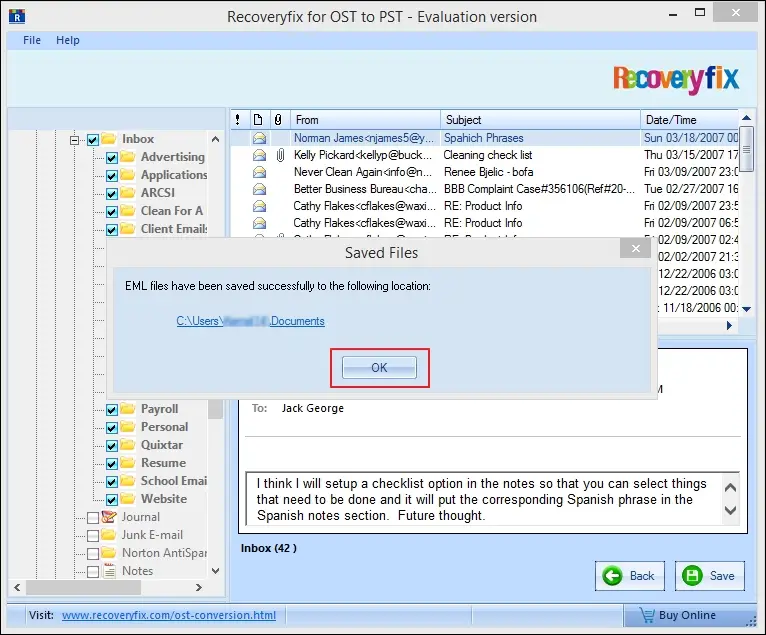
Step 6. You have successfully saved your files into EML format.
Avail Extra Benefits to Optimize Your Email Conversion Process!
Explore the additional features of the software to maximize your email conversion efficiency.
- Add single or multiple OST files to convert them into different formats.
- Offers Standard and Advanced scanning mode to repair and retrieve complete data from corrupted OST files.
- Restore deleted emails from OST files along with their attachments and metadata.
- Shows the detailed preview of the OST file's content, including attachments, tasks calendars, and contacts.
- Split the resultant PST file into smaller segments for better file management.
- Use filters and save data from OST files by selecting the specific folders that are suitable for you.
Conclusion
The blog has covered a detailed guide on how to convert OST to EML using an advanced solution. It is true that manual methods also exist, but they require time and technical expertise.
On the other hand, the recommended solution simplifies the entire process, even for non-technical users. So, why take any risks? Check out the free trial version and enjoy secure email conversion today.
Need Help? Check Out These FAQs!
Q1. What is the best solution to convert bulk OST files to EML format?
Ans. You have the option to use either manual or automated solutions to convert your OST files into EML files. But when it comes to bulk conversion, advanced solutions like Recoveryfix become the best options.
Q2. Do I have to install Outlook to convert OST files while using this software?
Ans.No, the software works independently to convert your OST files. Just add the OST file to the software and choose your desired format to execute the whole process.
Q3. How can I test the credibility of the software?
Ans.The software comes with a free trial version that allows you to convert 30 items per folder from an OST file. Download the software and test its credibility by yourself.
Q4. Can the tool repair my highly corrupted OST files?
Ans.Yes, the software is especially designed to repair highly corrupted OST files without any difficulties. So, you can rely on this software to restore your orphaned OST files instantly.