Top Ways to Fix AVI Index Error in VLC

Updated On - May 25, 2026
Issue: I first encountered the AVI indexing error while trying to play an old, archived video inside VLC media player.
What I Have Experienced: The video opened successfully at first, but after a few seconds, several playback problems started appearing unexpectedly. Fast forwarding stopped working properly, the timeline became unresponsive, & VLC displayed a warning related to a broken AVI index.
Since the AVI index plays an important role in helping media players to locate
- video frames
- audio streams
- playback timing information
- seeking references
If it is damaged or corrupted, AVI not playing in VLC problems can occur. Get along with the article to understand the concern & implement the right approaches to fix AVI index error in VLC.
The AVI file is divided into blocks or chunks, each identified by a FourCC tag. Each chunk is subdivided into 3 sub-chunks. The first sub-chunk is crucial and holds data like video codec, frame rate, audio format, etc. The second chunk contains the actual video and audio data. The third chunk contains the ‘idx1’ tag, which is optional and contains the info. regarding different timestamps of the video file.
The third sub-chunk helps the media player when the user wants to navigate to a specified timestamp in the video. Absence of this ‘idx1’ tag causes the AVI indexing error in VLC or any other media player, which interrupts the video playback.
Know the Common Symptoms of AVI Indexing Error
Look at the common symptoms of the AVI index problems. It will make you aware of the issue in advance.
- Playback freezes randomly.
- VLC can’t seek video properly.
- Video duration appears incorrect.
- Fast-forward & rewind stop working.
- VLC displays AVI index repair warning.
- Audio-video synchronization becomes inconsistent.
Common Factors Leading to AVI Indexing Error
Get a list of common reasons that can help you to resolve the AVI indexing issue.
- Interruption when downloading videos.
- The hard disk drive containing the AVI file is suffering from a bad sector.
- The transfer of the AVI file from one location to another terminated abruptly.
- Performing an edit or convert operation on an AVI file may introduce this issue.
- The media player accessing the AVI file is incompatible with the file format.
- Re-download the AVI file.
- Install & configure the required codec support.
- Allows VLC to rebuild the AVI index automatically.
- Update the VLC Media player to the newest version.
- Change the file extension to .mp4 or another compatible format.
Best Ways to Fix AVI Index Error in VLC
This section will list two methods to fix AVI files not playing in VLC. First, we will look at the VLC’s built-in method to solve the issue. Then, we will fix the AVI indexing error permanently with an advanced video recovery software.
Method 1. Using VLC’s Built-in Repair Approach
When VLC encounters this error, it will display the following message:
“VLC itself offers a temporary solution for the AVI indexing error. To play the video, select the Build index then play option. It will need a certain amount of time to build the index for the video, so wait patiently.”
To select an option every time you play a video is annoying, especially if you have multiple AVI files with the same indexing issue. To skip it, users can alter a preference setting in VLC using the following steps.
But make sure that this method will force VLC to automatically build the index of every file with an index issue, and will result in a delay in playing the video file.
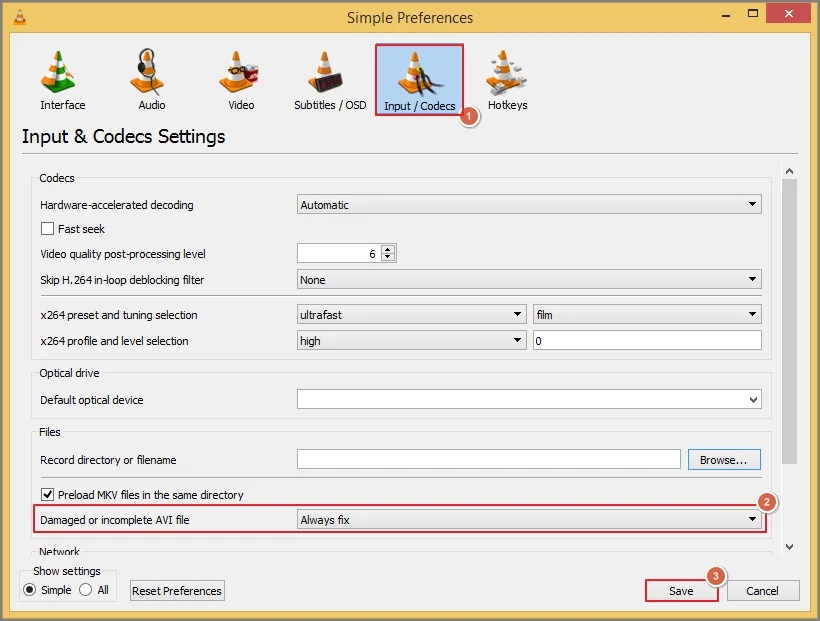
- Open VLC and press Ctrl + P to open the preference window.
- Click Input/Codecs and change the value for Damaged or incomplete AVI file from Ask for action to Always fix.
- Repeated VLC repair requests.
- Video stuttering continuously.
- Missing playback sections.
- Audio-video synchronization failure.
- Timeline navigation breakdown.
It is quite challenging to fix these concerns by using the manual methods. Hence, try the second one for easy error handling.
Method 2. Take the Help of an Automated Video Repair Tool
The above method is only a temporary fix and will only work if you use VLC media player. The AVI index error can persist in another media player. To implement a one-time solution, IT experts always recommend using the advanced solution over the manual ones as it offers quick & precise results.
Recoveryfix Video Repair is an advanced tool empowered by powerful algorithms to detect and repair corruption swiftly. You can easily fix the “AVI file won’t play in VLC” issue without losing its original structure. This video repair tool is best when it comes to repairing corrupt videos of any file format, like MP4, MOV, MPEG, AVI, etc., regardless of the file size
Key Features of an Advanced Software:
- Repair and restore damaged, broken, corrupt, or inaccessible files.
- Repair large files with the same efficiency as small ones.
- Support every video file format.
- Ability to repair files in bulk.
- Retain the original video quality.
- Compatible with all Windows versions.
Follow the steps below to repair the file with this automated software:
- Launch the tool on your system and click on Add File(s).
- Browse and select the corrupt videos and click Open. You can add multiple files in a single repair cycle
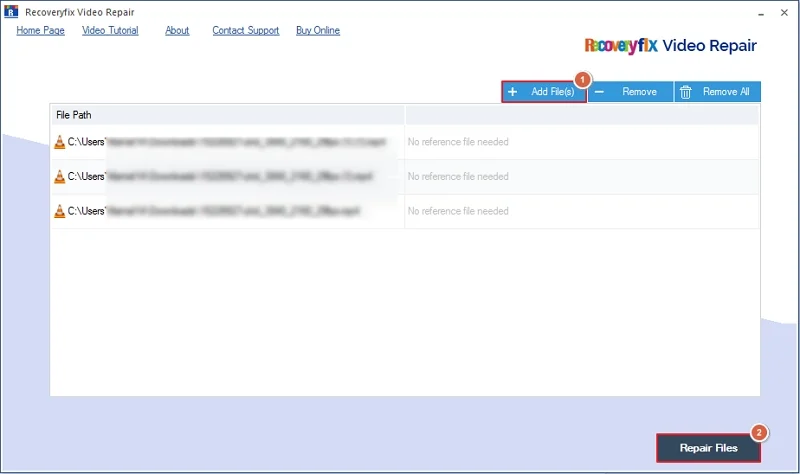
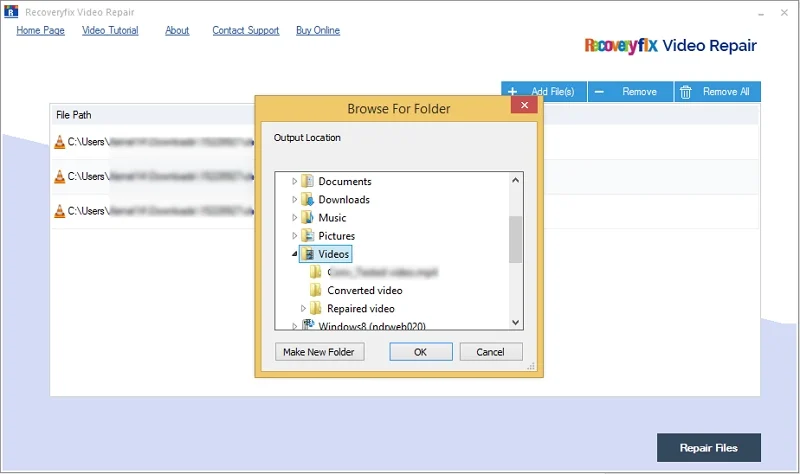
- Hit Repair Files & select a destination to save the repaired files. Click OK.
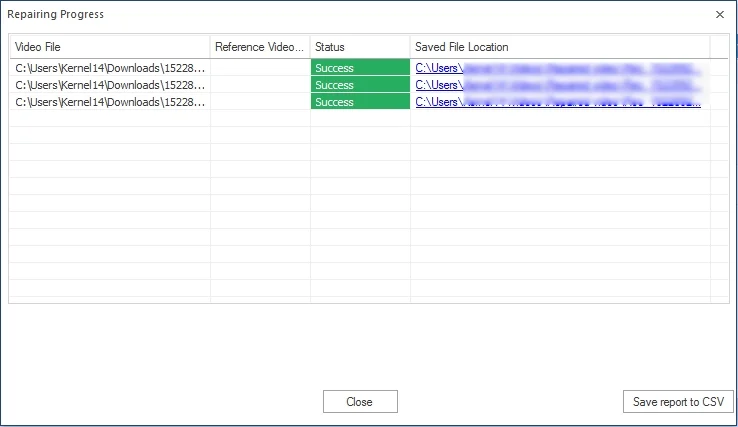
- Click Close to exit the tool’s interface; if you want to download a report to maintain a record of repaired files, click the Save report to CSV button.
Note: If the tool asks for a reference file, you can add videos of the same file format as the corrupted files.
Last Thoughts to Fix AVI Index Error in VLC
We hope you are well-through with all the steps to fix AVI not playing in VLC problems. To implement a one-time solution that provides consistent results with all media players & repairs the video corruption, go with the recommended smart tool. It is capable of repairing corrupt AVI files effectively and offers restoration of lost or deleted video files in any format.
FAQs:
Q- Why does VLC repeatedly ask to resolve the AVI indexing issue?
A- Repeated repair requests usually indicate incomplete indexing structures or deeper AVI file corruption.
Q- Is it possible to repair the AVI indexing error through VLC permanently?
A- VLC rebuilds indexing temporarily. For the permanent solution, check out the suggested automated solution.
Q- The video duration appears incorrectly in VLC. Why is it so?
A- Damaged AVI metadata or an indexing inconsistency can affect the playback duration calculation.