How to Remove Microsoft 365 From Your PC? – A Master Guide

Published On - March 26, 2026
Situations like application errors, version upgrades, or fresh installations often force organizations to uninstall Office 365 from PC. But improper removal steps can leave residual files, registry entries, or hidden services that may cause future installation issues.
The blog saves you from these problems by providing safe and effective methods for the complete Microsoft 365 removal process. Explore the practical approaches now to ensure no leftover data interferes with the system environment.
Why Do Users Need to Uninstall Office 365? – Listed Common Ones
There are several frequent situations where removing Microsoft 365 becomes necessary. Here they are:
- Need to reinstall the fresh copy.
- License or account conflicts occur.
- Switching to a different Office version.
- Persistent installation or update errors.
- System upgrades for system performance.
- Office applications are crashing or not responding.
Pre-Checklist: Things to Do Before You Uninstall Microsoft 365
Follow the listed important precautionary steps to avoid data loss or complications before you proceed:
- Backup important files or documents to a safe location.
- Close all the Office 365 applications before uninstalling it.
- Export the mailbox data into PST files for quick access in Outlook.
- Get the Administrator access or privileges to uninstall the program.
- Note down account credentials safely for future installation and access.
Top Methods to Uninstall Office 365 From PC [Manual Ones]
Check out this section to find the effective solutions from basic to advanced. Go through them now to identify the most appropriate one.
Way 1. Remove Microsoft 365 via Control Panel
A traditional yet more common way to uninstall any program from the Windows system. Here are the steps:
- Access Run wizard> type appwiz.cpl> hit Enter key.
- Locate Microsoft 365 under Programs and Features.
- Right-click on it and proceed to Uninstall.
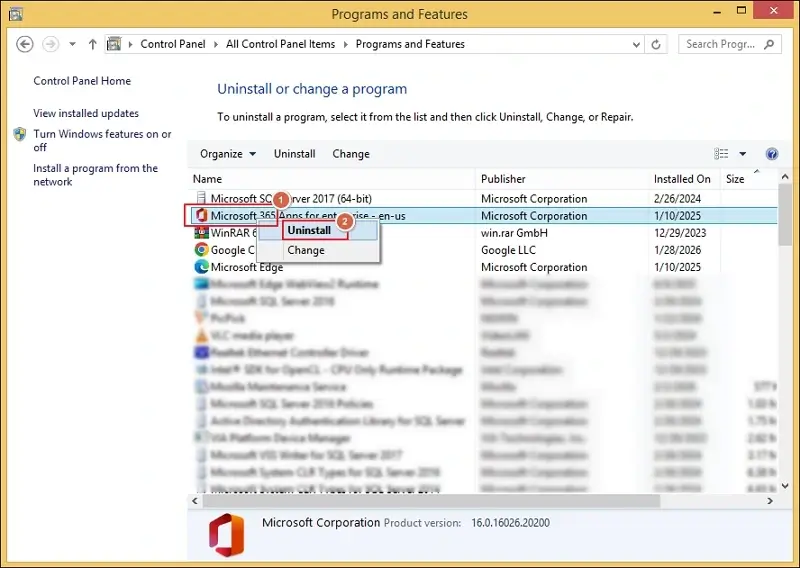
- Follow the on-screen instructions to complete the process.
- Restart the computer once it is done.
Way 2. Use Windows Settings to Uninstall Office
Follow the given instructions to uninstall Office 365 in Windows 11 and Windows 10.
- Go to Settings and navigate to Apps.
- Tap on Installed Apps and search for Microsoft 365.
- Click on three dots and select Uninstall.
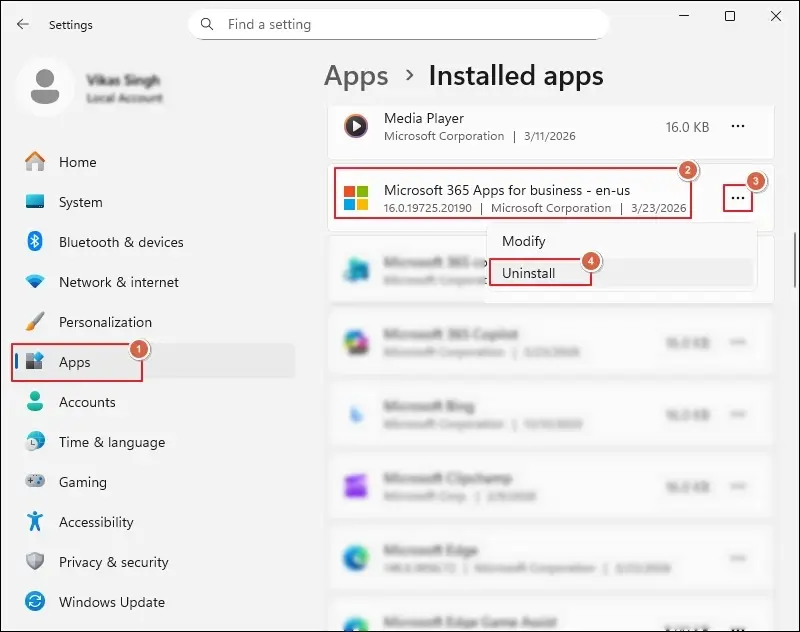
- Confirm the action to proceed.
- Reboot the system after completion.
Way 3. Try the Microsoft Office Removal Tool
You can use this method for the complete removal of Office 365 program. Here’s how:
- Download the Microsoft Support and Recovery Assistant (SaRA).
- Launch the SaRA tool and select Microsoft 365/Office 365.
- Choose the Uninstall option to proceed.
- Follow the prompts to complete the process.
- Restart the computer to save changes.
Note: The tool makes sure the removal of hidden files, registry entries, and leftover components.
Way 4. Uninstall Microsoft 365 Using Command Prompt
If you are an advanced user, then you can use the given steps to uninstall Office automatically.
- Open and Run Command Prompt as Administrator.
- Navigate to the Office installation directory.
- Execute the given command to uninstall:
- Remove all versions of Office 365
- Remove a specific Microsoft 365 version
SaRAcmd.exe -S OfficeScrubScenario -AcceptEula -OfficeVersion All
SaRAcmd.exe -S OfficeScrubScenario -AcceptEula -OfficeVersion 2016
- Wait for the process to complete.
- Restart the system to save the changes.
Way 5. Remove Office 365 via PowerShell
The given method is suitable for IT administrators of any organization to uninstall Microsoft 365 from PC. Here are the detailed steps:
- Run the PowerShell as Administrator.
- Execute the following command to remove Microsoft programs.
- Run the below command to verify whether the package is gone or not.
Get-AppxPackage -name “Microsoft.Office.Desktop” | Remove-AppxPackage
Get-AppxPackage -name “Microsoft.Office.Desktop”
Way 6. Delete Leftover Files Manually (Deep Cleanup)
Some files may remain even after the installation process is completed. Thus, execute the following steps for deep cleanup.
- Access File Explorer and delete folders from:
- Locate the provided location and delete the Office-related folders.
- Open Run wizard> type regedit> access Registry Editor.
- Find and delete all the Office-related keys carefully.
C:\Program Files\Microsoft Office
C:\Program Files (x86)\Microsoft Office
Important to Know: Perform the registry editing cautiously, as it can affect the system stability.
Way 7. Uninstall the Office 365 Program in Mac OS
Here are the complete steps to remove Microsoft 365 from Mac systems:
- Close all the Office applications if running.
- Access the Finder and go to Applications.
- Right-click on Office apps and proceed with the Move to Trash option.
- Remove hidden files by using these instructions:
- Press Command + Shift + G in Finder and type ~/Library/Containers.
- Delete folders starts with com.microsoft.
- Access the ~/Library/Containers and delete folders starts with UBF8T346G9
- Delete the Office icons from the dock and reboot the Mac system once it is completed.
- Right-click on the Trash and proceed with the Empty Trash option.
Note: You can directly drag and drop them to Trash.
Common Uninstallation Issues & Their Solutions
You can face different issues while uninstalling the Microsoft 365 program. So, find their quick solutions in the section below.
|
Problem |
Solutions |
|---|---|
|
Unable to install Office 365 program |
|
|
Error occured during the uninstallation |
Reboot your system and try again. |
|
Office apps still after uninstallation |
Cleanup leftover files and registry entries manually. |
|
Conflict arises after reinstalling |
Make sure the program was |
|
the program |
completely removed before reinstallation. |
Proven Tips for Safe Removal of Office 365 From Your PC
Here are the best practices that you must follow for a smooth uninstallation process:
- Don’t delete unrelated system files.
- Reinstall a clean setup if necessary.
- Maintain a backup of all the important data.
- Try to use the native tools whenever possible.
- Always restart your system after the removal process.
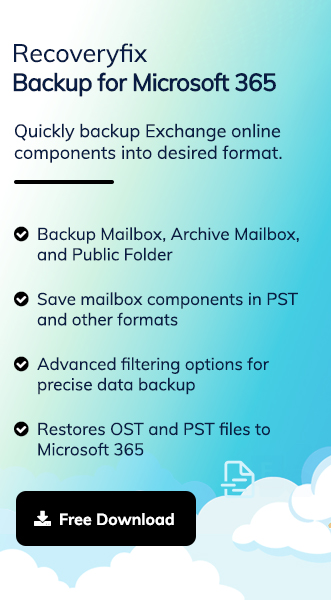
Need A Reliable Backup Solution? – Try the Professional Tool
Experts always recommend backing up crucial data for instant recovery in unusual scenarios. You can use the built-in Microsoft 365 Backup service or automated solutions like Recoveryfix. However, the native solution may require technical knowledge and impose certain limitations. On the other hand, our provided Office 365 Backup tool will be the best solution for both beginner and advanced users. It helps you to backup entire Exchange Online components in their original structure and hierarchy.
Wrap Up
The blog has covered the detailed solutions to uninstall Office 365 from PC. You can use them to remove the program completely from your system to avoid future issues. But, don’t forget to backup data before uninstalling it for easy data restoration. For this, you can choose the native or the recommended solution as per your convenience.
FAQs: Common Queries Answered
Q- How to confirm the complete removal of the Microsoft 365 program?
A- You can verify the following things to ensure no traces remain after uninstallation:
- Check the installed apps list.
- Search for the Office app using the Start menu.
- Confirm that all the Office folders are removed.
- Make sure that no Office process is running in the background.
Q- When should I reinstall the fresh copy of Office 365 in my system?
A- You may reinstall the program during the provided scenarios:
- Software errors are resolved.
- After the deep system cleanup.
- Switching between accounts or licenses.
- Installation of the newer version after the upgrade.
Q- Does the uninstallation of Microsoft 365 delete my files?
A- No, your personal files remain safe. But it is recommended to backup all the important files before uninstallation.
Q- What is the best way to completely remove Office 365 from PC?
A- The Microsoft Support and Recovery Assistant (SaRA) is the most reliable method to remove the Microsoft 365 program.