How to repair corrupt or damaged Outlook PST files?

Updated On - January 12, 2026
Being enriched with features like ease of use and enhanced security & productivity in one place, users prefer Microsoft Outlook over others for managing emails and contacts, organizing events, scheduling tasks, and keeping notes efficiently.
When Outlook is configured with a POP account, it creates the PST file to store all mailbox content. Its easy accessibility and shareability make this file format the first choice for storing their mailbox content.
However, for various reasons, these PST files can experience corruption. Under such a scenario, immediate and reliable solutions are crucial to implement. In this regard, this blog will help you identify the symptoms of having this issue, the common reasons & provide possible practical solutions to repair Outlook PST file.
Symptoms of unusual file condition
To identify the root causes of the specific problem, one needs to point out the corresponding symptoms that indicate issues with the file. So, let’s discuss some major ones:
- Get the message that Outlook can’t open your data file while accessing.
- Get the notification that Outlook can’t access the folders.
- Not able to send or receive new emails.
- The PST file is missing from its predicted location.
- The PST file size shows zero KB.
Common reasons of PST corruption in Outlook
Outlook Data File (PST) is vulnerable to corruption due to various reasons, but the significant one is described below:
- PST size limitation errors.
- Exceeding storage space
- Sudden termination of the Outlook program.
- Faulty hardware or software.
- Hard drive corruption or error.
- Incompatible add-ins or extensions.
- Virus or malware attacks.
Understanding these issues might help to avoid Outlook PST file corruption in future. But circumstances may arise at times, and you might face corruption, so let’s discuss how to deal with it.
How can you identify whether PST files have an issue or not?
However, before delving into the discussion of ways to repair PST file, it is necessary to validate whether the problem is with the PST file or the Outlook application. So, to validate this, you can run Outlook in safe mode, which disables additional add-ins, extensions & custom settings & helps you to identify the root cause. Here are the steps that you can follow to execute the operation:
- Close the Outlook application & open the Run window by pressing the Windows + R key.
- Type Outlook.exe /safe & click on the OK option to run the Outlook in safe mode.
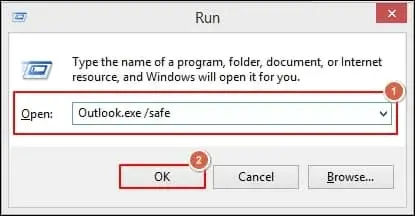
If you find that you can access your emails easily, it’s a sign that the issue is not with the PST files, but with your application. This realization puts you in control, allowing you to focus on fixing the application. If emails are not accessible, then follow the given methods to repair corrupt PST file.
How to repair PST file?
As per the symptoms & reasons for having this issue, we have entitled certain practical solutions that will help you to repair damaged PST files significantly. So, follow them with utmost care to get the desired output.
Method 1. Use the Inbox Repair tool (Scanpst.exe)
Scanpst.exe is an inbuilt PST repair tool by Microsoft Outlook. It helps users to diagnose the minor errors in the file & repairs them accordingly. It can be easily searched and accessed in your system by following the given paths as per your Outlook versions:
Follow the steps given below to run the Inbox Repair tool to repair corrupt PST file:
| Location of the Inbox Repair tool (Scanpst.exe) | ||
| Windows 32 bit | Windows 64 bit | |
|---|---|---|
|
Outlook 2016/2019/Office 365 |
C:\Program Files\Microsoft Office\root\Office16 |
C:\Program Files(x86)\Microsoft Office\root\office16 |
|
Outlook 2013 |
C:\Program Files\Microsoft Office 15\root\office15 |
C:\Program Files(x86)\Microsoft Office 15\root\office15 |
|
Outlook 2010 |
C:\Program Files\Microsoft Office\Office14 |
C:\Program Files\Microsoft Office(x86)\Office14 |
|
Outlook 2007 |
C:\Program Files\Microsoft Office\Office12 |
C:\Program Files(x86)\Microsoft Office\Office12 |
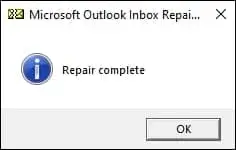
- Locate and open the Scanpst.exe utility
- Browse the corrupt PST file location. Click Start and wait till the process is finished.
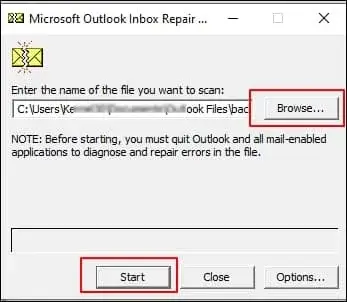
- It will show you the analysis report of your PST file. If the error is found, then click on the Repair option. You can check the checkbox for a backup and specify a location for it.
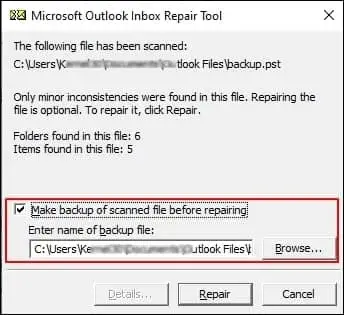
- Click OK to complete the repair process.
Method 2. Create a new PST file
If some folders are empty after the repair, those files can be found in Outlook’s Lost & Found folder. After repairing the PST file with Scanpst.exe, every recovered file and folder might be available in the Lost & Found folder in folder pane. Users can create a new PST file and drag the folders from the folder to the new file.
- Open Outlook, then, click File > Account Settings > Account Settings.
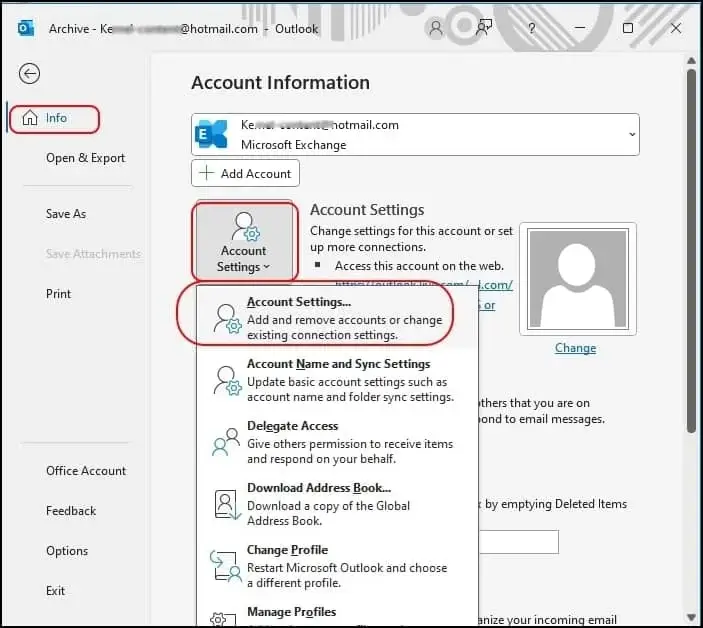
- Select the Data Files tab. Click Add.
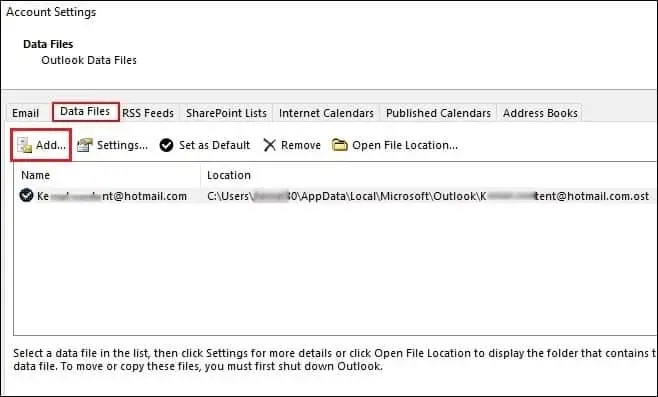
- Click OK to generate new PST file.
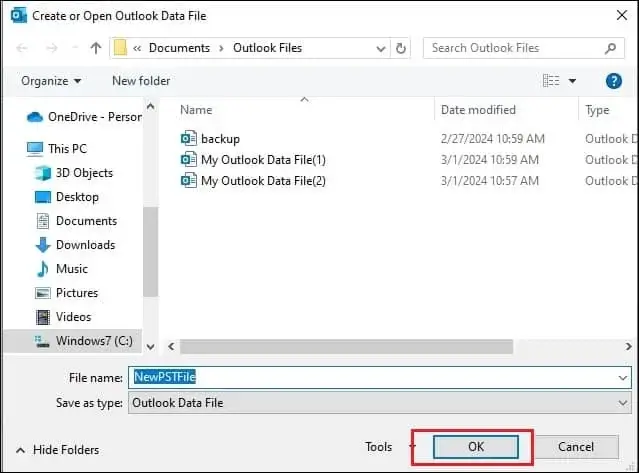
- Select the files from the Lost & Found folders on the desktop, which will save them in the .msg format, and drag them into the new PST file (available on left pane).
Method 3. Using the backup(.bak) file to recover items
Sometimes, files are missing, even from the Lost & Found folder. In this scenario, users can restore these files from the PST backup file created after using the Inbox Repair tool and then import them into the Outlook application using the Import/Export feature.
- Locate the backup file. It would be a file with a .bak extension and available at the same location specified in method 1.
- Copy and paste it in another location. Change the pasted file extension from .bak to .pst.
Note: If you can’t view the extension, click View in the folder window menu. Check the File name extensions option.
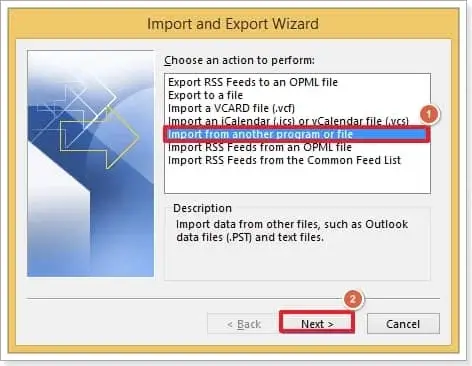
- Open Outlook, click Files > Open & Export > Import/Export.

- Select Import from another program or file. Click Next.
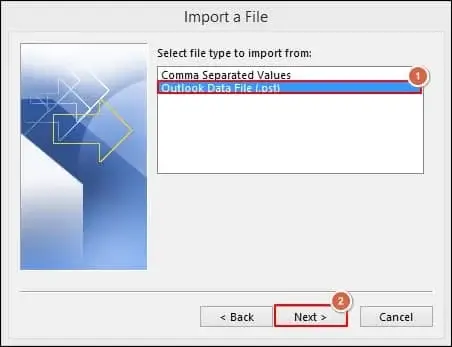
- Select Outlook Data File(.pst). Click Next.
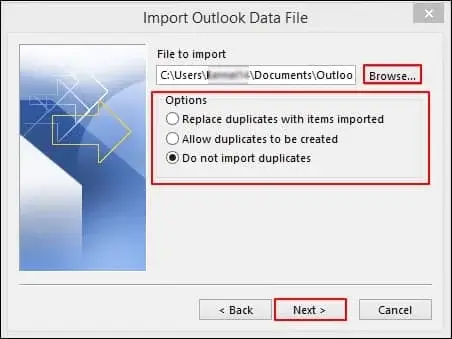
- Browse the newly created PST file. Select Do not import duplicates. Click Next.
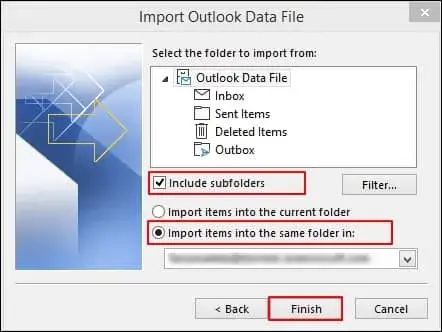
- Check Include subfolders. Select Import folders into the same folder option. Choose an account & click on the Finish option to start importing process.
Why do experts recommend automated tools over manual methods?
The above-mentioned methods will help you with minor issues only. Also, you might have to repeat methods like Scanpst.exe multiple times to recover corrupt Outlook PST files, however 100% data restoration might not be possible with the manual methods. Therefore, large PST files with severe issues will require a professional tool like Recoveryfix for Outlook PST Repair. Here are some significant features that make the tool user-friendly or handy:
Features of the PST Repair Tool:
- It uses an advanced algorithm to recover 100% of data with complete integrity.
- It features a user-friendly user interface for accessibility.
- Optimised to provide quick and reliable results.
Steps to recover corrupt or damaged Outlook PST files are as follows:
- Launch Recoveryfix Outlook PST Repair tool.
- Click Browse to select corrupt or damaged PST file, select Standard mode as the file recovery mode.
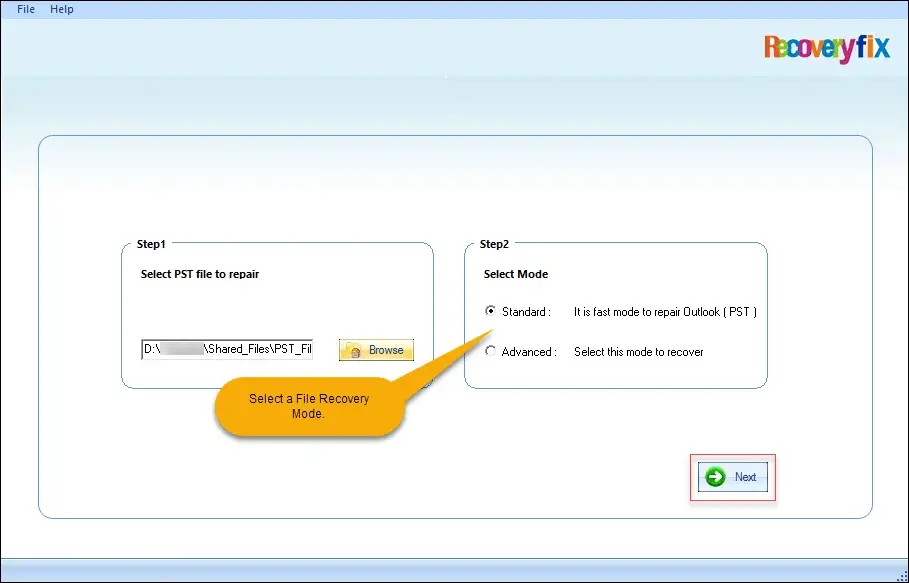
Note: For badly corrupt or damaged Outlook PST File(s), choose Advanced Mode and click Next.
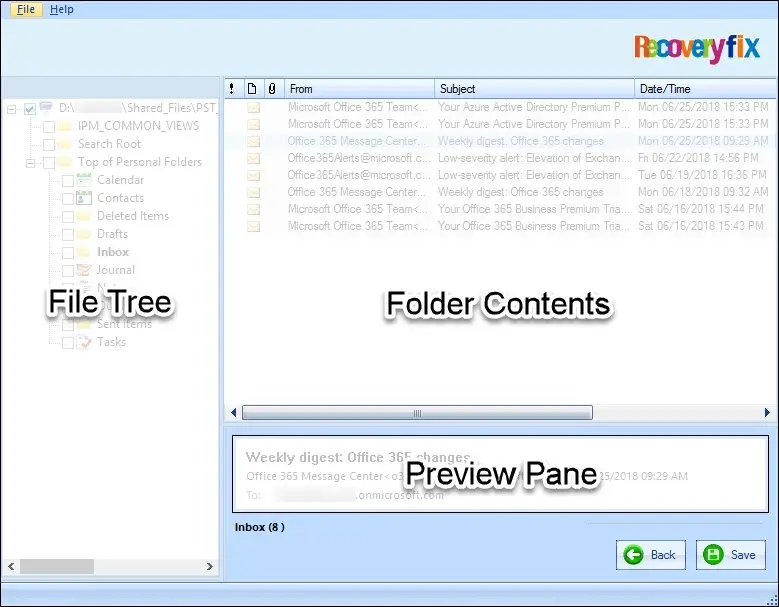
- Upon PST file scan completion, all the mailbox info will pop on-screen in distinct sections:
File Tree: In this section, all the parent folders are arranged in a tree structure.
Folder Content: This area displays what’s inside of each folder.
Preview Pane: By clicking on the mail item or attachment, a preview will be shown in this section.
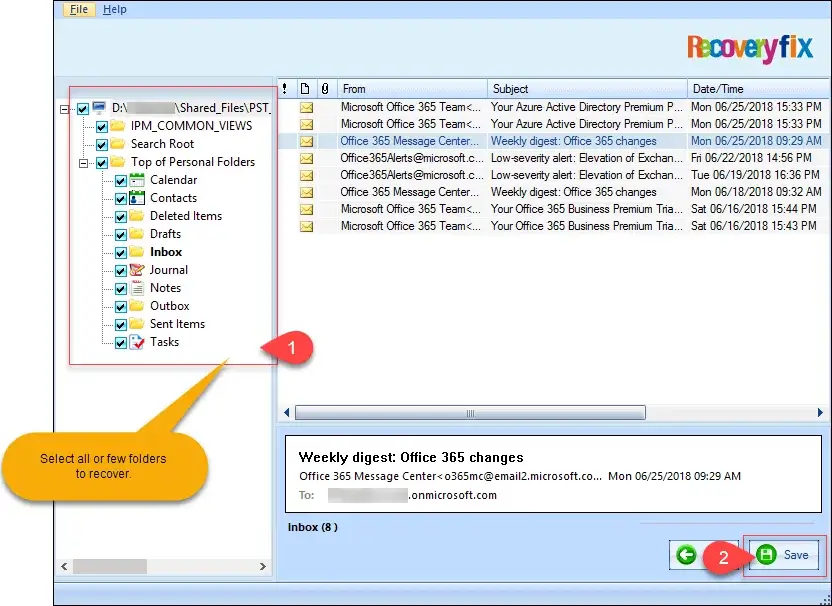
- Checkmark all or some specific folders (1) you want to recover and click Save (2).
- Select Save in Outlook (1) and select Save in PST (2). Browse file saving location (3) and click Ok (4).
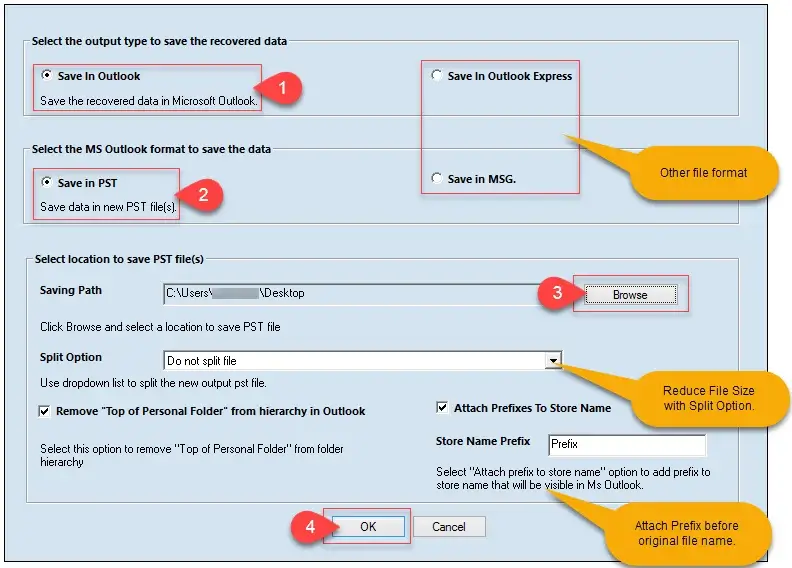
Note: Here, you can save the file in MSG format. Also, you can save the file in Outlook Express format.
- Wait for the process to complete.
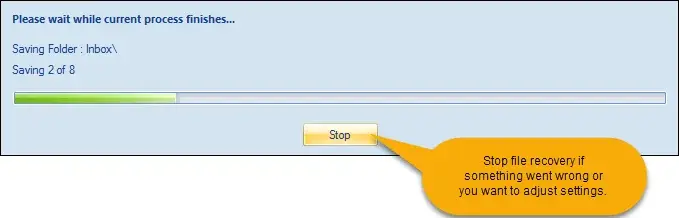
Note: If something goes wrong or you want to adjust some settings before final PST file recovery, click Stop.
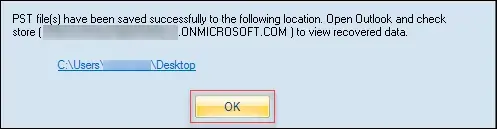
- In this way, you can repair corrupt PST file & recovered its content successfully; click Ok.
Conclusion
PST files with minor issues can be repaired with the manual methods discussed above. In case those methods fail, users can go with the automated advanced method. To restore data or repair corrupt PST file of any size, experts recommend using Recoveryfix for Outlook PST Repair. It provides a swift and accessible procedure to export data with 100% integrity and data retention safely.
FAQs
Q-1 What are the causes behind the corruption of my PST files?
A- Here are the most common reasons that corrupt the PST file:
- Malware or virus attacks.
- Issues with the storage drives.
- Abrupt system or Outlook shutdown.
- Large PST files exceed the limit.
Q-2 My PST file is corrupted. What are the immediate steps I need to perform?
A- You have to close the Outlook application. After that, use the Inbox Repair tool to diagnose and fix the PST file errors.
Q-3 I am not able to find the ScanPST.exe tool. What’s the default location?
A- The location of the Inbox Repair tool depends on the Outlook version. It is usually available in the Microsoft Office installation folder.
Q-4 Where can I find the corrupted items of my PST file?
A- You can find the corrupted items in the “Lost & Found” folder of the Outlook application.