Migrate Kerio to Microsoft 365: Latest 2025 Guide!

Published On - December 5, 2025
Kerio Connect is one of the most popular legacy platforms for team collaboration. But, it lacks advanced capabilities like improved security, anytime accessibility, and scalability that modern cloud solutions like Microsoft 365 offers. Thus, users are planning to migrate Kerio to Microsoft 365 for better email features.
However, migration challenges or risk of losing emails, contacts, or user permissions worries them. If you are facing the same situation, then read this guide to get the practical solutions with detailed procedures for complete migration.
Why Migrate Kerio Mail to Microsoft 365? – Reasons Explained!
Here is the list of features that motivate users for migrating emails from Kerio to Microsoft 365.
- All-in-one Ecosystem with Outlook, Teams, OneDrive, and SharePoint provide better collaboration.
- Advanced Security features like MFA, threat protection, and advanced compliance tools
- Better Mailbox & Cloud Storage compared limited capacity of Kerio Connect.
- Reliable and Stable Uptime with globally distributed cloud-infrastructure of Microsoft.
- Superior Cross-device Syncing across Windows, MacOS, Android, and iOS.
- Regular Updates and Dedicated Customer Support are the added benefits of Microsoft platform.
Pre-Migration Checklist: Essential Steps You Can’t Skip!
Prepare for the Kerio Mail to Microsoft 365 migration by using the given checklist to avoid potential errors.
- Stable internet connectivity: Make sure you have a good connection to avoid upload failures.
- Analyze Mailbox Size: Review the mailbox size and plan the batch or one-time migration accordingly.
- Active Microsoft 365 tenant: Ready the Exchange account by assigning the necessary permissions and licenses
- Kerio & Microsoft 365 Account Access: Keep the administrator access of both Kerio and Microsoft accounts ready.
- Enable Export Permission in Kerio: It is necessary to enable the required permission to backup mailboxes smoothly.
- Map the User Mailboxes: List down all the user mailboxes and map the source and destination user mailboxes correctly.
How to Migrate Kerio Mail to Microsoft 365 Manually?
We have found only these two methods working after trying several native approaches. You can use them to identify the most appropriate one for yourself.
Solution 1. Migrate Emails via Microsoft’s IMAP Migration Facility
IMAP migration is one of the simplest methods to migrate mailboxes from different IMAP servers. Here’s how to use it:
Note: It only migrates emails from the IMAP server account. You won’t be able to move contacts, calendars, and other mailbox data with the help of this method.
Step 1: Enable IMAP Service in Kerio Connect
- Access the Kerio Connect admin console.
- Go to Accounts and click on Users.
- Verify the mailbox credentials for each user.
- Tap on Configuration and go to Services.
- Enable IMAP services if disabled.
Step 2: Prepare Microsoft 365 for IMAP Migration
Note: It is necessary to create a migration endpoint before using the given steps.
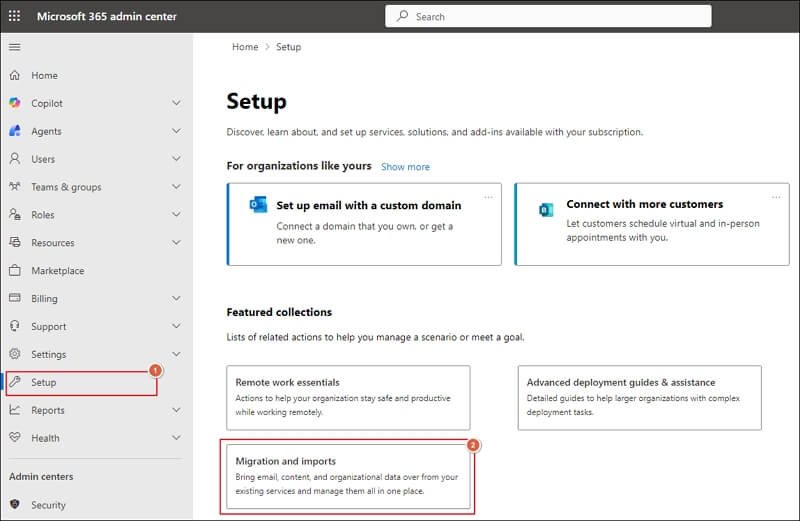
- Log in to Microsoft 365 admin center and go to Setup. Then, click on Migration and imports.
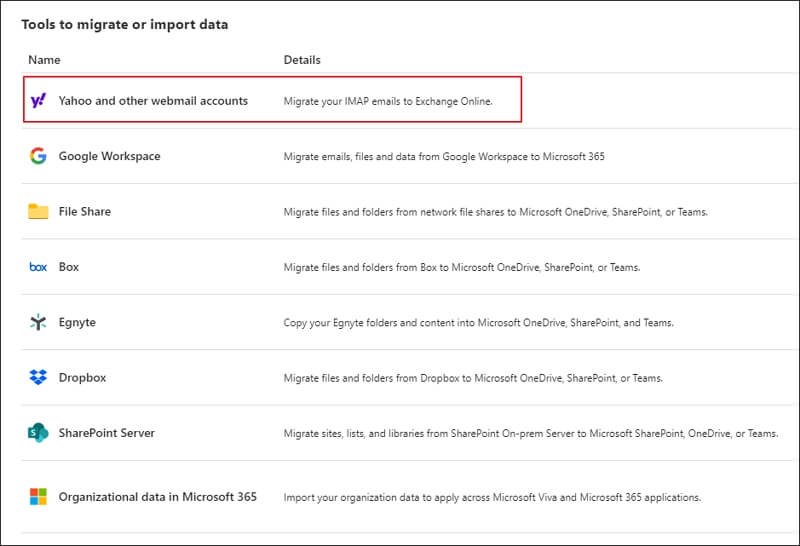
- Click on the Yahoo and other webmail accounts option.
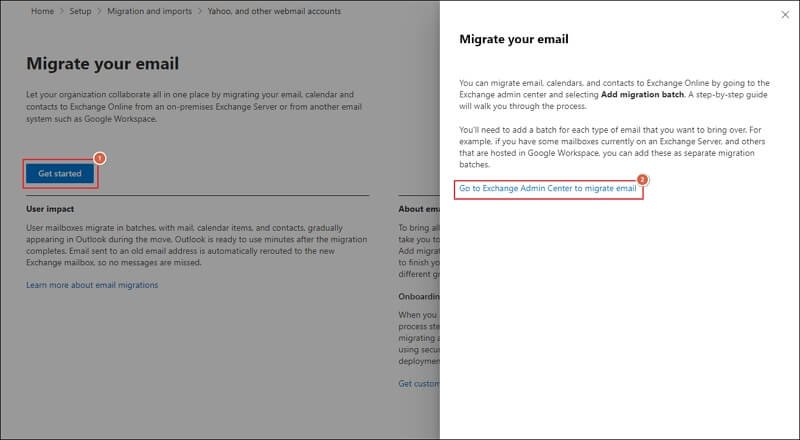
- Migrate your email by clicking on Get started. Then, go to Exchange Admin Center to migrate email.
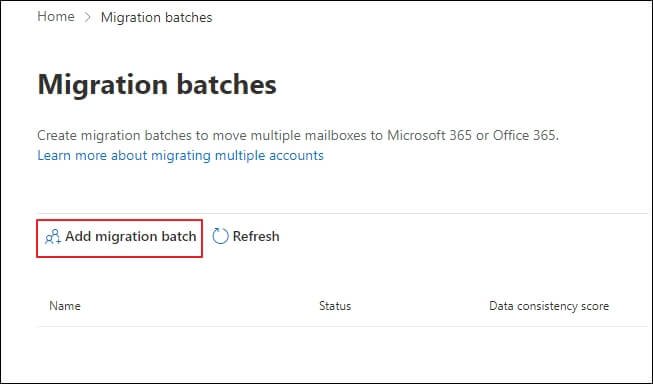
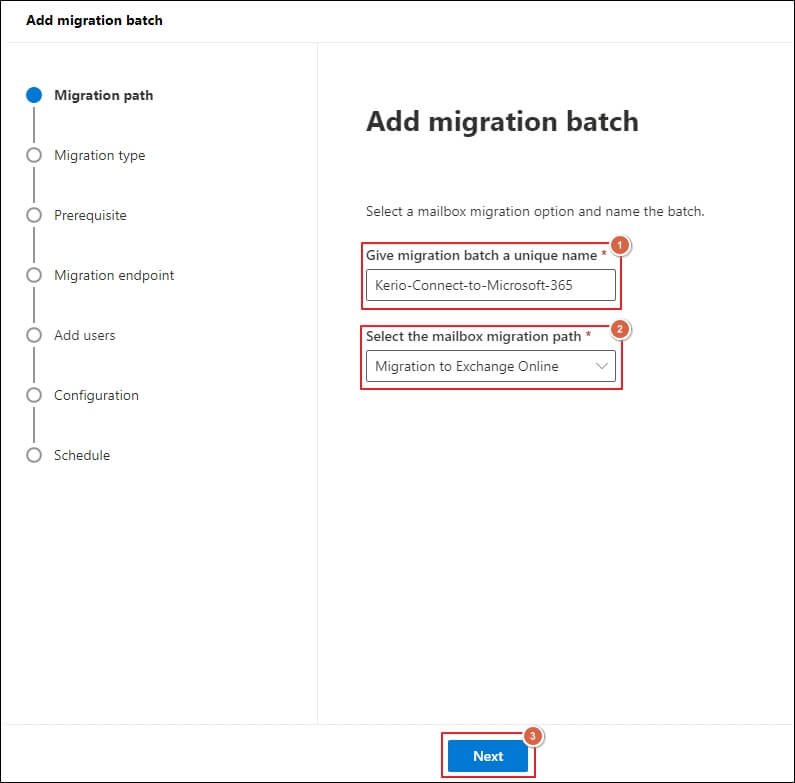
- Add migration batch to move multiple mailboxes.
- Provide the migration batch name and select the mailbox migration path. Then, click Next.
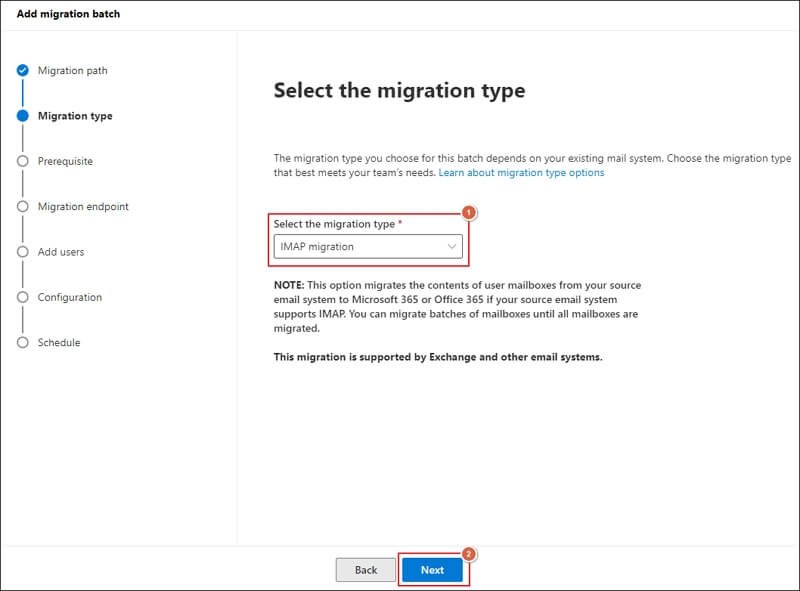
- Choose the IMAP migration and click Next.
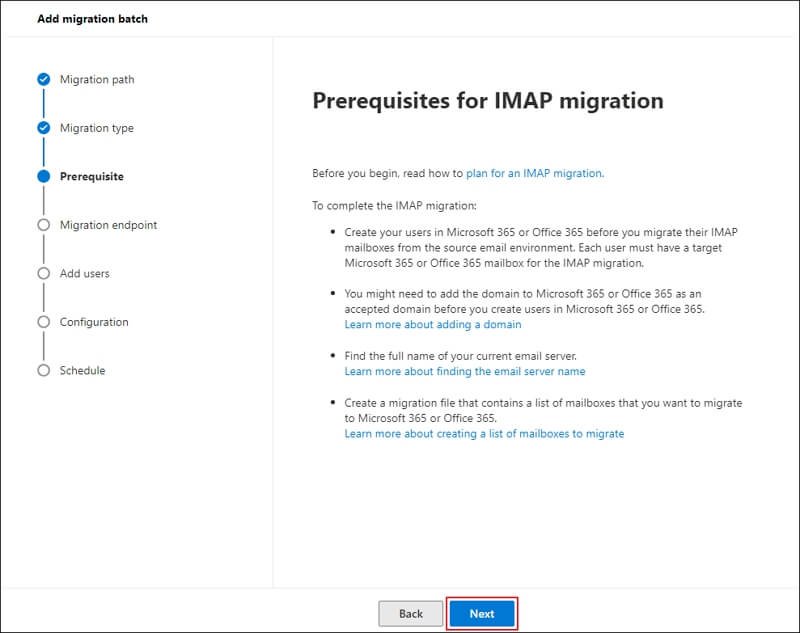
- Complete the Prerequisites for IMAP migration and proceed to Next.
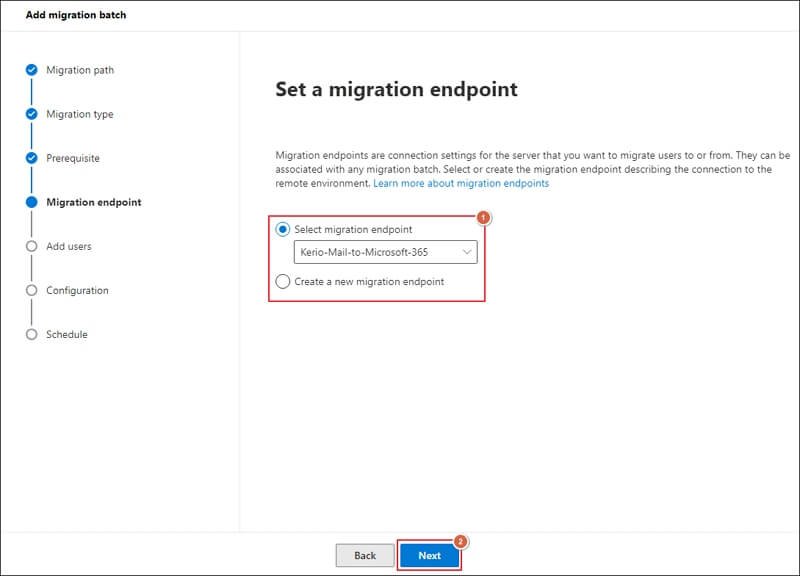
- Create a new migration endpoint or select the existing one. Then, proceed to Next.
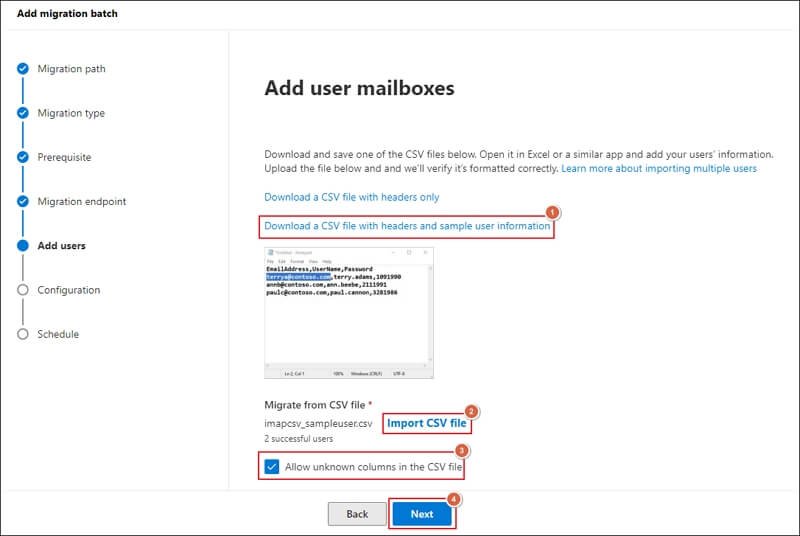
- Download a CSV file with headers and sample user information and fill in the required entries. Then, Import CSV file to Add user mailboxes. Check the Allow unknown columns in the CSV file and click Next.
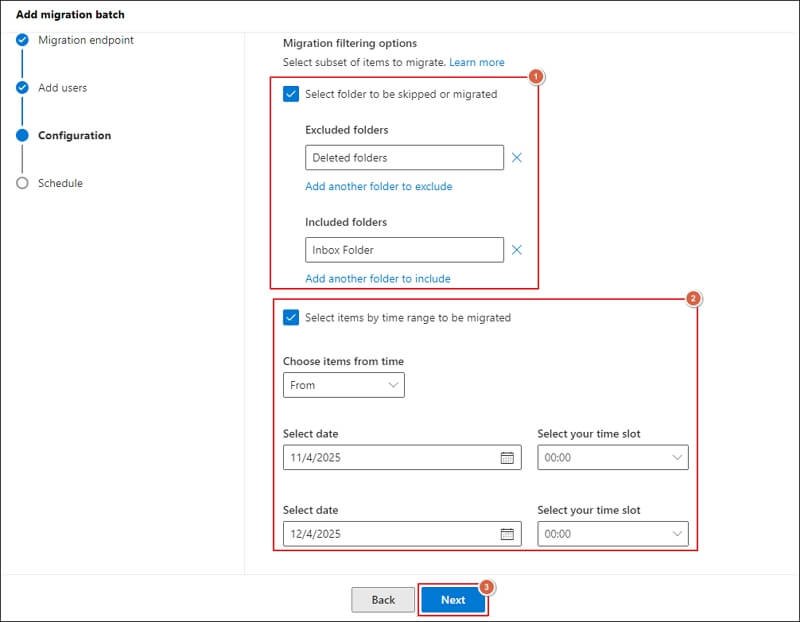
- Use the Migration filtering options to remove unnecessary data. Then, proceed to Next.
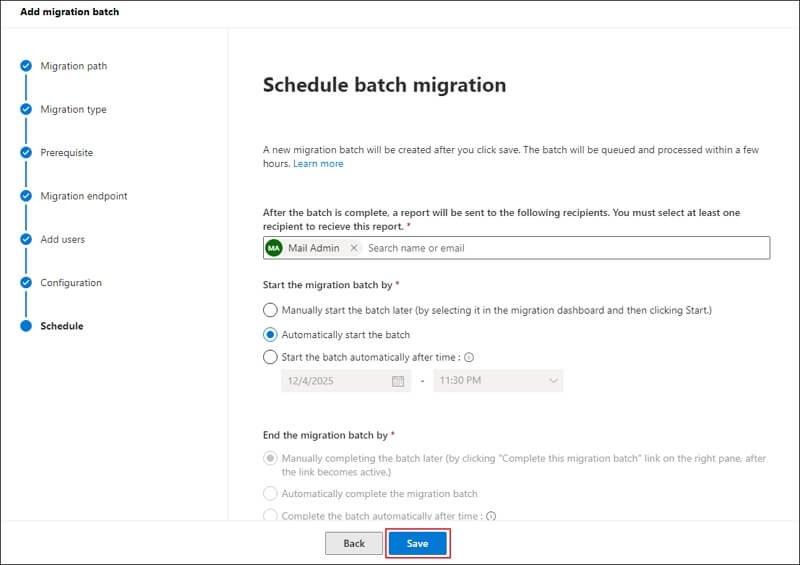
- Schedule batch migration and click Save.
Step 3: Verify Data in Microsoft 365
- Check that emails appear in the correct order after the migration batch completes.
- Validate that the mailbox folder structure remains the same.
Important to Know: This method is not suitable for complete migration at the organization level.
Method 2: Transfer Mailbox Data Using the Network Upload
You can use this method to migrate email messages, contacts, calendars, and tasks in bulk. Follow the details steps to migrate Kerio Mail to Microsoft 365:
Section 1. Set up Kerio Outlook Connector (KOFF) in Outlook
Kerio Connect supports Outlook integration through Kerio Outlook Connector(KOFF). Here are the detailed steps to configure it:
Step 1. Download and install the Kerio Outlook Connector on your system.
Step 2. Configure the Kerio email account in Outlook application.
Step 3. Wait for Outlook to fully synchronize the mailbox folders.
Section 2. Export Kerio Emails to PST Format Using Outlook
Use the following steps to extract the mailboxes into PST format once the setup is successfully completed. Here’s how:
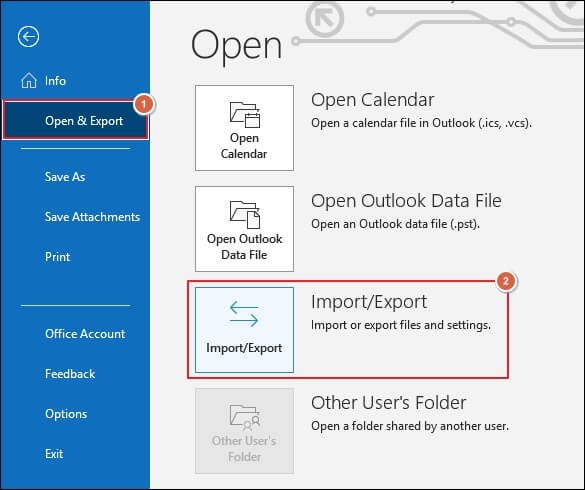
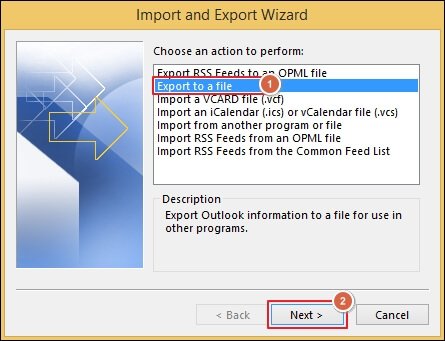
Step 1. Navigate to File> Open & Export> Import/Export.
Step 2. Choose the Export to a file option and click Next.
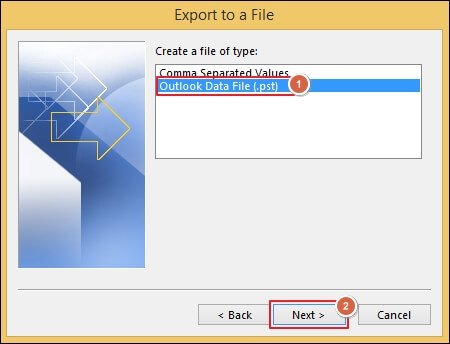
Step 3. Tap on Outlook Data File (.pst) and proceed to Next.
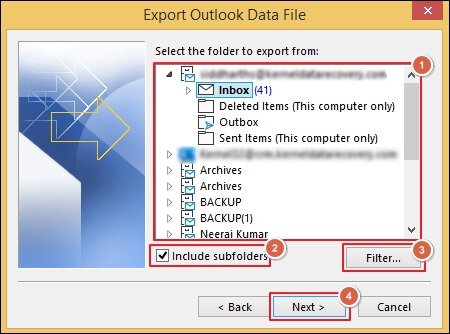
Step 4. Select the required mailbox folder and check the Include subfolders option.
Step 5. Filter out the unwanted data and click Next.
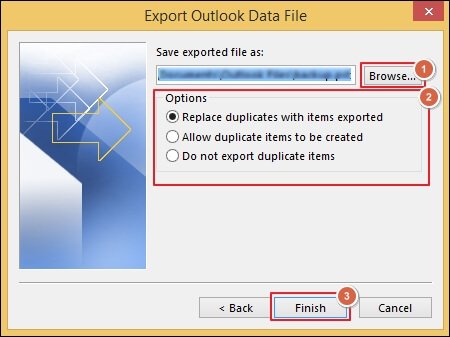
Step 6. Browse to select the destination path and choose the suitable Options. Then, proceed to Finish.
Section 3. Import PST to Microsoft 365 via Network Upload
Network Upload is the best feature of Microsoft that helps users to upload PST files to different user mailboxes. Use the provided steps to complete the import process:
Step 1. Download the Azure AzCopy tool and copy the SAS URL to save it.
Step 2. Upload the PST files using the AzCopy tool.
Step 3. Install the Microsoft Azure Storage Explorer to verify the uploaded list of PST files.
Step 4. Create a CSV file to map user mailboxes along with the PST files.
Step 5. Navigate to the Import Service of Microsoft and create a PST Import job.
Step 6. Filter your data and begin the PST Import job.
Automate Migration Process: Try the Advanced Tool Now!
Now, you have the complete knowledge of manual solutions to transfer Kerio Mail to Microsoft 365. You can choose any of them to migrate data as per your requirements. However, native solutions often require adequate technical knowledge and careful execution to complete the migration process without any errors.
If you want a direct approach that eliminates lengthy procedures and migrates data easily, then go with the Recoveryfix Email Migration Tool. The Email Migration Software allows you to transfer data from one email server to another in seconds.
Conclusion
Here, we have highlighted both manual and automated solutions to migrate Kerio to Microsoft 365. You can choose the best applicable method to transfer mailbox data among the mentioned ones. Go with the manual solutions when you have to migrate limited data. For large-scale data migration, the recommended solution is the most efficient approach.
