Top Ways to Fix AutoComplete Not Working Issue in Outlook?

Updated On - March 20, 2025
Outlook’s versatile & advanced features make it one of the preferred email clients for email communication, either personal or professional. Features like AutoComplete suggest users compose emails in the ‘To’ section as per its stored cache.
Facing Outlook AutoComplete stopped working issues restrains users from availing of these benefits. But no worries! Explore the blog to get easy resolutions to manage the problem.
Outlook AutoComplete not working: Why?
Here are some noticed reasons that might create these kinds of issues. Understand them one by one.
Top fixes for “Outlook AutoComplete stopped working” issue!
This section unlocks the different manual methods to troubleshoot the “Outlook AutoComplete not working” issue. Follow them carefully.
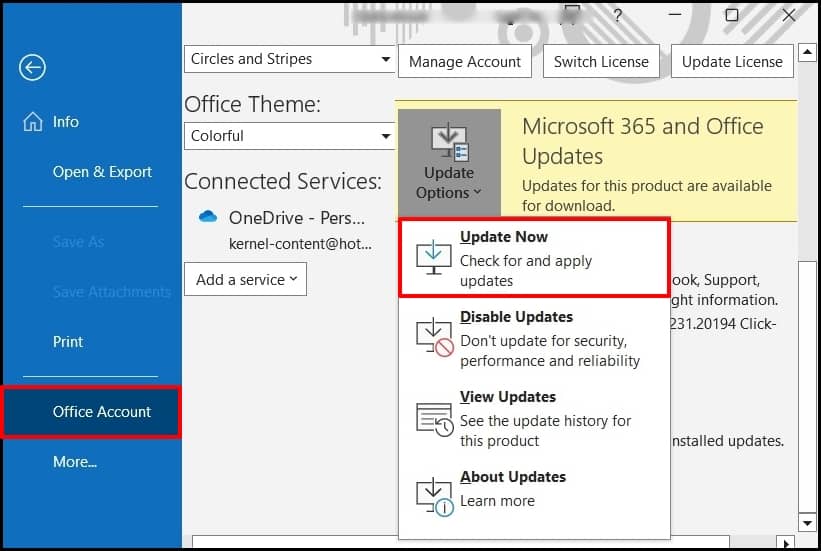
Method 1. Update Outlook Application
AutoComplete not working in Outlook can be due to an outdated Outlook version. Since older versions might be going through disparity in technical support, try to update towards the latest version. Use the following steps to execute it:
- Open Outlook and click on File > Office Account.
- Choose Update Now from Update Options for the latest Outlook application updates.
Method 2. Enabling the Outlook AutoComplete feature
Turning off Outlook AutoComplete features can be the foremost concern behind having the Outlook AutoComplete stopped working issue. Try to enable it with the following steps:
- Open Outlook, visit File > Options and then click on Mail.
- Tap on the Mail option. Scroll down for the Send Messages section and check the Use Auto-Complete List to suggest names when typing in the To, Cc, and Bcc lines checkbox. Then, click on the OK option to save changes.

Method 3. Empty the Outlook AutoComplete List
If turning on the Outlook AutoComplete option does not resolve the issue, it can be a problem with the AutoComplete list. Problems like oversizing or data redundancy can make it inactive. So, try to create the new one after deleting the previous one with the below steps:
Step 1. Access the Outlook application and tap on the File option.
Step 2. Click on Options.
Step 3. Go to the Mail section, search for the Send Messages option and hit on the Empty Auto-Complete List. Hit on the OK option further. Now, create a new list by sending new emails.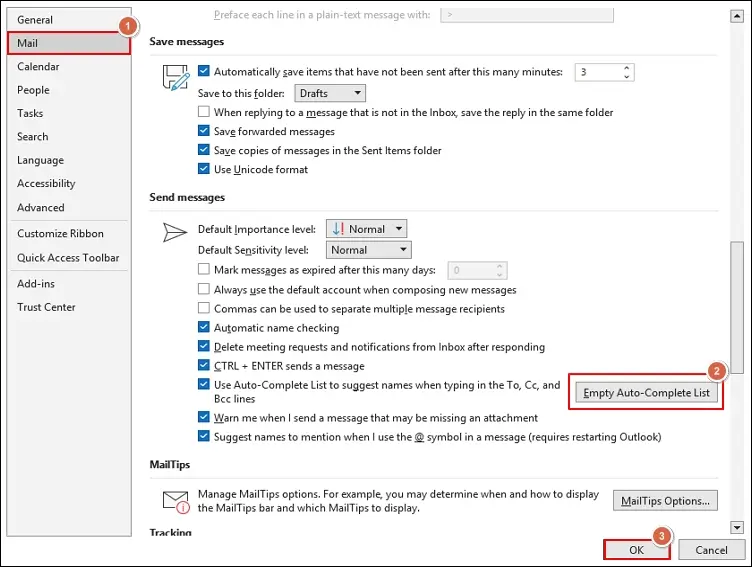
Method 4. Identify & remove faulty add-ins
Faulty add-ins are those whose incompatibility with the system settings can lead to discrepancies in Outlook services. Outlook AutoComplete stopped working can be one of the prevailing issues. Here, we will find those & try to remove them with the following steps.
Step 1. Start Outlook in safe mode first to make all add-ins in dormant state:
Step 2. Then, go to the File > Options > Add-Ins options, select COM Add-ins & hit on the Go option.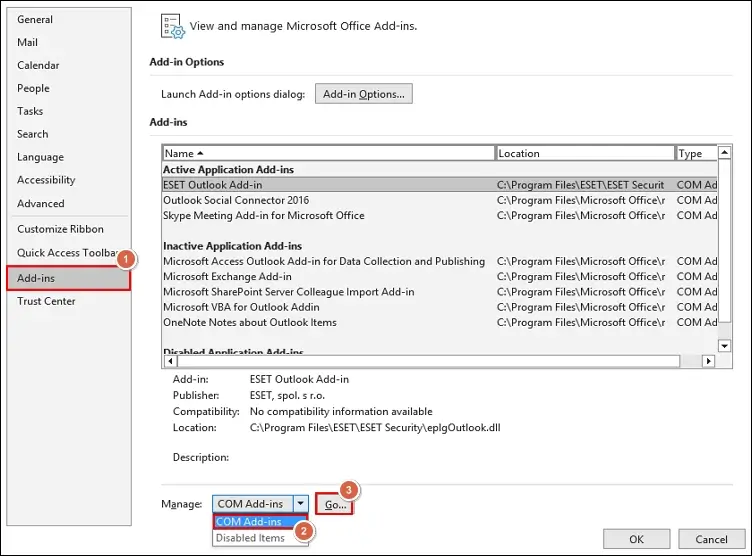
Step 3. Uncheck all the add-ins and click OK.
Restart Outlook normally, enable the add-ins one by one at a time, find & remove the faulty add-ins.
Method 5. Rename roam-cache folder
Renaming the RoamCache folder will reset AutoComplete, which might help fix AutoComplete not working in Outlook issue. Here, we will illustrate how to do so with the Microsoft Exchange account. Follow the steps carefully.
Note: You can lose all stored addresses in AutoComplete with this method.
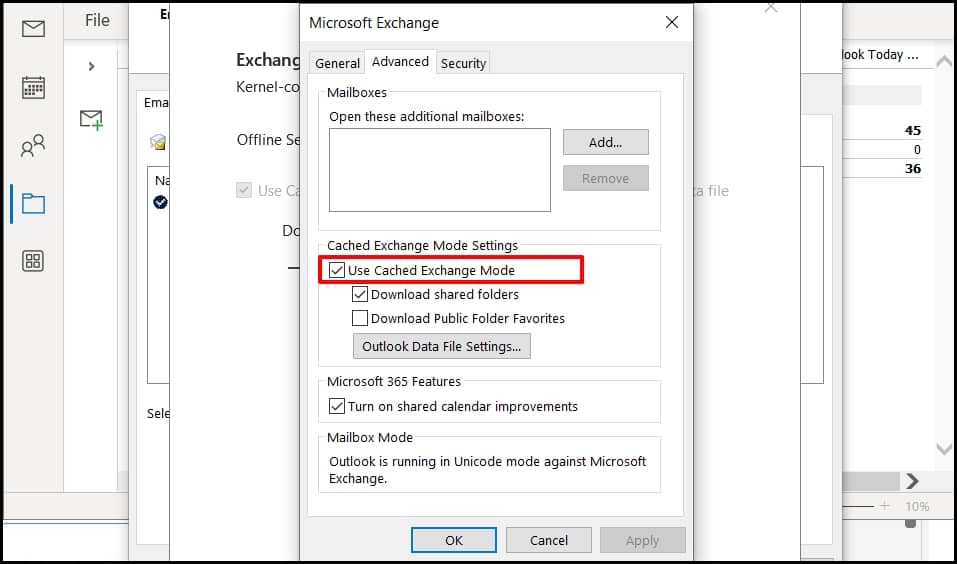
Step 1. Run Outlook without Cached Exchange Mode. Go with the following steps below:
- Open Outlook & tap on the File option.
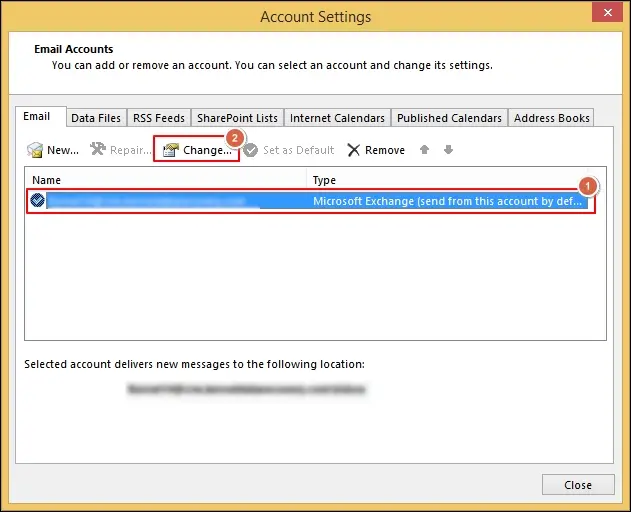
- Click on the Account Settings > Account Settings… option.

- Choose the Exchange account & click on the Change option.
- Uncheck the Use Cached Exchange Mode check box, hit on the Next option.
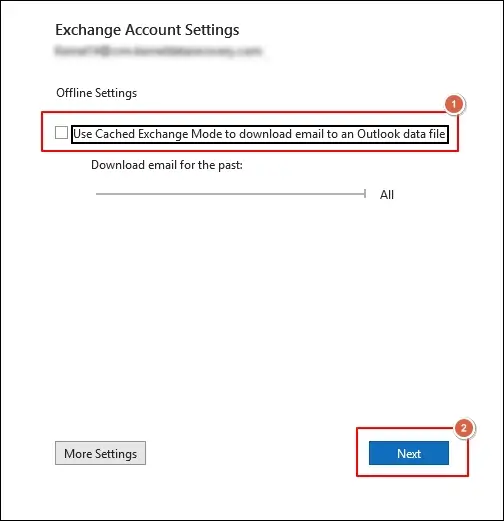
- Finally, tap on the Done option that leads to the Account Settings page. Click on the Close option & exit the Outlook application.
Step 2. Press Windows + ‘Q’ key, copy & paste.
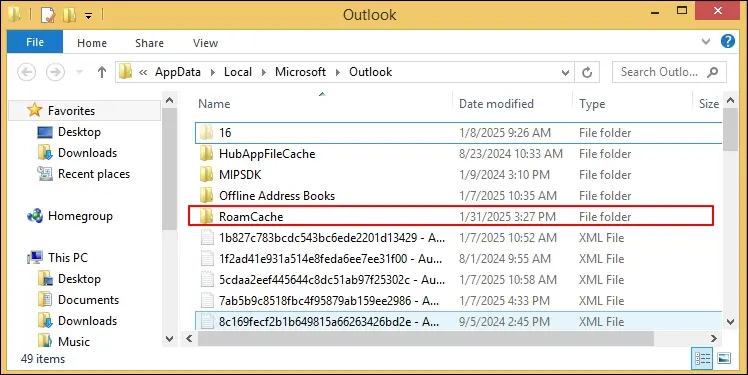
Step 3. Right-click on the folder, choose Rename. It will create new RoamCache folder once Outlook application restarts.
Step 4. Now, access Outlook & turn on the Cached Exchange Mode further with the same steps as above by marking its checkbox. Then, close the Outlook application, restart it & check whether the issues are resolved or not.
Note: Follow the step-3 & step-4 to find & rename the RoamCache folder if you are using the home email account.
Method 6. Create a new Outlook profile
The new Outlook profile can remove the minor technical glitches and errors that might be helpful in resolving the issue. This feature can also be unlocked using a new account. Follow the steps below to create a new profile:
- In the Control Panel, go to Mail and click on Show Profile.
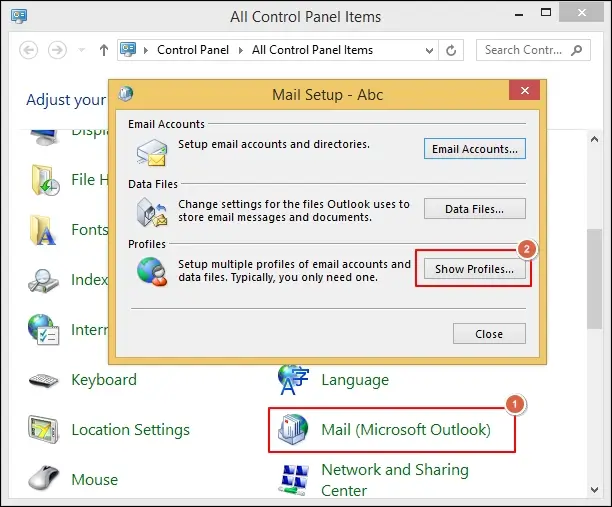
- Click on Add, type a profile name and click OK. Follow the upcoming instructions for the validation of email account and then click on the Next option.
- Go to the Always use this profile section, choose the created profile & click on the Apply > OK option. Now, restart Outlook and check the status of the issue.

Method 7. Rebuild the Outlook data file
Misconfigured Outlook data files can also cause AutoComplete not working in Outlook issue.You can check it out by creating a new one if the issue persists after performing the above steps. Go with the following steps to rebuild the OST files:
Note: Take a backup of your OST file before executing this method to secure yourself from unusual mishaps.
- Type Control Panel in the run window and press OK.
- Click on Mail and choose Data Files.
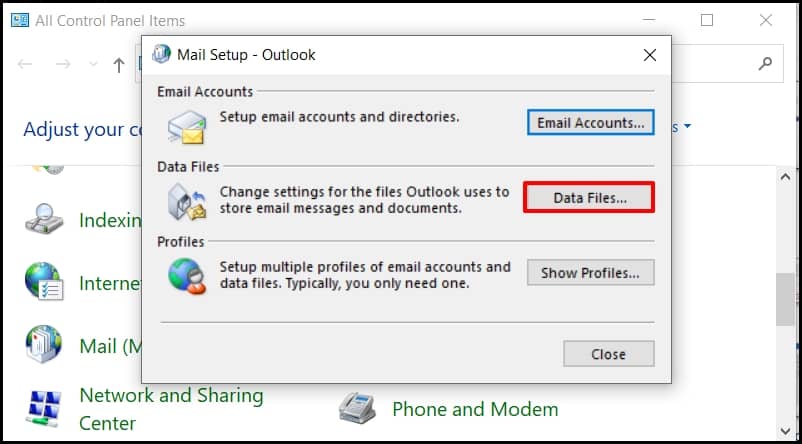
- Choose the email account and copy the file path of the data file.

- Open the file path in File Explorer and rename or delete the file as per your requirements. In both cases, when you restart your Outlook application, new Outlook data file will be created automatically.
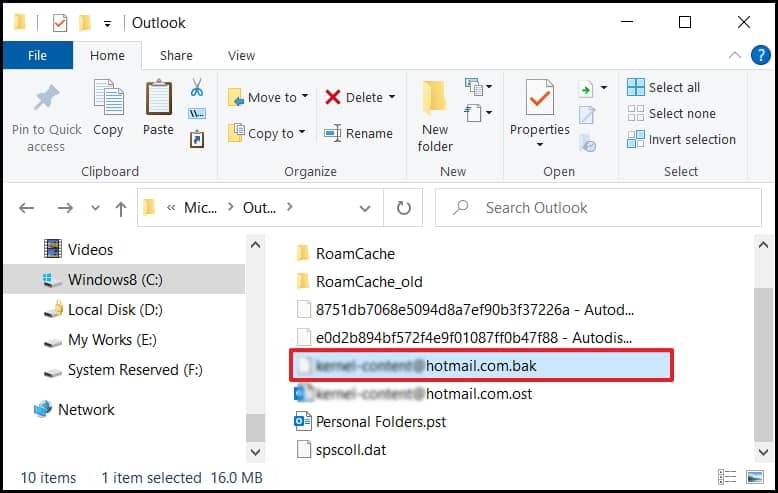
A newly created Outlook data file will synchronize all mail items from the mailbox server, and the AutoComplete feature may start working as earlier.
But this method can’t be applied to corrupt or inaccessible Outlook data files. Using the advanced OST to PST Converter solutions may be more appropriate to make the file accessible again. Professionals recommend using Recoveryfix for OST to PST Converter over others for an all-in-one solution. It repairs, recovers & converts all the mailbox items from inaccessible, inconsistent, or orphaned OST files to different formats like PST, MSG, PDF, DOC, etc.
Conclusion
Hopefully, we have covered all the ends of the Outlook AutoComplete not working issue in this detailed blog, like what, why, & how it can be resolved.
Follow the suggested methods carefully & use advanced recommended OST converter solutions as needed.
FAQs – Frequent Asked Questions
Q1- Can you help me out with the Outlook AutoComplete list location?
AutoComplete list is stored as a hidden file in the Outlook data file.
Q1- Does deleting Outlook’s cache cause any harm?
Since cache memory is helpful to speed up the search process, deleting them is not harmful. Moreover, it helps in resolving minor syncing errors.